Saturday, March 31, 2018

Oh Baby Spring Showers

Hi everybody! Kim here from My Kraft Kloset and Spring is finally here and that means so are babies. As two of my four kids where born in Spring months, which inspired me to create these fun projects with Craft Fantastic products.  Surprise the Moms-to-be, the new Grandma's, or surprise your guests with a baby gender reveal party with these fun images.


Let's get started:

1.  Choose from hundreds of Craft Fantastic images or print your own on regular copy paper, from internet images, like I did today for these baby shower images. More printing tips "here."


2.  Add a few drops of Fantastic Glaze & Glue on the back of small glass rounds and press gently for a few minutes until set. Wipe off any excess glue around the edges with a Q-tip.


3.  Once dry, cut around the glass and cut out the image. Copy paper is thinner than the special paper Craft Fantastic uses for it's images, so you may want to add more Fantastic Glaze & Glue on the back of the glass image to make it stronger. Tips on Printing at home on copy paper "here"

4.  Adhere a Fantastic Super Sticky Dot. Add more dots if your tray is larger. Remove red sticky dot backing and place glass image into a SMALL ROUND PENDANT TRAY silver

5.  Just add a Chain to complete. 

How to create a fun Gender Reveal Party Game:
These are so affordable you can make a whole bunch of images in pink and blue and have every guests choose a color. Then reveal if the baby is a boy or a girl and see which color wins. And everybody goes home with a uniquely handmade party favor and wonderful memories! Make extra's if somebody wants to trade. 

Is it a Boy???


Or Is it a Girl???


Make a few special pendants for the Mom-to-be and the new Grandma's too. I love these Craft Fantastic images with hearts, roses, and a tiara. Fit for a princess or queen. And they will LOVE them too!


Voila! There you have a few unique pendants ready for special gifts for a Baby Shower or Mother's Day gifts too. The possibilities are truly endless with these fun products!
Thanks for stopping by!

Kim Klinkovsky @mykraftkloset

Thursday, March 29, 2018

NOTE CARD CARD CLUTCH

At my stamp group meeting the other evening we made this adorable paper clutch out of a 12x 12 piece of scrapbook paper.  I will put the link to the video tutorial on how to make this simple folded project.  There is no scoring involved it just is several folds.  When you open the clutch which is closed by two tiny magnets. I thought what a great way to embellish this by using something from CRAFT FANTASTIC.  


I chose to use the ROSETTE TRAY ANTIQUE SILVER and I cut off the piece of metal that would be used to hold a chain or jump ring.


I also used the SUPER STICKY DOTS to adhere the FANCY pendant tray to the finished clutch.  I also used the same scrapbook paper for the image inside the pendant.  I thought this was a perfect embellishment for this particular project.


This is the website that will show you how to make this paper clutch
dawnsstampingthoughts.net.  The video tutorial you will look for is the FLORAL BOUTIQUE NOTE CARDS AND CLUTCH VIDEO.  You will be surprised at how easy this is to make!
This is a photo of what the clutch looks like inside.  This one is not mine as I did not finish the cards.  Keep in mind that you could also put other goodies inside this paper clutch!


Liz from Junque Drawer Designs!


Saturday, March 24, 2018

Fun Fashion Updates Part 2!

Hi Everyone! I found another cute purse at Target and I couldn't help myself! So I bring another fun update your way!

Here is a picture of what you will be using.
So let's begin. First using Small Jump Rings attach the V Connectors to the Open Daisy Trays as shown here.
Next using a Large Jump Ring connect a Filigree Tray to the Butterfly Kiss Charm as shown here.
Using E6000 attach these pieces to the purse as you can see here.
Using Fantastic Super Sticky Dots attach the Tiny Round Glass Bling to the center of the Open Daisy Trays. Using the Sunflower Image Sheet and a Small Round Jewelers Glass use Fantastic Glaze & Glue to attach the image to the glass. When dry, trim around the glass and using Fantastic Super Sticky Dots attach the glass to the Filigree Tray and you are done!

What do you think? Did you like this project?

We love your feedback!

Hugs,

Judy

Friday, March 23, 2018

Using Craft Fantastic Charms as Bling on a Zipper Pulls

Hello everyone!! It's Kymona from Kreative Kymona. I've been MIA for awhile but I'm back now and super happy to be here to show you how to use Craft Fantastic charms as bling on a zipper pull.

Let's take a look:


I recently learned how to sew and I must say I love it. The finished product feels and looks good in my hand.  I also love seeing the look on the recipients face when the receive the handmade item.

Adding a Craft Fantastic charm to the zipper pull adds that extra touch to the handmade item, in this case a small clutch!!


They are easy to add to the zipper pull with a pair of pliers and a small jump ring. So you don't have to only use them on your jewelry. They can be used on just about anything.

What do you think?  

How will you use Craft Fantastic charms on your projects? Let me know.

Where to find us:

Just in case you didn't know you can find Craft Fantastic on all of the social media platforms:


Follow so that you don't miss out on any of the creative ideas, deals and new goodies that appear in the store.

Thank you so much for stopping by!!

Sunday, March 18, 2018

CRAFT SHOW IDEAS

Hello from Junque Drawer Designs.  As you know I am on the CRAFT FANTASTIC DESIGN TEAM and I also take my PENDANTS and other CRAFT FANTASTIC creations to local craft and vendor shows.  I always get a lot of compliments on how lovely the pieces are and how they are cleverly packaged.  I think that is definitely a selling point. Customers like to purchase something that is pleasing to the eye but also ready to give as a gift. I do mostly fall craft shows and most consumers are shopping for stocking stuffers, teachers gifts, etc.  I know a lot of you use CRAFT FANTASTIC products in your ETSY shops also.  Today I will show you what I use to package my PENDANTS.


I frequent local craft stores and look for any pocket scrapbooking cards 3"x 4" size with no particular brand preference.  There are several brands all with beautiful designs, double sided and easy to match up with any theme of jewelry piece you have created.


 I have my PENDANT and then look through my cards for a match that I like 


I clip two notches to adhere the chain


 Then I place the card with PENDANT into a 3" x 4" plastic holder which can also be purchased at local craft stores.  I like the resealable bags that you can find in the cake making aisle.  I also insert my business card on the back side.


This is just a simple way to package your creations.  
Liz 


Thursday, March 15, 2018

Butterfly Wishes

Hi everybody! Kim here from My Kraft Kloset and Spring is nearing my neck of the woods with flowers and trees blooming, warm air is returning, and soon the butterflies will too! Which inspired me to create these gorgeous butterfly projects with Craft Fantastic products that I'm sharing with you today. These images are wonderfully detailed and so very colorful for any occasion and see how to personalize with collage words too!


Let's get started:

1.  Choose from hundreds of images and click on the links and follow along. Today we're using Butterflies and Collage Words. Choose your butterfly and a word, cut it out, add a drop of Fantastic Glaze & Glue on the back of the word, and adhere to the butterfly image. You have a little time to move it around in place and position it just where you want it. Wipe away any excess glue, and allow a couple minutes to dry.


2.  Once dry. Add a few drops of Fantastic Glaze & Glue on the back of an X Large Glass Squares and press onto the whole butterfly image until set. Wipe off any excess glue around the edges with a Q-tip.


3.  Cut around the glass and cut out the image.

4.  Because this piece is Extra Large, adhere glass images with several Fantastic Super Sticky Dots. About 4-5 dots are recommended.

5.  Remove red sticky dot backing and place glass image into an Extra Large Square Silver Tray.

Just add a chain and here's a close up of this gorgeous butterfly collage pendant. 


My next project is this stunning monarch butterfly pendant.


Follow the same Steps 1-5 above, but we're using the Extra Large Glass Rounds and the Extra Large Round Trays in Silver or Antique Brass. I love them both, don't you?


Here is a closer look. I love the script background, the realistic details, and you could certainly add some sparkle, but it's pretty stunning just by itself. Just add a chain and your complete.


Voila! There you have a few unique gorgeous pendants ready as special gifts for upcoming events like Mother's Day, Graduation, or Weddings. Or keep a few for yourself with just a few supplies. The possibilities are truly endless! Thanks for stopping by!

Kim Klinkovsky @mykraftkloset

Monday, March 12, 2018

March 2018 Kit Assembly Instructions

Introducing the NEW March Kit-of-the-Month

There are so many things to love about this month's kit! Whimsical FLAPPERS and TINY ALPHABET #1 Image Sheets provide tons of creative options! As a BONUS, we're throwing in the COLLAGE WORDS sheet, too! Beautiful Glass Bling and Retro Charms create an artsy, bohemian look that will add eclectic style to any wardrobe! 

Let's put these fabulous pieces together...

Assembly Instructions

Thanks for ordering the Craft Fantastic MARCH KIT! This kit is available for a limited time. 
Click HERE to order yours today!  

Here's a few links to help you complete the projects followed by a few 
assembly instructions for each piece:


  1. Select images and add them to the glass cabochons using Fantastic Glaze & Glue.   
  2. Remove the Lobster Clasp and Jump Ring from the  30" Rolo Chain and cut off a 5-link strand for use on the Swallow Dangle.
  3. To each exposed end of the Rolo Chain, add a small jump ring. To each small jump ring, add a large jump ring and clip both ends through the Key Clip. 
  4. MONOGRAM DANGLE: Using pliers, attach the Tiny Round Ornate Tray to the Swivel Loop of the Key Clip with a Large Jump Ring. 
  5. SWALLOW DANGLE: Attach a Small Jump Ring to one end of the 5 link strand you cut from the Rolo Chain. Attach the strand to the Swivel Loop of the Key Clip using a Large Jump Ring. Bend back the top and bottom loops of a Tiny Round Modular Tray and attach it to the bottom of the strand using a Small Jump Ring. Attach the Swallow Connector to the bottom of the tray using a Small Jump Ring. Bend back the top loop of the remaining Tiny Round Modular Tray and attach it to the bottom of the Swallow Connector using a Small Jump Ring. 
  6. IMAGE DANGLE: Attach the Small Round Classic Link Tray to the Swivel Loop of the Key Clip using a Large Jump Ring. Attach the Mini Round Twist Link Tray to the bottom link of the Classic Tray using a Small Jump Ring. Attach the Mexi-Rose Charm to the bottom link of the Twist Tray using a Small Jump Ring.
  7. GLASS BLING DANGLE: Attach the remaining Mini Round Twist Link Tray to the Swivel Loop of the Key Clip using a Large Jump Ring. Attach the Wing Charm to the bottom link of the Twist Tray using a Small Jump Ring.
  8. Add a Fantastic Sticky Dot to each tray. Use 1/4 dot in the tiny trays. Remove the red backing to expose the adhesive. 
  9. Firmly press the appropriate cabochons and glass bling into the trays. 


  1. Select an image and add it to the glass cabochon using Fantastic Glaze & Glue.   
  2. Using a jump ring, add the Grand Rose Charm to the 24" Classic Chain.
  3. Slide the Dewdrop Tray onto the 24" Classic Chain.
  4. Add a Fantastic Sticky Dot to the Dewdrop tray. Remove the red backing to expose the adhesive. 
  5. Firmly press the cabochon into the tray. 

  1. Select an image and add it to the glass cabochon using Fantastic Glaze & Glue.   
  2. Using a jump ring, add the Fan Charm to the 24" Rolo Chain.
  3. Slide the Pleat Tray onto the 24" Rolo Chain.
  4. Add two Fantastic Sticky Dots to the tray. Remove the red backing to expose the adhesive. 
  5. Firmly press the cabochon into the tray. 

  1. Select images and add them to the glass cabochons using Fantastic Glaze & Glue.   
  2. Using pliers open the loop to each French Earwire and attach the Tiny Round Ornate Tray to each wire, closing the loop with pliers.
  3. Cut a Fantastic Sticky Dot into quarters and attach to each Tiny Round Ornate Tray. Remove the red backing to expose the adhesive. 
  4. Firmly press the appropriate cabochons into the trays. 

  1. Select images and add them to the glass cabochons using Fantastic Glaze & Glue.   
  2. Unscrew the ball to the Slide Bangle Bracelet and thread on the Mini and Small Square Pendant Trays.
  3. Add a Fantastic Sticky Dot to each tray. Remove the red backing to expose the adhesive. 
  4. Firmly press the appropriate cabochons into the trays. 


  1. Select images and add them to the glass cabochons using Fantastic Glaze & Glue.   
  2. Unscrew the ball to the Slide Bangle Bracelet and thread on the Mini and Small Round Pendant Trays.
  3. Add a Fantastic Sticky Dot to each tray. Remove the red backing to expose the adhesive. 
  4. Firmly press the appropriate cabochon and Glass Bling into the trays. 

We hope you have fun putting together the MARCH Kit-of-the-Month! Be sure to follow Craft Fantasic on FACEBOOK and INSTAGRAM! Also, sign up for the CRAFT FANTASTIC NEWSLETTER for the latest and greatest sales, giveaways and product peeks! 

See you soon with more crafty stuff!

Thursday, March 8, 2018

Fashion Update With Craft Fantastic

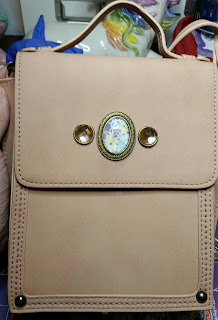
Ok as we are starting to look toward spring I wanted to get my daughters new purses. And I loved the color of this particular purse but wanted to "bling it up" a bit. Not crazy over the top, mind you, but make it more "her".

So as any crafter would do, yup you guessed it, I turned to some of my favorites from Craft Fantastic.


So the purse was actually gotten at Target. So here we go. I used a piece of origami paper that she happened to like the flower pattern from. For the main piece I am using an Oval Scroll Tray with Small Glass Oval. Adhere the glass to the origami paper with Fantastic Glaze & Glue. Let that dry and trim around the glass. Use Fantastic Super Sticky Dots to adhere the glass to the tray and snip off the link as we will not need it for this project. Using the Fantastic Super Sticky Dots attach the Tiny Round Glass Bling in Champagne to Tiny Round Link Trays and snip off the links on these as well. Use E6000 to adhere the three pieces to the purse.


And there you have it! How cute is that!
So what do you think of this project? I would love to know!
Hugs,
Judy

Monday, March 5, 2018

DESIGNER KIT - Angel Cascade Necklace

Thank you for purchasing one of our EXCLUSIVE Designer Show Kits! We hope you enjoy wearing this one-of-a-kind piece of jewelry!

Here's a few links to help you complete the
Angel Cascade Necklace Designer Kit 
followed by assembly instructions to finish your piece:


  1. Select images and add them to the glass cabochons using Fantastic Glaze & Glue.
  2. Remove the small jump ring from the 30" Rolo Chain. Cut 6" of chain from the end leaving 24".    Re-attach the small jump ring using pliers.
  3. Attach the large jump ring to the pinch bail and string the rolo chain through it.
  4. Attach the Angel charm to the large jump ring using a small jump ring.
  5. Attach the Medium Round Link Tray to the large jump ring using a small jump ring. Attach a Mini Round Tray to the bottom link of the Medium Round Link Tray 2 small jump rings.
  6. Cut a 2 1/8" length of chain from the scrap Rolo Chain. Add a Mini Round Tray to the bottom of the chain using a small jump ring. Attach the other end of the chain to the large jump ring using a small jump ring. 
  7. Cut a 1" length of chain from the scrap Rolo Chain. Add a Mini Round Tray to the bottom of the chain using a small jump ring. Attach the other end of the chain to the large jump ring using a small jump ring.
  8. Add a Fantastic Sticky Dot to each tray. Remove the red backing to expose the adhesive. 
  9. Firmly press a corresponding cabochon into each each tray.
We hope you have fun putting together the Exclusive Angel Cascade Necklace Designer Kit! Be sure to follow Craft Fantastic on FACEBOOK and INSTAGRAM! Also, sign up for the CRAFT FANTASTIC NEWSLETTER for the latest and greatest sales, giveaways and product peeks! 

DESIGNER KIT - Earring Luxe Collection

Thank you for purchasing one of our EXCLUSIVE Designer Show Kits! We hope you enjoy wearing this one-of-a-kind piece of jewelry!

Here's a few links to help you complete the
Earring Luxe Collection Designer Kit 
followed by assembly instructions to finish your piece:


  1. Select images and add them to the glass cabochons using Fantastic Glaze & Glue. 
  2. Using pliers, attach a French Ear Wire to the top of each Mini Bird Connector, Butterfly Connector, and Tiny Round Link Tray. Attach a jump ring to the bottom of each connector and attach appropriate Mini Round Trays & Knot Connectors.
  3. Using pliers, attach a 2 Mini Round Trays and 2 Mini Square Trays to the 2 pairs of Long Earwires using small jump rings. 
  4. Add a Fantastic Sticky Dot to each tray. Remove the red backing to expose the adhesive. 
  5. Firmly press the appropriate cabochon into each each tray. 
We hope you have fun putting together the Exclusive Earring Luxe Collection Designer Kit! Be sure to follow Craft Fantastic on FACEBOOK and INSTAGRAM! Also, sign up for the CRAFT FANTASTIC NEWSLETTER for the latest and greatest sales, giveaways and product peeks! 

DESIGNER KIT - Love Key Necklace

Thank you for purchasing one of our EXCLUSIVE Designer Show Kits! We hope you enjoy wearing this one-of-a-kind piece of jewelry!

Here's a few links to help you complete the
Love Key Necklace Designer Kit 
followed by assembly instructions to finish your piece:


  1. Select images and add them to the glass cabochons using Fantastic Glaze & Glue.
  2. Using pliers, remove the lobster clasp and small jump rings from the 30" Rolo Chain.
  3. Using scissors cut a length of chain measuring 10 links from one end of the Rolo Chain.
  4. Using pliers, attach a small jump ring to each end of the Rolo Chain. String each end onto a large jump ring and slide the Medium Heart Pendant Tray on before closing. 
  5. Attach the Cute Heart Charm to the large jump ring using 3 small jump rings.
  6. Attach the Small Fancy Heart Charm Tray to the length of chain cut from the Rolo Chain using a small jump ring. Attach the other end to the large jump ring using 2 small jump rings.
  7. Slide the pinch bail onto the Love Key Tray and then onto the large jump ring.
  8. Add a Fantastic Jeweler's Dot to each tray and remove the red backing to expose the adhesive.
  9. Firmly press each glass piece into the corresponding tray.
We hope you have fun putting together the Exclusive Love Key Necklace Designer Kit! Be sure to follow Craft Fantastic on FACEBOOK and INSTAGRAM! Also, sign up for the CRAFT FANTASTIC NEWSLETTER for the latest and greatest sales, giveaways and product peeks!