Tuesday, February 28, 2017

CONVERSATION PIECES

Hi this is Liz from Junquedrawerdesigns and My all time favorite Craft Fantastic tray is the Extra Large Circle Tray. It measures 1 1/2 " in diameter making it large enough to insert some very fun and interesting graphics inside. Works great for a personal photo too.


For the pendant pictured above I used the Craft Fantastic Old Mexico image sheet. This sheet fits all jeweler's glass sizes.


I chose my image and applied several drops of the Fantastic Glaze and Glue to the extra large glass circle. After it was dry I trimmed the image and placed it into the extra large circle tray using 4 Fantastic Jeweler's Dots. 


I then placed the finished tray on a 30" silver rolo chain. I have made several of these Extra Large Circle Pendants by choosing pictures from magazines, collage paper etc.  I like to find fun images from magazines like Somerset Studio and other crafting magazines. The possibilities are endless 


The products used in this project are:


Saturday, February 25, 2017

Vintage Elvis Bracelet

Hello everyone!! Kymona here from Kreative Kymona to show you how to create a Vintage Elvis Bracelet.   My coworker loves everything Elvis.  I'm not sure where this love affair came from. She was born one year before he died so she didn't grow up with him or his music.

Her love affair is very deep- she was married at Graceland, she visits Graceland every single time she is in Memphis and her house is full of Elvis. Her husband takes a back sit at time, LOL!!!

So this bracelet, will absolutely make her cry out in joy!!

Take a look:


My coworker did pick out the photos she wanted, LOL!!  I had to let her help with something!  I used photoshop to create a vintage look on each of the photos for her.

Here's how I created this Vintage Elvis Bracelet:

1. My coworker sent me the images to that she wanted on the bracelet.

2. Then I picked out the supplies need to make the bracelet: the Retro Posh Bracelet, the Fantastic Jeweler's Dots, the Fantastic Glaze and Glue 2, some Q-tips and a pair of scissors.


3.  Next, I added Fantastic Glaze & Glue 2 to the oval glass.


4. Then I placed the oval glass on top of the image making sure the glass covered parts of the image I wanted to see. I press down hard so that the glue moves and cover the entire image underneath.


5. I waited for about 2-3 minutes to make sure the glue set.  I used my finger to push the glass a bit.  If it does not move, then it's set.  

6. Once the glue set, I used a Q-tip to remove the excess glue around the edges.

7. Before placing the oval glass in the bracelet tray, I added two Fantastic Jeweler's Dot in the center of the try. Once the dot is in place, remove the red backing.

8.  Place the heart directly in the try and press down.  The tape is strong and will hold the glass.

Nice and pretty simple.  

Take another look at the bracelet, on my arm:


I love how this turned out.  I sure hope my coworker loves it too!!

So what do you think?  Do you think my coworker will love this piece of handmade jewelry? Would you give this jewelry making a try? Please let me know below.  I would love to hear from you!!

Just in case you didn't know you can find Craft Fantastic on all of the social media platforms:

Facebook  ~  Instagram  ~  Pinterest  ~  Twitter  ~  Blog


Follow so that you don't miss out on any of the creative ideas, deals and new goodies that appear in the store.

Supplies used:


Thanks for stopping by!!


Tuesday, February 21, 2017

Craft Fantastic For Planner Fun

Hi All and Happy Tuesday! Today I am bringing you two fun projects really for everyone, but I made these with our planner girls in mind.

Our first project is a planner marker. Now this can also be used as a purse hangie thingie as well. I am not really sure of the technical name so purse hangie thingie will be what we call it!


We are going to start by using a key ring clip and a large jump ring and a peacock tray and attach the peacock tray to the loop of the key ring clip with the jump ring by using two pairs of the multipirpose jewelry pliers. Next  we are going to use a piece of rolo chain and a small jump ring. Use a wire cutter to snip a piece of the rolo chain. I used a piece that is about 4 inches long. Use the small jump ring to attach the piece of chain to the large jump ring. Now at the other end of the piece of rolo chain, using a small jump ring, attach the love key tray. Now in the center of the piece if chain we are going to use a small jump ring to attach tiny pretzel tray. Then use a small jump ring to attach the cute heart charm halfway between the peacock tray and the pretzel tray, and finally use a small jump ring to attach a wing charm halfway between the pretzel tray and the love key. Your project is almost complete.

 Now I used two word images from the Inspiration Image Sheet  for the two small glass rounds and some origami paper for the image for the one tiny glass oval. Use your Fantastic Glaze & Glue applied on the flat side of the glass and then placed on top of the image. And finally use Fantastic Jewelers Dots to adhere the finished glass to the piece.


Our second project is to make planner clips. Now to ne perfectly honest I did go through a bit of trial and error to make sure I was giving you the best way to do things.


First you are going to need a few large paper clips. Second choose which Craft Fantastic pieces you would like to use. (note here, this is really easy and once you start you really can't stop). I used a scallop tray with a small glass round, a paisley tray with a medium glass round,  a pocket wach tray with a small glass round, and an owl tray with a medium glass round. I used two images from the Valentines image sheet and two of the images were also taken from a piece of origami paper. Take your four pieces of glass, and using Fantastic Glaze & Glue create your images on your glass and set this aside to dry. Now here is that trial and error part I was talking about. Use the protective plastic sleeve that the image sheet comes in and put your paper clips on it as if you are using the sleeve as a page. Now you can use either E6000 (my tube in the picture is 2.0 oz and the one in the shop is .18oz) or krazy glue and put either on the side of the paper clip where you wish to adhere your tray and then place the tray on top of the adhesive. Krazy glue does hold more quickly. E6000 is more forgiving but does take a little more time to dry. Let this step dry completely. Once it is dry you can remove from the plastic sleeve. Use your Fantastic Jewelers Dots  to adhere your glass onto the trays. I then finished off with some ribbon I have in my stash to decorate where the loops are. Really fun and really easy!


So what do you think? Did you enjoy this tutorial? If you have any questions at all on either of these projects or any of the other projects shown please feel free to ask. We love hearing from you! I do hope you have enjoyed these projects and I will see you again soon!

Hugs,

Judy
Products Used In These Projects
peacock tray
love key tray
tiny pretzel tray
scallop tray
paisley tray
pocket wach tray
owl tray
Small Glass Rounds
Medium Glass Rounds
tiny glass oval
cute heart charm
wing charm
key ring clip
large jump ring
small jump ring
rolo chain
multipirpose jewelry pliers.
Valentines image sheet
Inspiration Image Sheet
Fantastic Glaze & Glue
Fantastic Jewelers Dots
E6000

Saturday, February 18, 2017

Gifts with Heart from Craft Fantastic

Hi everybody! Kim here sharing my first post for the Craft Fantastic All Stars Design Team!  I am overjoyed to be here creating with these truly fantastic products. I’m mostly a card maker, but when I tried these products a few years ago at a craft show, I was hooked and you will be too! They are fun, easy, and oh so pretty.

For my first project I wanted to show you the versatility of these amazing products and how you can incorporate them into many facets of your crafty life. As a special gift, I designed this beautiful handmade necklace, a charming card, and a matching gift bag tag.

The Necklace:
I started with a super unique necklace that could be for a special Birthday, Anniversary, Wedding, Valentines gifts, or any special occasion. To help you better understand the lingo, Craft Fantastic calls their pendant pieces trays, and you use these as your vehicles to creativity. 

 
1. I chose this bright red heart image with a funky black and white button type background.

2. Next I chose a silver medium fancy heart tray and medium glass heart. The silver pieces are lead and nickel free and oh so gorgeous, I really hated to alter them, but I wanted to do something that hadn’t been done or shown on the blog before.  So, I colored the silver heart trays with a red Copic alcohol marker. I know—gasp! (lol) But it turned out stunning, with or without the heart image too, don’t you think? 

3. Add several drops of Craft Fantastic Glaze & Glue onto the flat part of the glass heart and place over the image. Too much glue can be cleaned up, but too little won't seal properly to the image. Press a finger over the glass to help distribute the glue, hold in place for about a minute, and then wait 2-3 minutes for it to set. Give the glass a nudge, if it doesn’t move its set.

4. Use a Q-tip to remove any excess glue around the edges of the glass. Trim around the edges of the glass and cut out your image.

5. Place a Fantastic Jewelers Dot in the center of the heart tray, remove the red backing, and place glass heart image into the tray and press down.  It’s a jeweler’s quality dot and super duper strong. For larger trays you’ll want to use more than one dot. For more details, check out the Craft Fantastic tutorial HERE.

6. Add a pinch bail and a small jump ring to the heart tray pendant. Then add a heart charm to the small jump ring, clamp with pliers, and string a necklace chain through the pendant.

The colored pendent will dry very quickly, but go over it a few times to get desired coverage, and if it is still tacky to the touch, you may want to spray it with a clear epoxy sealer.


The Card:
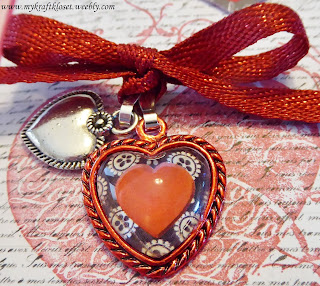
As an avid card maker I believe every gift should have a handmade card to go with it too! So, I added these gorgeous heart charms and a red ribbon to give it some extra love and sparkle too! See step by step card tutorial at: My Kraft Kloset

 For the charms, repeat Steps 1-5 as above to create this heart pendant

6. Add two pinch bails to the heart pendant and the silver heart charm. Then string a glittery red ribbon through the pendant and charm, and tie in a bow.

7. Place a Fantastic Jewelers Dot on the back of the ribbon, the heart tray pendant, and the silver heart charm. Remove the red backing, place them on the card, and press down. The dots are super strong and sticky and will hold these in place really well. If any parts of the dots are visible and causing other things to stick to your card, just add a touch of talc powder to those edges to un-stick it.

Craft Fantastic Supplies: Fantastic Glaze & Glue, 2 pairs-Multi purpose Jewelry Pliers, Fantastic Jewelers Dots, Fantastic Art Images Sheet-Valentines, Medium Fancy Heart Tray, Medium Glass Hearts, Cute Heart Charm, 2-Silver Pinch Bails, Q-tips, Red Cadmium Copic Marker, Cardstock, Pattern Paper, Die Cuts, Ink/Stamps, Stickers, and Creative Impressions Red Glitter Ribbon.

 The Gift Bag Tag:
No present is complete without a gift bag and a matching tag. So, I added a set of heart charms and a sparkly red ribbon here too!

 For the charms, repeat Steps 1-6 as above to create this heart pendant

7. Then add a large silver jump ring through the red glittery ribbon and string it through the braided tag ribbon that came with the bag, and clamp with pliers. Add tissue paper. Voila!

Craft Fantastic Supplies: Fantastic Glaze & Glue, 2 pairs-Multi purpose Jewelry Pliers, Fantastic Jewelers Dots, Fantastic Art Images Sheet-Valentines, Medium Fancy Heart Tray, Medium Glass Hearts, Cute Heart Charm, 2-Silver Pinch Bails, Large Jump Rings, Q-tips, Red Cadmium Copic Marker, Creative Impressions Red Glitter Ribbon, a Gift bag and tissue paper.

And there you have a very unique and special gift made from the heart with a few products, a whole lot of imagination, and at very little cost. And maybe include a little note explaining to your recipient that they could remove the pendants from the card and the gift bag to wear for a total of three pendant gifts. WOW! I’d love that, wouldn’t you?

I hope I’ve inspired you to think outside the box. Lets see what you can create with these fantastic jewelry products and your paper crafting supplies. Because the possibilities are truly endless!
Please let us know what you think, we’d love to hear from you. 
Thanks for stopping by!

~Kim Klinkovsky @mykraftkloset

Tuesday, February 14, 2017

Key To My Heart

Happy Valentine's Day!  I'm Liz and I am so thrilled to be a part of the Craft Fantastic Design Team!!  Looks like there has been lots of new product added to the Craft Fantastic website so be sure to check that out!  The pendant I made uses some of that new product.


This is how I created the pendant:

1. I chose the images I wanted to place into the Antique Brass Medallion Key Tray ( new) from the (new) Royal Hearts image sheet. The sentiment I used for the Mini Round Antique Brass Pendant  Tray is from the Inspiration mini and small glass image sheet.


2. Using the Fantastic Glaze and Glue I added several drops onto the Small Glass Round and the Mini  Glass Round and put each glass  over the images I chose. Once the glue was set I used a q tip to remove any glue that may have seeped out. 

3. I put Fantastic Jeweler's Dots in each of the trays. After carefully cutting out my glass from the image sheet I affixed the glass into each of the trays. 

4. An Antique Brass pinch bail was used to connect the Medallion Key Tray to the 30" Antique Brass Rolo Chain. Then I put the Mini Round Tray on the chain to complete the Pendant. 

Product used in this project:


Saturday, February 11, 2017

My Heart's in Paris Necklace

Hello everyone!! Kymona here for the first time as a design team member and I'm over the top excited to be here!! When I was asked to join the Craft Fantastic team I couldn't stop smiling.  I love creating new pieces of jewelry!

Today I'm going to share with how to create this heart necklace that I created for my sister!

Take a look:


My sister is going to love this necklace.  I can't wait to give it to her.  She has a love affair with Paris. When she had her first daughter, she made a promise to bring her to Paris when she gets older.  The time is drawing near so I figured this necklace is so perfect for her. 

Here is how I created this necklace:

1. I picked out the image that I wanted to appear in the necklace from Craft Fantastic Paris Image 
sheet

2.  Then I picked out the Antique Brass Medium Heart Pendant and the Medium Glass Heart  but later changed my mind and switch to the Silver Medium Heart Pendant.  The image looked so much better in the silver vs the antique.  


3.  Next, I added Fantastic Glaze & Glue 2 to the glass heart.  I added about 7 to 8 drops.


4. Then I placed the heart on top of the image making sure the glass covered parts of the image I wanted to see. I press down hard so that the glue moves and cover the entire image underneath.

5. I waited for about 2-3 minutes to make sure the glue set.  I used my finger to push the glass a bit.  If it does not move, then it's set.  

6. Once the glue set, I used a Q-tip to remove the excess glue around the edges.


7. Before placing the glass heart in the tray, I added one Fantastic Jeweler's Dot in the center of the try. You can see it in the picture above. Once the dot is in place, remove the red backing.

8.  Place the heart directly in the try and press down.  The tape is strong and will hold the glass.

9.  After that I strung the 24" Silver Ball Chain  through the heart pendent.  

10. To finish the necklace off, I added a Silver Cute Heart Charm. To do that I add a Silver Pinch Bail to the heart charm so that I could add it to the ball chain. 

Nice and pretty simple.  Once you create one the possibilities are endless!!


Supplies used:


Paris Image Sheet


Silver Medium Heart Pendant


Medium Glass Heart


Fantastic Jeweler's Dots


24" Silver Ball Chain


Silver Pinch Bails


Silver Cute Heart Charm


So what do you think?  Do you think my sister will love this piece of handmade jewelry? Would you give this jewelry making a try? Please let me know below.  I would love to hear from you!!

Just in case you didn't know you can find Craft Fantastic on all of the social media platforms:

Facebook  ~  Instagram  ~  Pinterest  ~  Twitter  ~  Blog


Follow so that you don't miss out on any of the creative ideas, deals and new goodies that appear in the store.

Thank you so much for stopping by!!

~Kymona


Tuesday, February 7, 2017

Valentines Day Projects by Judy


Hi and welcome to my first blog post as a member of the Craft Fantastic Design Team!

Today I am going to share with you two projects perfect for Valentines Day! For both projects you will need:

Craft Fantastic Glaze & Glue, 2 pairs of pliers, a ruler, Fantastic Jeweler's Glue Dots and a Craft Fantastic Image Sheet

For our first project we will make a Valentines Day necklace and for that you will need:

1  30" rolo chain (more about this later), 2 long rose connectors, 4 small jump rings, 1 medium fancy heart tray, 1 meduim glass heart, 1 wire cutting tool, Craft Fantastic Glaze & Glue, 2 pairs of pliers, a ruler and a Craft Fantastic Image Sheet


To begin I will choose an image for my heart pendant. I will cut out the image, apply my Glaze & Glue to the flat side of the glass, using a dollup in the center of the heart glass as well as several additional dollups around the edges. I will then place my glass over the image and hold it in place for a moment until it grips. Too much glue can be cleaned up with a q-tip, but too little glue won't seal properly with the image. On the Craft Fantastic website there is an in depth tutorial which you can find HERE.  Next use a scissor to trim the edges closely around the glass and set aside.

For our next step take the rolo chain and set it along side your ruler with the clasp closed. We are going to snip out 2 links at the 11" mark. I chose to remove an 8" section from the middle of the chain, so we will be able to use the snipped out portion at a later date for another project. (Note, you can use a 24" chain as well and snip in the middle, or you can also just snip the 30" chain in half. You can decide exactly how long you want your finished piece. I liked the idea of having a piece long enough that I could use later for a bracelet possibly.) Now use a small jump ring on each end of the chain where you just snipped the link and attach the chain to a long rose connector. Repeat this process for the other piece of chain and other rose connector.


Now take your next jump ring and attach the other end of the rose connector to the medium heart pendant, and do the same with the other connector and remaining jump ring.

Take two Fantastic Jeweler's Dots and place on the heart tray. Peel the orange pieces off and adhere your glass heart. And you are all finished!


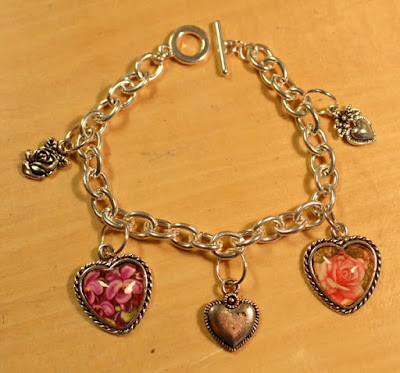
For our second project we will make a Valentines Day charm bracelet and for that you will need:

2 small fancy heart trays, 2 small glass hearts, 1 cute heart charm, 1 charm bracelet, rose charm and rose with heart charm (both of these come in a set of charms called day/dead charm collection), 5 large jump rings, Craft Fantastic Glaze & Glue, 2 pairs of pliers, a ruler and a Craft Fantastic Image Sheet


To begin I will choose 2 images for my heart charms. I will cut out the images, apply my Glaze & Glue to the flat side of the glass, using a dollup in the center of the heart glass as well as several additional dollups arounf the edges. I will then place my glass over the image and hold it in place for a moment until it grips. Too much glue can be cleaned up with a qtip, but too little glue won't seal properly with the image. On the Craft Fantastic website there is an in depth tutorial which you can find HERE. Next use a scissor to trim the edges closely around the glass and set aside.

For our next step I will measure to the center of the charm bracelet and using a large jump ring, attach the cute heart charm. I will then count five links to the left of center and attach one of the heart trays by using a large jump ring, and repeat this counting five links to the right of the center and attach the second heart tray. I will then count five more links from each of the heart trays and attach the rose charm and the rose and heart charm.


Take a Fantastic Jeweler's Dot and place on each of the heart trays. Peel the orange pieces off and adhere your glass hearts. And you are all finished!


I do hope that you have enjoyed these two projects! If you have any questions please just ask!

And do check out the FEBRUARY KIT SPECIAL, which contains a lot of what I have used in todays' projects! It is a really fabulous kit so definitely check it out!

Here is a link to the CRAFT FANTASTIC WEBSITE where you can find everything you need! And below there are specific links to all the items I have referenced above.

Have a wonderful Valentines Day and I will see you again soon!

Hugs,

Judy


Multipurpose Jewelry Pliers

Fantastic Jewelers Dots

Fantastic Glaze & Glue

30" Rolo Chain

Charm Bracelet

Valentine Image Sheet

Cute Heart Charm

Day/Dead Charm Collection

Long Rose Connectors

Small Jump Rings

Large Jump Rings

Small Glass Hearts

Medium Glass Hearts

Medium Fancy Heart Tray

Small Fancy Heart Tray