Showing posts with label gifts. Show all posts

Saturday, December 15, 2018

Fantastic Holiday Gift Ideas

Hi everybody! Kim here from My Kraft Kloset and December is half over and the holidays are just around the corner. Are you ready?  If not, don't panic, Craft Fantastic has you covered. Get out all your Craft Fantastic kits you've been collecting all year and make something homemade. We make it simple, yet fun or elegant, you choose and you'll have holiday gifts done in no time at all.

Poinsettia Earring and Pendant Set


Gather up all your supplies, choose from hundreds of images, charms, jump rings, earwire earrings bangles, chains, glass pieces, trays, Glaze & Glue, Super Sticky Dots, scissors and Qtips.

Then click "here" to get all the basic details on how to make these masterpieces and all the supplies I used are listed in links below. Grab a friend or maybe your kids to make Grandma, Mom, or Auntie gifts. Ready...Set...Go...Craft!!!

Vintage Birds Pendant


Candy Cane Pendant


Bangle Charm Bracelet, duo tray side 1


Bangle Charm Bracelet, duo tray side 2

Click "here" to see how to collage the "s and daughter" together

Voila! There you have several uniquely made or personalized holiday gifts sure to please anyone on your holiday gift giving list and that only took an hour or two.  I hope I've inspired you to grab a Kit-of-the-Month or two, mix them up, and create something fantastic!

The possibilities are truly endless with these amazing Craft Fantastic products! Leave us a comment and tell us what you think of these projects or what your making for the holidays and share with us on social media. Thanks for stopping by! Happy Holidays!


~Kim Klinkovsky @mykraftkloset


Supplies Used:
MINI GLASS SQUARES (poinsettia earrings)
HOLIDAY mini & small glass sizes images (poinsettia earrings)
LONG EARWIRES antique brass (poinsettia earrings)

HOLIDAY all jeweler's glass sizes-large images (poinsettia pendant)
X LARGE GLASS SQUARES (poinsettia pendant)

VINTAGE BIRDS mini & small glass sizes images (vintage birds pendant)
SMALL GLASS ROUNDS (vintage birds pendant)
SMALL JUMP RINGS silver (vintage birds to attach charm)
BUTTERFLY KISS CHARM antique silver (vintage birds charm)


HOLIDAY all jeweler's glass sizes-large images (candy cane pendant)
EXTRA LARGE ROUND PENDANT TRAY silver (candy cane pendant)
X LARGE GLASS ROUNDS (candy cane pendant)

SLIDE BANGLE silver (charm bracelet)

SMALL JUMP RINGS silver (to attach charms) 
NATURE CHARM (tree of life) silver (Tree of Life charm) (bangle bracelet)
TINY ROUND GLASS BLING-Aqua (bangle bracelet)
INSPIRATION mini & small glass sizes (bangle bracelet heart image)
WING CHARM antique silver (bangle bracelet)
MEDIUM ROUND DUO SIDE CHARM TRAY silver (bangle bracelet, double sided for two images)
MEDIUM GLASS ROUNDS (bangle bracelet for duo tray)
HOLIDAY mini & small glass sizes Images (bangle bracelet, images for duo tray)
Silver Angel Charm (out of stock, but she is found in many past kits, so check your stash) 
Day of the Dead Silver heart/flower Charm (out of stock, but maybe in past kits)
SMALL ROUND CHARM TRAY silver (bangle bracelet-letter "s")
SMALL GLASS ROUNDS (bangle bracelet - letter "s")

Saturday, November 17, 2018

One of a Kind Holiday Cards

Hi everybody! Kim here from My Kraft Kloset and the holidays are soon upon us and as a card maker, I'm busy working on holiday cards to mail out soon. So today I thought I'd share a couple of ideas on how to use your Craft Fantastic products in your card making and create special one of a kind holiday cards your friends and family will swoon over!


Let's get started. Gather all your supplies together, like an assembly line to make several cards at once. And to make it easier I used these gorgeous Luxe-Line cards and envelopes set in off-white as the base of my cards. Which are found in the Craft Fantastic shop, but let me tell you, these cards are beautiful, elegant, and very sturdy quality.


Next I die cut blue panels from patterned paper with a scallop stitched die cut that is 1/4" larger than the luxe card base. Then I came across this free vintage holiday sheet music "here" online and printed them on regular copy paper. They already had a vintage ivory color to them, but I inked around the edges to give it a wintery blue look. Cut it out with a stitched die cut and trimmed to fit. Adhered to blue card panel with several super sticky dots.


Added this rustic twine to frame the sheet music panel and adhered with Glaze & Glue. It drys really quick and worked really well. Then I chose these precious Craft Fantastic holiday images, cut them out, and adhered in the corners with Glaze & Glue. 

Adhered blue panel to luxe card base with several super sticky dots. And attached a little floral holiday bundle in each corner with a super sticky dot to complete these special cards. 

Tip: Use a bubble mailer envelope or a small box to mail thick cards.


Voila! There you have special one of a kind holiday cards made with Craft Fantastic products and a few of your card making supplies. I hope I've inspired you to play with your supplies, mix and match, and check out other images to see what else you can make! But these are so precious, I just might frame them and give as gifts or hang them on my wall for all to see!


Also take a peak at the new Kit-of-the-Month to get a lot of projects made for the holidays or any upcoming special occasions at a reasonable price. The possibilities are truly endless with these amazing Craft Fantastic products! Leave us a comment and tell us what your making and share with us. Thanks for stopping by! Happy Holidays!

~Kim Klinkovsky @mykraftkloset


Supplies:
HOLIDAY all jeweler's glass sizes (Christmas images sheet)
FANTASTIC GLAZE & GLUE 2 oz.
FANTASTIC SUPER STICKY DOTS
Free printable holiday sheet music
Gina Marie Designs Stitched and Scallop Die Cuts
Bo Bunny Vintage Double Dot 6x6 patterned paper
twine
Petaloo floral holiday bundle
Ranger Distress Ink-Stormy Sky

Thursday, June 7, 2018

Family Heirloom Necklace

Hi everybody! Kim here from My Kraft Kloset sharing with you a beautiful heirloom necklace that was created using these amazing vintage antique brass pieces from Craft Fantastic that can be passed down through the generations to treasure for a lifetime. 


Let's get started:


1.  Choosing from hundreds of Craft Fantastic images is always the hardest part. So for this project I chose a couple of my families favorite flowers, the word "family" and the letter "K" for our name.


2.  To collage with the word "family," cut it out, add a couple drops of Fantastic Glaze & Glue to the back of the word, and place where you want it on your flower image and press down to make smooth. Allow to dry for a few minutes. If you don't, the glue could smear your image under the glass and could appear cloudy. 

3.  Add a couple drops of Glaze & Glue to a MEDIUM GLASS ROUNDS and place over the newly collage image, and press gently for a few minutes until set. Wipe off any excess glue around the edges with a Q-tip. 

(Do this step for the duo side daffodil flower image and the alphabet image too)


4.  Once dry, cut around the glass and cut out the images.

5.  Next choose a tray for your beautiful images. I chose a double sided "duo" tray so I could use two flower images and this lovely twist link tray in antique brass to give it a vintage quality. Adhere a Fantastic Super Sticky Dot to each tray. Use more dots if your tray is larger. Remove red sticky dot backing and place glass images in the trays.


6.  Attach trays and tree charm to each other with small jump rings and pliers. 


7.  To complete this design I cut my chain in half with scissors and made them equal lengths on both sides. Using small jump rings and pliers, attach a flourish connector to each piece of the chain. Attach a celtic type knot connector on each end and attach to the top of a V connector. Then attach the bottom of the V connector to the top of the duo side charm tray. 
(as shown with arrows in the picture above)


Voila! There you have a stunningly vintage heirloom piece, complete with the tree of life and a family monogram to pass down through the generations to treasure forever. I'd love to get this from my mom or grandmother. Wouldn't you?


Be sure to check out our *NEW* Designer Kits-of-the Month and get started on a few custom gifts for all your upcoming special occasions. And keep a few for yourself too, because the possibilities are truly endless with these amazing Craft Fantastic  products! Leave us a comment and tell us what you think. Thanks for stopping by!


Kim Klinkovsky @mykraftkloset


Supplies Used:
(2)MEDIUM GLASS ROUNDS

MINI GLASS ROUNDS (for alphabet images)

NATURE CHARM COLLECTION antique brass (family tree charm)

Seed Packets all jeweler's glass sizes (blue/white daisies image)

Thursday, May 10, 2018

Thank A Teacher - Gift Ideas

Hi everybody! Kim here from My Kraft Kloset sharing with you a few unique projects to say "thank you" to some very special teachers using these beautiful products from Craft Fantastic. To honor and celebrate our teachers for National Teachers Appreciation Week/Month.


As the school year is winding down you still have plenty of time to order these amazing products and make several handmade gifts for all the special teachers in your kids life. I've been told by some teachers, who are my friends, that they get TONS of gifts at the end of the school year. So I wanted to do something different and unique and this is what I came up with...a gift card holder that holds flower seed packets and a special handmade necklace she couldn't buy in any store.


To make the Flower Seed Holders:

1.  I started with an empty paper towel holder,  cut in half to give me two pieces for my flower seed holders, and press down flat. I like to recycle or upcycle, but you could use cardstock with this free printable template to cut out your own box that measures about 4 x 5.5" or 6 x 4." Or if you have a pillow box die cut or SVG that will do too.


2.  I used a whole sheet of *NEW* Seed Packets images, which measures 4 x 11" and cut in half at 4 x 5.5" makes two perfect patterned paper panels to match my project. Great for two teachers. Wrap the sheet around the paper towel holder and adhere the panel with Super Sticky Dots, because you want your project to hold together and these work great. 


3.  Then I used various paper scraps to create a "band" to wrap around the box for interest and decoration. Adhere with Super Sticky Dots, add a "thanks" sentiment with stickers, and decorate as shown in the picture above and below. Add flower seed packets to complete. Don't you just love these images? So brightly detailed for teachers, Mother's Day this Sunday, May 13th,  or the gardeners in your life.


Next how to make the necklaces:


1.  I started with an APPLE PENDANT KIT  that includes both an antique brass and silver apple trays, two apple jewelers glass, and silver and brass necklace chains. And also used a couple of  SMALL SQUARE PENDANT TRAYS in silver and SMALL GLASS SQUARES to match.
 

2.  Next choose from hundreds of Craft Fantastic images, which is always the hardest part. I really love them all! Or make your own and mix them up. I choose a teachers printable sheet from the internet and printed it on plain white copy paper at home.

3.  Cut out the apple image and added a couple drops of Fantastic Glaze & Glue and adhered it on top of a script image from the *NEW* Seed Packets images, as shown below, to create a unique collage. Allow to dry before adding glass. 


4.  Once dry. Add a few drops of Fantastic Glaze & Glue on the back of a Glass Apple piece, press gently for a few minutes, and hold until set. Wipe off any excess glue around the edges with a Q-tip.


5.  Once dry, cut around the glass and cut out the image. Adhere a Fantastic Super Sticky Dot to the apple tray, remove the red backing, and place glass image into the tray and a chain to complete. Aren't these apples precious?  I just love them! Don't you???

Repeat the steps above to make the square pendants.


Voila! There you have several uniquely designed gifts wrapped in their own handmade packaging to show your appreciation of a teachers great work with our kids or for having a fabulous school year. "Thank You, Teachers"


Be sure to check out our *NEW* Designer Kits-of-the Month and get started designing special gifts or keep a few for yourself, because they are stunning! The possibilities are truly endless with these super fantastic products! Thanks for stopping by!

Kim Klinkovsky @mykraftkloset

Saturday, April 28, 2018

Mothers Day Gift Ideas

Hi everybody! Kim here from My Kraft Kloset sharing a very special bracelet I made using these wonderful products from Craft Fantastic. As Mother’s Day is approaching next month on Sunday, May 13th you still have plenty of time to order this amazing kit and make several handmade gifts for all the special ladies in your life.


Let's get started in 4 easy steps:

1.  I started with a Retro Square Bracelet Kit in antique brass which includes one bracelet and 8 Glass Squares.  


2.  Next choose from hundreds of Craft Fantastic images, which is always the hard part. I love them all! Or choose this *NEW* Sewing mini image sheet, like I used, because it reminded me of those sewing patterns from my childhood.


3.  Add a few drops of Fantastic Glaze & Glue on the back of each Glass Squares and press gently for a few minutes and hold until set. Repeat until you have eight amazing images. Wipe off any excess glue around the edges with a Q-tip.


4.  Once dry, cut around the glass and cut out the images. Adhere a Fantastic Super Sticky Dot to each square space on the bracelet and remove the red backing. I suggest laying out your images in a row to decide where to place each image first, before you add them to the bracelet and complete. 


Voila! There you have a uniquely designed gift for Mother's Day or any upcoming occasions like Graduation, Birthday, Wedding, Baby Mama gift or special gifts for a seamstress, crafter, fashionista or any special day.

Be sure to check out our *NEW* Designer Kits-of-the Month and get started designing special gifts and keep a few for yourself too, because they are stunning! The possibilities are truly endless with these super fantastic products! Thanks for stopping by!

Kim Klinkovsky @mykraftkloset

Thursday, April 12, 2018

Special Graduation Gifts

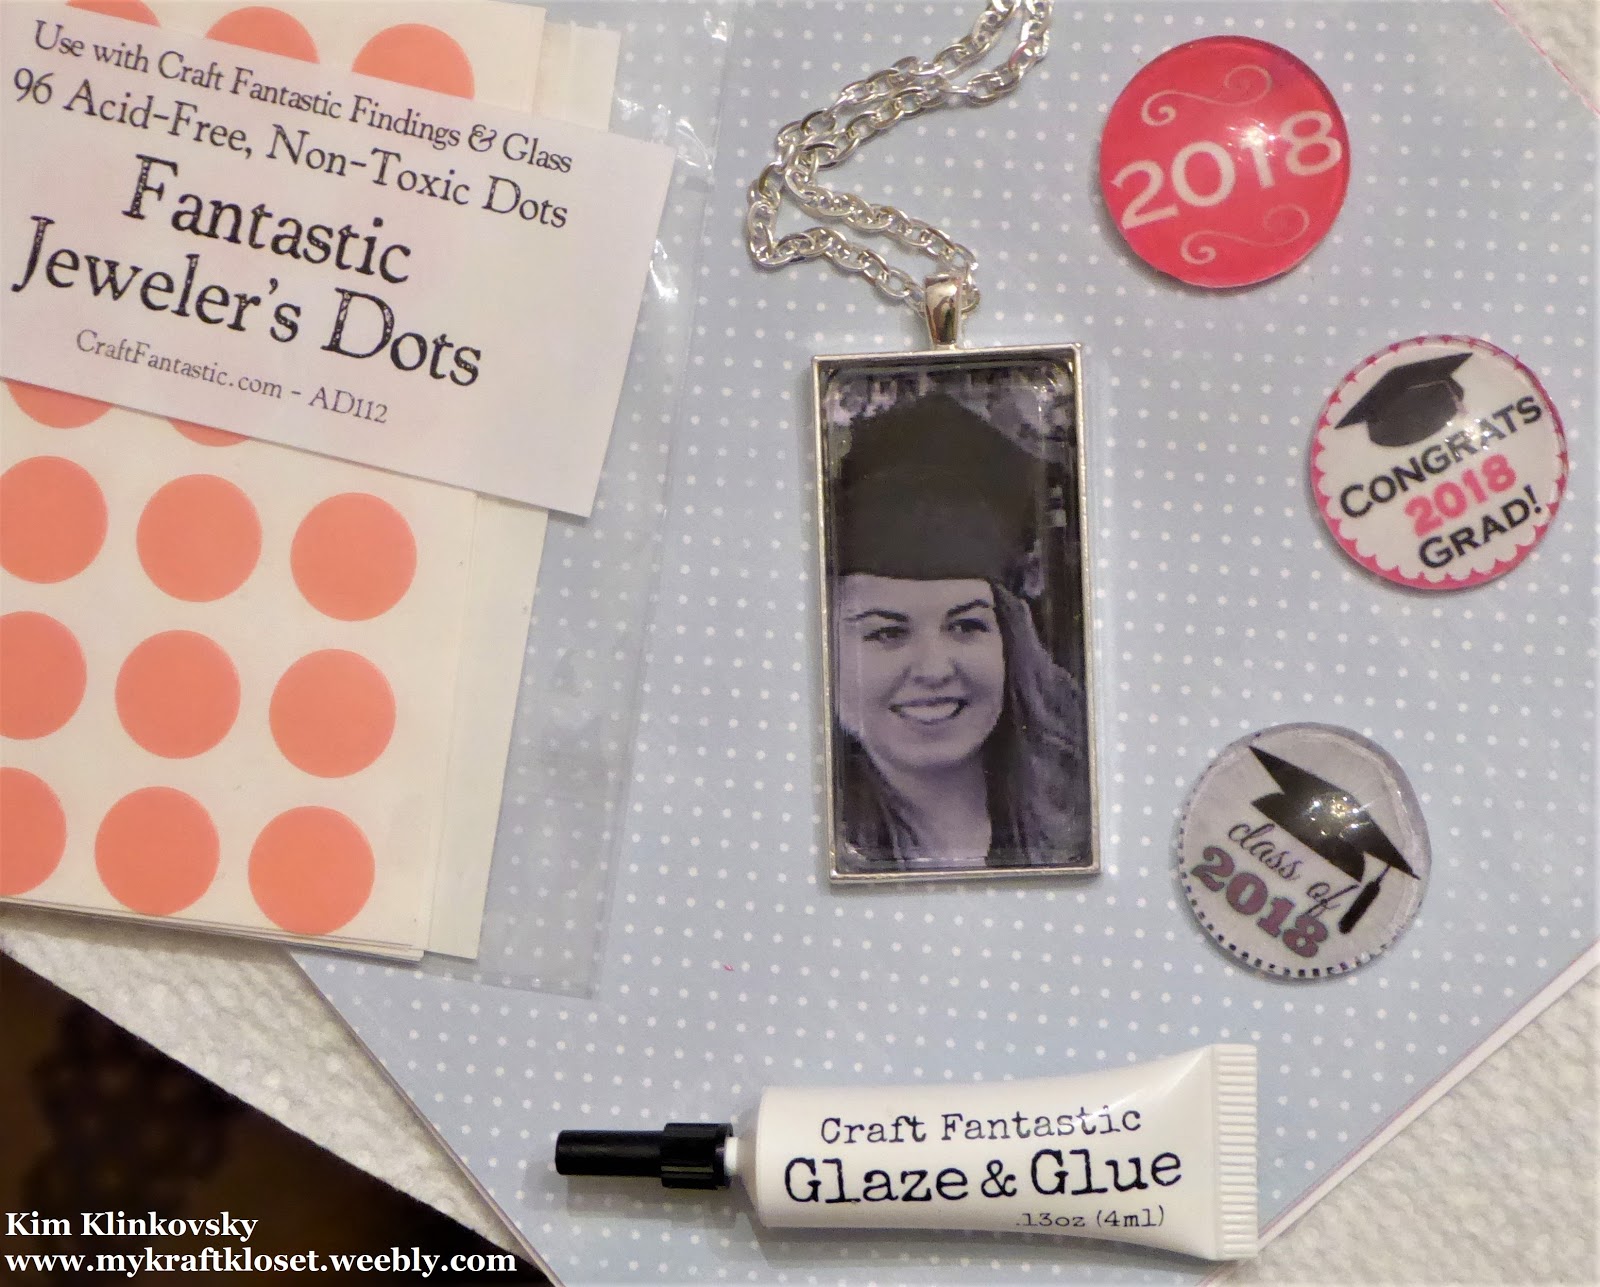
Hi everybody! Kim here from My Kraft Kloset sharing some super fun graduation gifts that have a personalized touch using Craft Fantastic products and special photos you can print from home. Just perfect for those upcoming Graduations.


Let's get started in 5 easy steps:

1. Choose from hundreds of Craft Fantastic images. Or print your own photos or internet images on regular copy paper, like I did today for these graduation gifts. More printing tips "here."

2. Add a few drops of Fantastic Glaze & Glue on the back of MEDIUM GLASS ROUNDS and press gently for a few minutes until set. Wipe off any excess glue around the edges with a Q-tip.

3. Once dry, cut around the glass and cut out the image. Copy paper is thin so you may want to add some Fantastic Glaze & Glue on the back of the glass image to make it stronger and seal your printed images. Allow to dry. Tips on Printing photos and images at home on copy paper "here"

4. Adhere a Fantastic Super Sticky Dot. Add more dots if your tray is larger. Remove red sticky dot backing and place glass image into a tray.

5. Just add a Chain, Key Ring, or Charms with jump rings to complete.


Whether your child is graduating kindergarten, middle school, high school or college, these are so fun, unique, and affordable to commemorate those special achievements. Search and print a bunch of images in your graduates school colors or school emblem for a special gift for your child, their close friends, the parents, and grandparents too! So fun for everybody!

This personalized key ring has wing charms for your graduate to fly into their future. Commemorate college acceptance schools with this special double sided tray. So fun to choose multiple images or emblems like these graduation messages and like my hubbys ol' college Alma mater "AU" shown below. (images found on the internet)


Add a chain and turn this double sided tray into a special pendant for your grad or alumni friends and family. They will cherish these and wear them proudly, especially on game days!  I would.  Wouldn't you?


 Here are some more fun charms to personalize your grads double sided key chain with a more masculine flair. (image found on the internet)


Add a chain and turn this double sided tray into another fun and special pendant for your grad. (image found on the internet)


Voila! There you have several unique gifts for those special kids on your upcoming graduation list. Or surprise your family and friends and make a few extras of their favorite schools/teams. They will love them! Mine below is a dog tag type tray for "UM" football and I wear it proudly, even though I'm surrounded by the Crimson Tide or AU Tigers, but it's all fun and games. Ha! #GOBLUE (image found on the internet)


Be sure to check out our *NEW* Designer Kits-of-the Month and get started on gifts for Mother's Day May 13th or other upcoming occasions. And keep a few for yourself too, because they are stunning!  The possibilities are truly endless with these super fantastic products! Thanks for stopping by!

Kim Klinkovsky @mykraftkloset


Supplies:
LONG RECTANGLE PENDANT TRAY silver (top photo project)
MEDIUM GLASS ROUNDS

Saturday, March 31, 2018

Oh Baby Spring Showers

Hi everybody! Kim here from My Kraft Kloset and Spring is finally here and that means so are babies. As two of my four kids where born in Spring months, which inspired me to create these fun projects with Craft Fantastic products.  Surprise the Moms-to-be, the new Grandma's, or surprise your guests with a baby gender reveal party with these fun images.


Let's get started:

1.  Choose from hundreds of Craft Fantastic images or print your own on regular copy paper, from internet images, like I did today for these baby shower images. More printing tips "here."


2.  Add a few drops of Fantastic Glaze & Glue on the back of small glass rounds and press gently for a few minutes until set. Wipe off any excess glue around the edges with a Q-tip.


3.  Once dry, cut around the glass and cut out the image. Copy paper is thinner than the special paper Craft Fantastic uses for it's images, so you may want to add more Fantastic Glaze & Glue on the back of the glass image to make it stronger. Tips on Printing at home on copy paper "here"

4.  Adhere a Fantastic Super Sticky Dot. Add more dots if your tray is larger. Remove red sticky dot backing and place glass image into a SMALL ROUND PENDANT TRAY silver

5.  Just add a Chain to complete. 

How to create a fun Gender Reveal Party Game:
These are so affordable you can make a whole bunch of images in pink and blue and have every guests choose a color. Then reveal if the baby is a boy or a girl and see which color wins. And everybody goes home with a uniquely handmade party favor and wonderful memories! Make extra's if somebody wants to trade. 

Is it a Boy???


Or Is it a Girl???


Make a few special pendants for the Mom-to-be and the new Grandma's too. I love these Craft Fantastic images with hearts, roses, and a tiara. Fit for a princess or queen. And they will LOVE them too!


Voila! There you have a few unique pendants ready for special gifts for a Baby Shower or Mother's Day gifts too. The possibilities are truly endless with these fun products!
Thanks for stopping by!

Kim Klinkovsky @mykraftkloset

Saturday, March 3, 2018

Rock Paper Scissors Projects

Hi everybody! Kim here from My Kraft Kloset sharing these beautiful silver scissor charm projects that are sure to please any crafter with these stunning products from Craft Fantastic. They are a wonderful mix of vintage and modern that would make great gifts for any special occasion you wanted to personalize with monograms from paper images, charms, faux leather and more. 


If you were lucky enough to get February's Kit-of-the-Month, congratulations, because that kit included a few of the pieces I used for these projects.  But don't fret if you didn't, click on these links to get all the supplies you need to make the projects above and several more: Silver Scissors Charms, V Connector, Small Jump Rings, Pinch Bails, Glaze & Glue, Faux Leather Necklaces, Key Ring, Large Jump Rings, and a Swirl Toggle.

To create the "rock" part of our project, I added just 1-2 drops of Glaze & Glue into the center of the scissors where there is a small open circle and placed a small sparkly blue gemstone (purchased at a local craft store), into the glue to secure it in place. Attach the scissors to a special key ring or add it to a 3-ring or spiral planner and personalize it with monograms for a lovely planner chain or bookmark. As shown above.


For my next project (shown above) I created a vintage necklace with a pink gemstone adhered with Glaze & Glue, attached a V Connector with small jump rings, added a pinch bail and slipped the pendant through a black faux necklace. And it's so simple, yet stunning. Don't you think? It's one of my favorite pieces, but I say that about all of them. (lol)

Here is another look at our stunning "scissors" on black faux leather for a vintage look and pink faux leather for a more modern look to mix and match your outfits. 


Voila! There you have several unique necklaces, planner chains, or key chains for special gifts or keep a few for yourself with just a few supplies.  The possibilities are truly endless! Thanks for stopping by!

Kim Klinkovsky @mykraftkloset