Showing posts with label charms. Show all posts

Saturday, December 15, 2018

Fantastic Holiday Gift Ideas

Hi everybody! Kim here from My Kraft Kloset and December is half over and the holidays are just around the corner. Are you ready?  If not, don't panic, Craft Fantastic has you covered. Get out all your Craft Fantastic kits you've been collecting all year and make something homemade. We make it simple, yet fun or elegant, you choose and you'll have holiday gifts done in no time at all.

Poinsettia Earring and Pendant Set


Gather up all your supplies, choose from hundreds of images, charms, jump rings, earwire earrings bangles, chains, glass pieces, trays, Glaze & Glue, Super Sticky Dots, scissors and Qtips.

Then click "here" to get all the basic details on how to make these masterpieces and all the supplies I used are listed in links below. Grab a friend or maybe your kids to make Grandma, Mom, or Auntie gifts. Ready...Set...Go...Craft!!!

Vintage Birds Pendant


Candy Cane Pendant


Bangle Charm Bracelet, duo tray side 1


Bangle Charm Bracelet, duo tray side 2

Click "here" to see how to collage the "s and daughter" together

Voila! There you have several uniquely made or personalized holiday gifts sure to please anyone on your holiday gift giving list and that only took an hour or two.  I hope I've inspired you to grab a Kit-of-the-Month or two, mix them up, and create something fantastic!

The possibilities are truly endless with these amazing Craft Fantastic products! Leave us a comment and tell us what you think of these projects or what your making for the holidays and share with us on social media. Thanks for stopping by! Happy Holidays!


~Kim Klinkovsky @mykraftkloset


Supplies Used:
MINI GLASS SQUARES (poinsettia earrings)
HOLIDAY mini & small glass sizes images (poinsettia earrings)
LONG EARWIRES antique brass (poinsettia earrings)

HOLIDAY all jeweler's glass sizes-large images (poinsettia pendant)
X LARGE GLASS SQUARES (poinsettia pendant)

VINTAGE BIRDS mini & small glass sizes images (vintage birds pendant)
SMALL GLASS ROUNDS (vintage birds pendant)
SMALL JUMP RINGS silver (vintage birds to attach charm)
BUTTERFLY KISS CHARM antique silver (vintage birds charm)


HOLIDAY all jeweler's glass sizes-large images (candy cane pendant)
EXTRA LARGE ROUND PENDANT TRAY silver (candy cane pendant)
X LARGE GLASS ROUNDS (candy cane pendant)

SLIDE BANGLE silver (charm bracelet)

SMALL JUMP RINGS silver (to attach charms) 
NATURE CHARM (tree of life) silver (Tree of Life charm) (bangle bracelet)
TINY ROUND GLASS BLING-Aqua (bangle bracelet)
INSPIRATION mini & small glass sizes (bangle bracelet heart image)
WING CHARM antique silver (bangle bracelet)
MEDIUM ROUND DUO SIDE CHARM TRAY silver (bangle bracelet, double sided for two images)
MEDIUM GLASS ROUNDS (bangle bracelet for duo tray)
HOLIDAY mini & small glass sizes Images (bangle bracelet, images for duo tray)
Silver Angel Charm (out of stock, but she is found in many past kits, so check your stash) 
Day of the Dead Silver heart/flower Charm (out of stock, but maybe in past kits)
SMALL ROUND CHARM TRAY silver (bangle bracelet-letter "s")
SMALL GLASS ROUNDS (bangle bracelet - letter "s")

Thursday, June 7, 2018

Family Heirloom Necklace

Hi everybody! Kim here from My Kraft Kloset sharing with you a beautiful heirloom necklace that was created using these amazing vintage antique brass pieces from Craft Fantastic that can be passed down through the generations to treasure for a lifetime. 


Let's get started:


1.  Choosing from hundreds of Craft Fantastic images is always the hardest part. So for this project I chose a couple of my families favorite flowers, the word "family" and the letter "K" for our name.


2.  To collage with the word "family," cut it out, add a couple drops of Fantastic Glaze & Glue to the back of the word, and place where you want it on your flower image and press down to make smooth. Allow to dry for a few minutes. If you don't, the glue could smear your image under the glass and could appear cloudy. 

3.  Add a couple drops of Glaze & Glue to a MEDIUM GLASS ROUNDS and place over the newly collage image, and press gently for a few minutes until set. Wipe off any excess glue around the edges with a Q-tip. 

(Do this step for the duo side daffodil flower image and the alphabet image too)


4.  Once dry, cut around the glass and cut out the images.

5.  Next choose a tray for your beautiful images. I chose a double sided "duo" tray so I could use two flower images and this lovely twist link tray in antique brass to give it a vintage quality. Adhere a Fantastic Super Sticky Dot to each tray. Use more dots if your tray is larger. Remove red sticky dot backing and place glass images in the trays.


6.  Attach trays and tree charm to each other with small jump rings and pliers. 


7.  To complete this design I cut my chain in half with scissors and made them equal lengths on both sides. Using small jump rings and pliers, attach a flourish connector to each piece of the chain. Attach a celtic type knot connector on each end and attach to the top of a V connector. Then attach the bottom of the V connector to the top of the duo side charm tray. 
(as shown with arrows in the picture above)


Voila! There you have a stunningly vintage heirloom piece, complete with the tree of life and a family monogram to pass down through the generations to treasure forever. I'd love to get this from my mom or grandmother. Wouldn't you?


Be sure to check out our *NEW* Designer Kits-of-the Month and get started on a few custom gifts for all your upcoming special occasions. And keep a few for yourself too, because the possibilities are truly endless with these amazing Craft Fantastic  products! Leave us a comment and tell us what you think. Thanks for stopping by!


Kim Klinkovsky @mykraftkloset


Supplies Used:
(2)MEDIUM GLASS ROUNDS

MINI GLASS ROUNDS (for alphabet images)

NATURE CHARM COLLECTION antique brass (family tree charm)

Seed Packets all jeweler's glass sizes (blue/white daisies image)

Saturday, May 26, 2018

Bridal Party Wedding Gifts

Hi everybody! Kim here from My Kraft Kloset sharing with you a few beautiful projects just in time for bridal season for some very special people you've asked to be a part of your wedding party. Show your bridesmaids just how special they are to you with these amazing gifts they will treasure for a lifetime.

Craft Fantastic products allow you to personalize each gift for each bridesmaid using their initials, birthstone, favorite color, a family tree for a sister, cousin or special family member, hearts, a Celtic type knot, roses, butterflies, angel wings and so many Charms to chose from to customize each bangle bracelet.


Let's get started:

1.  Choose from hundreds of Craft Fantastic images, which is always the hardest part, because they are amazing. But for this project I wanted something vintage and traditional and selected the initials of each bridesmaid with these wonderful alphabets: TINY ALPHABET #1 all tiny jeweler's glass sizes and TINY ALPHABET #2 all tiny jeweler's glass sizes


2.  Add a few drops of Fantastic Glaze & Glue on the back of a mini glass round and press gently onto an alphabet image for a few minutes until set. Wipe off any excess glue around the edges with a Q-tip.


3.  Once dry, cut around the glass and cut out the alphabet image. 

4.  Adhere a Fantastic Super Sticky Dot to a chosen tray. Remove red sticky dot backing and place glass alphabet into a silver or antique brass tray, as shown below. If your using a tiny or mini bling, like these "birthstones" then there is no need for glue, just adhere the bling directly onto a tray with a super sticky dot. 


5.  As you can see above, some of the tiny trays have circles on each end. One to hang special Charms from with jump rings and the other to attach with another jump ring to slide onto a bangle. Add a tiny bling of color in the center to match their birthstone. 

Add a special note, like this one below, that I typed up on my computer and printed on cardstock to accompany each treasured gift. And don't forget the bride, make one for yourself with a little something old, new, borrowed or blue too!


Bangles are so pretty alone or stack a few of them together and have some fun.


See how lovely these are in antique brass with these Charms: Celtic type knot, tree of life from nature set, heart, dragonfly, butterfly, and a cute little button.


Voila! There you have several uniquely personalized gifts to say "thank you" to those special people who've decided to stand beside you and your groom on your special day. They will love these! I do! Don't you?

Be sure to check out our *NEW* Designer Kits-of-the Month and get started on a few custom gifts for all your upcoming special occasions. And keep a few for yourself too, because they are stunning! The possibilities are truly endless with these super fantastic products! Leave us a comment, we'd love to hear what you think. Thanks for stopping by!

Kim Klinkovsky @mykraftkloset


Supplies Used:
Qtips

Saturday, July 1, 2017

Craft Fantastic Meets Super Woman!

Hello everyone!!  Kymona from Kreative Kymona here today to share how Craft Fantastic mets Wonder Woman!!

One of my coworkers loves Wonder Woman ever since she was a small child.  So anytime I see Wonder Woman trinkets I think of her.  I was in a store this past week and saw a couple of Wonder Women charms and I knew I had to create a Craft Fantastic charm for my coworker.  Totally unique and one of a kind.

Take a look:


Awesome, right?  I can't wait to give it to her.  She is going to be blown away.  Adding her initial really personalized this charm in a way that is unique to her. 

To create this charm, I used:

7. Wonder Woman Charms

Craft Fantastic trays and images can turn any piece into a masterpiece!! The pieces are easy to use and possibilities are endless. 

So what do you think?  Aren't these charms just the cutest? Please let me know below.  I would love to hear from you!!

Just in case you didn't know you can find Craft Fantastic on all of the social media platforms:

Facebook  ~  Instagram  ~  Pinterest  ~  Twitter  ~  Blog


Follow so that you don't miss out on any of the creative ideas, deals and new goodies that appear in the store.

Thank you so much for stopping by!!


SaveSave

Saturday, June 17, 2017

How To Use Craft Fantastic To Personalize Your Supplies

Hello everyone!!  Kymona here from Kreative Kymona to show how to use Craft Fantastic to personalize your supplies.

How many times have you gone to a crop, a class, or just a place to craft and you had to bring your supplies with you?  How do you tell your scissors different from the other people sitting at your table? I have a super cool and stylish way to have your supplies stand out.

Take a look:


Yes, I used the Small Oval Duo-Side Tray from May's Kit of the Month and the Small Square Pendant Tray from June's Kit of the Month to personalize my scissors. This way no one could mistake them for theirs!  

Plus, it gives my scissors a super elegant look.  I love how the trays rattle against the scissors.  

These charms are so easy to create for your scissors or any other tool you want to personalize.

Here's how:

1. Decide on the trays you want to use.  
2. Add a sticky dot to the bottom of the tray.
3. Decide on the image you want to use.
4. Add Glaze & Glue to the glass and place the glass on top of the image.  
5. Press and hold the glass until the glue dries.
6. Cut around the glass to trim off excess paper.
7. Add the prepared glass inside the tray.
8. Choose the length of the chain and attach it to the scissors.

Super simple to create.

Lets take a closer look:


The Oval Tray is my favorite, because its has two sides.  So I can have both of my initials in one tray. 

So what do you think?  Aren't these charms just the cutest? Please let me know below.  I would love to hear from you!!

Just in case you didn't know you can find Craft Fantastic on all of the social media platforms:

Facebook  ~  Instagram  ~  Pinterest  ~  Twitter  ~  Blog


Follow so that you don't miss out on any of the creative ideas, deals and new goodies that appear in the store.

Thank you so much for stopping by!!

Wednesday, August 5, 2015

Bohemian Dangle Necklace!

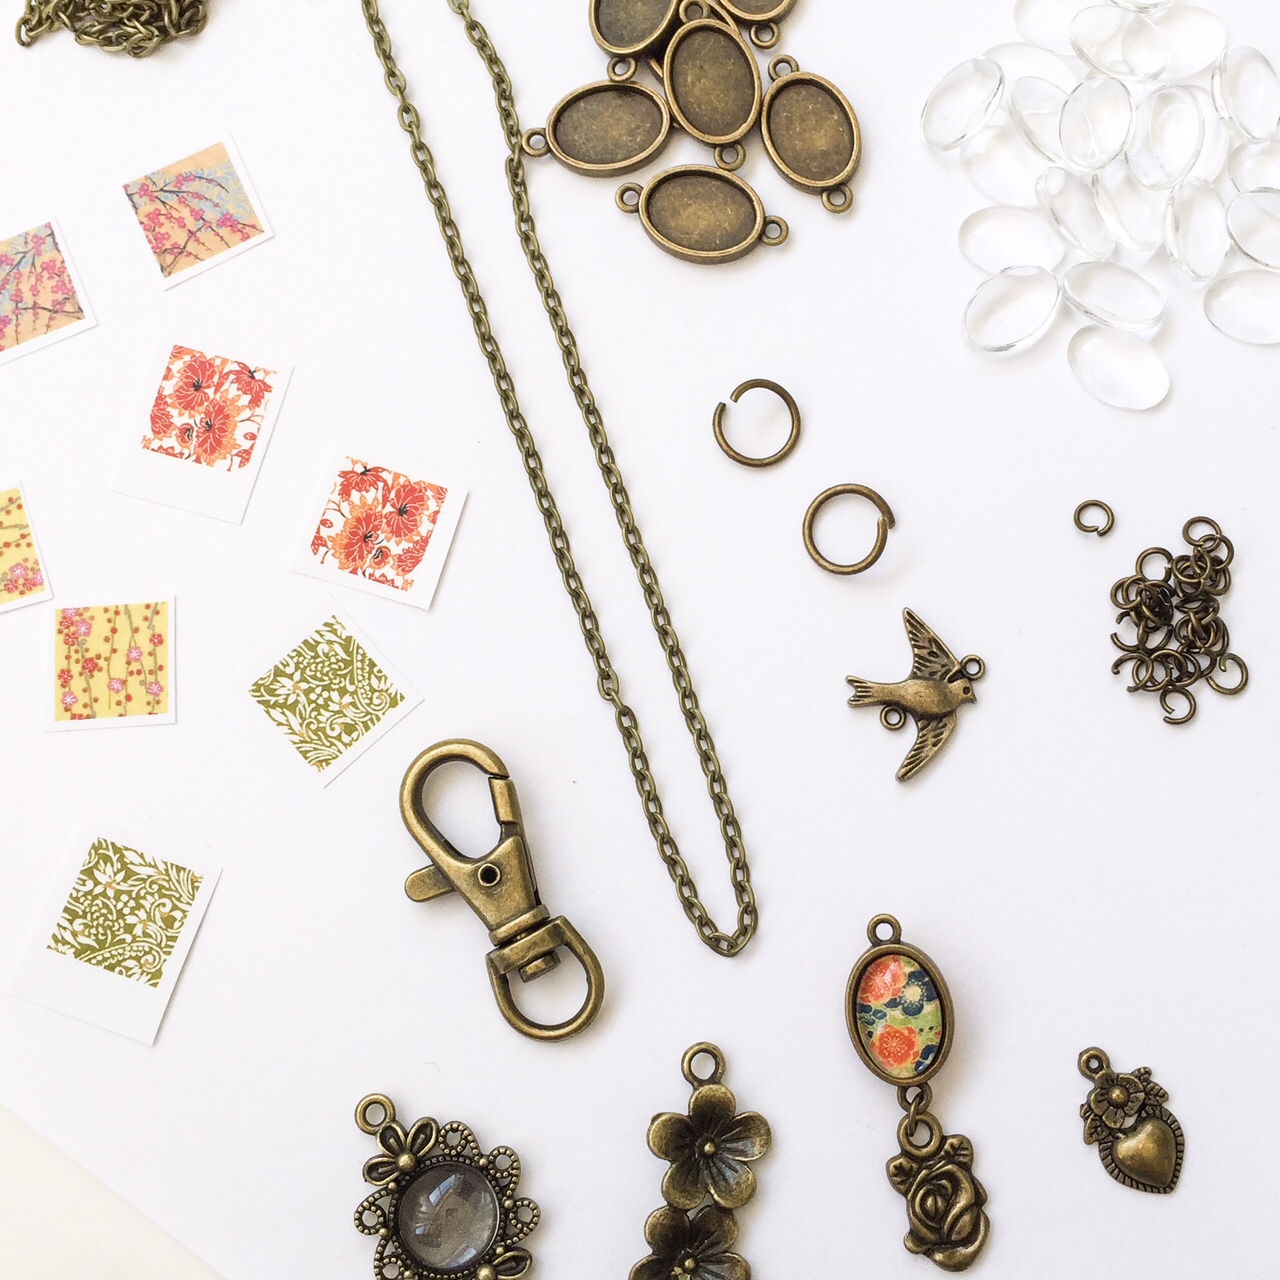
Welcome back! Today I'm sharing a very simple bohemian dangle necklace. I refer to it as bohemian because it does not conform to any rules, it's carefree, artsy and eclectic. If I had to sum it up, it's a tossed salad of odds and ends pieced together with jump rings. This project is not so much a tutorial regarding technique as it is a flash of inspiration on using the Craft Fantastic line of products to create something a little out of the ordinary.

I kid you not when I say that I just grabbed whatever was within arms reach of my desk here at Craft Fantastic HQ. Of course, my desk is pretty much overflowing with CF goodies so this was not a challenge in any way shape or form. In fact, just the opposite. I had so much ridiculously awesome stuff to pick from I actually had to use some restraint about what I used for this project. If you decide to make something similar, I urge you to not think too much about it. Just have fun and use what's handy. I'll walk you through my project.

Let's get started...

What I used (all items are in the Antique Brass finish)

24" Rolo Chains - I used 2 of these...one for my necklace base and one to cut into pieces.

Key Clip -  I used just the clip portion from one of our Key Chains.

Tiny Oval Duo Side Link Trays - I thought these would be fun since both sides of the tray feature a piece of glass.

Tiny Oval Glass - I needed 10 of these glass pieces to complete my Duo Side Trays.

Tiny Round Ornate Tray - Just a pretty little something to add to the mix.

Tiny Round Glass - I needed just one piece for my Ornate Tray.


Multi Purpose Pliers - Two pairs are a must when working with jump rings.


Cotton Swabs 

Scissors


I reached for whatever was handy and this was what I came up with. Not too shabby. I even had a tray already made up with the glass and a charm attached. I think this must have been part of an earring set at one time and it became separated from not only its partner, but its ear wire, as well. Oh well, waste not, want not. In it goes!  


I started by making my glass pieces. I opted for some colorful images I found on our Washi Art Image Sheet. The petite patterns work so well with the tiny glass! 


Using the Fantastic Jeweler's Dots, I pressed each piece of glass into the trays. I always apply the dot to the tray, slightly burnishing it down with my fingernail. Then I peel off the backing to expose the adhesive and firmly press my piece of glass into the tray, which creates a strong bond between the tray and glass. We're pretty rough with the samples around Craft Fantastic HQ, but I have never had a piece of glass fall out of a tray. Those Fantastic Jeweler's Dots are something fierce!


I cut the center of one of the rolo chains and attached a jump ring to each end. Next I added my key clip to the two rings to give it a modern look. This will be the foundation of the dangling elements. 


Using the extra rolo chain, I cut pieces of varying lengths to dangle my trays and charms from. I attached everything using my handy dandy multi purpose pliers and lots of jump rings. 


Once everything is put together I am left with a playful, one-of-a-kind, dangling, necklace showpiece, sure to turn heads and invite conversation. 


Here's an upclose look. Fun, huh! I imagine this piece adorning a simple white tee, accompanied by a flowing, tiered, gypsy-style skirt, awash in vibrant colors and patterns.  


Thanks for stopping by today! Visit every Wednesday for a new project or technique! Find all of the supplies used in today's project in our Craft Fantastic Online Shop and don't forget to follow our Facebook page for all of the latest Craft Fantastic updates!