Tuesday, September 5, 2017

More Fall Fun With Craft Fantastic

Here in New Mexico there is an awesome event every Labor Day Weekend at the Santo Domingo Pueblo. This event is a favorite for me every year. Literally hundreds of artisans from many different pueblos have their work for sale. I would have brought photos for you to see this amazing event but there is no photography allowed. What I wish I could do justice in describing to you is the amazing array of color in all the incredible jewelry that you see. And very prevalent among the various artists is earthtones, beautiful stonework, turquiose, lapis, jade, hematite, to name just a few. One of the things I really love about our Craft Fantastic products is that ability to create so many different things and we are really only limited by our imaginations. You will have to stay tuned for some amazing things that will be coming up, but for today, here is something sparkly!

So lets get started. I chose the following to work with: watchface tray, medium glass round, faux leather necklace, fantastic super sticky dots and a few nail polish choices.

On the flat side of your jewelers glass first give a coat of clear nail polish that contains some kind of something extra, like glitter, flecks, etc. On this piece I used several different special effects coats including one that is an iridescent glitter. Let dry. Remember this is really the coat that will show the most so you can even layer several coats to build up your effect. Next pick out a deep shade of polish. This willl actually be your backing color. I have chosen black this time to let the colors of the top layers stand out. You really don't want to be able to see through this last coat so if you need to give a second coat, do so but definitely let your layers dry between coats. Once dry, simply apply fantastic super sticky dots to the watchface pendant tray and adhere your glass. I chose to finish the piece with one of our black faux leather necklaces.


I love that you can use this pendant on either side, getting double the wear out of it!

II really love how this piece turned out. Do you like it? I would love to see what you create!
 
Hugs,
 
Judy

Saturday, September 2, 2017

Starting to Think Fall Colors With Craft Fantastic

As we start to head into the Fall I start to think about my jewelry and think of those pastels and sherbert colors that I love so much in the summer will start to give way to jewel tones and deeper, richer colors. So today I am bringing you one of my favorite techniques with a deeper tone, perfect for starting on fall accessories!

So lets get started. I chose the following to work with: medallion tray, large glass round, faux leather necklace, fantastic super sticky dots and a few nail polish choices.

On the flat side of your jewelers glass first give a coat of clear nail polish that contains some kind of something extra, like glitter, flecks, etc. Let dry. Remember this is really the coat that will show the most so you can even layer several coats to build up your effect. Next pick out a deep shade of polish. This willl actually be your backing color. For fall I have chosen a pretty shade of red. You really don't want to be able to see through this last coat so if you need to give a second coat, do so but definitely let your layers dry between coats. Once dry, simply apply fantastic super sticky dots to the medallion pendant tray and adhere your glass. I chose to finish the piece with one of our black faux leather necklaces.

 
II really love how this piece turned out. Do you like it? I would love to see what you create!
 
Hugs,
 
Judy

Friday, September 1, 2017

September Kit Instructions

The NEW September Kit-of-the-Month is out and it is absolutely SPOOKY-licous! 

Fall is just around the corner and with it comes all of the autumnal celebrations that showcase what we love best about this season. The leaves start to don their fiery hues, the temps drop just enough for us to pull our favorite sweaters off the top shelf of our closet, we gather for conversations around the backyard fire pit while sipping cocoa (or wine) and hearty soups and stews find their way to our dinner table. All of these things make me so happy, but my absolute favorite thing to arrive with Fall is Halloween! I guess I've never lost that child-like infatuation with it. I love the costumes, the imagery, the candy, everything! Which is why this month's kit makes my heart swell and makes me feel like a kid again. I hope you love it, too!

Let's put these fabulous pieces together...

Assembly Instructions

Thanks for ordering the Craft Fantastic SEPTEMBER KIT! This kit is available for a limited time. 
Click HERE to order yours today!  

Here's a few links to help you complete the projects followed by a few 
assembly instructions for each piece:


  1. Select an image and add it to the glass cabochons using Fantastic Glaze & Glue.   
  2. Remove the small jump ring from the end of the 30" Rolo Chain. Cut a length of chain that is 6 links long using scissors. Re-attach the small jump ring.
  3. Close the Rolo Chain and then cut the necklace in the center. Attach a small jump ring to each end of the chain.
  4. Attach a large jump ring by stringing it through the 2 small jump rings.
  5. Attach the Owl Tray to the large jump ring using a Pinch Bail.
  6. Attach the small length of chain to the Mini Square Charm Tray using a small jump ring. Attach the other end to the large jump ring also using a small jump ring.
  7. Attach the Tree Charm to the large jump ring using a small jump ring.
  8. Add a Fantastic Sticky Dot to each tray. Remove the red backing to expose the adhesive. 
  9. Firmly press the appropriate cabochon into the trays. 


  1. Select an image and add it to the glass cabochon using Fantastic Glaze & Glue.   
  2. Cut the center of the 24" Rolo Chain using scissors. Attach the V-Connector to each end using small jump rings. 
  3. Attach the Rectangle Frame Tray to the V-Connector using a small jump ring.
  4. Add 2 Fantastic Sticky Dots to the Rectangle Frame Tray. Remove the red backing to expose the adhesive. 
  5. Firmly press the cabochon into the tray. 


  1. Select images and add them to the glass cabochons using Fantastic Glaze & Glue. 
  2. Attach the Mini Square Charm Trays to the Charm Bracelet using small jump rings. Leave enough space in between each tray to allow for a charm.
  3. Attach a charm in between the Mini Square Charm Trays using small jump rings.  
  4. Add a Fantastic Sticky Dot to each tray. CRemove the red backing to expose the adhesive. 
  5. Firmly press the appropriate cabochon into each tray. 


  1. Select an image and add it to the glass cabochon using Fantastic Glaze & Glue. 
  2. Attach the Mini Square Charm Tray to the Slide Bangle using a small jump ring. 
  3. Attach the Flower Skull Charm to the Slide Bangle using a small jump ring.
  4. Add a Fantastic Sticky Dot to the tray. Remove the red backing to expose the adhesive. 
  5. Firmly press the cabochon into the tray. 


  1. Select images and add them to the glass cabochons using Fantastic Glaze & Glue. 
  2. Attach a Mini Square Charm Tray to each Tiny Round Link Tray using a small jump ring. 
  3. Attach a French Ear Wire to each Tiny Round Link Tray.
  4. Add a Fantastic Sticky Dot to each tray. Cut the dots in quarters to use in the Tiny Round Link Trays. Remove the red backing to expose the adhesive. 
  5. Firmly press the appropriate cabochon into each tray. 
We hope you LOVE the SEPTEMBER Kit-of-the-Month! Be sure to follow Craft Fantasic on FACEBOOK and INSTAGRAM! Also, sign up for the CRAFT FANTASTIC NEWSLETTER for the latest and greatest sales, giveaways and product peeks! 

See you soon with more crafty stuff!

Tuesday, August 29, 2017

THE "BOO" TUTORIAL

Hello this is Liz from Junquedrawer Designs and October is approaching fast!! Time to start some Halloween Pendants!


I love this steampunk "Boo" rubber stamp but it stamps too large to fit into the EXTRA LARGE ROUND PENDANT TRAY. So what I did was stamp the image in black ink onto some different papers, one a spiderweb 12x12 scrapbook paper and the other on a distressed looking paper tag that I found.
The above photo is the actual stamp and what I stamped on.


This photo above is after I have taken the larger images to Staples and had them reduce the stamped images to 75 percent and copied onto a paper similar to what the Craft Fantastic Art Images are printed on.  I did this so the ink would not smear when the FANTASTIC GLAZE AND GLUE  was applied when making the pendants.


I then applied the image to the X LARGE GLASS ROUND with the FANTASTIC GLAZE AND GLUE.  Once dry I cut the image out and placed it into the X LARGE ROUND PENDANT TRAY with the FANTASTIC SUPER STICKY DOTS. 


I added the 30" SILVER ROLO CHAIN to the PENDANT and now they will be ready for my upcoming craft show.  Last year the "BOO" was highly sought after.

I love all the endless possibilities that can be used with all the CRAFT FANTASTIC products!!


Saturday, August 26, 2017

How To Create A Sea Glass Necklace

Hello everyone!!!  Kymona from Kreative Kymona here today to share how to create a sea glass necklace.

I went to the Scrapbook Expo a couple of weeks ago and met Tina and Gloria at the Craft Fantastic Booth! My daughter and nieces sat down to participated in a free make and take.

While I watched them, I noticed some of the necklaces that were on display.  My eyes were stuck on this piece:


I asked Gloria how did she create these pieces and she told me to use Sea Glass.  I wasn't sure what sea glass was or where to get it. She said any big box store would carry them.  That was all I needed to get started. 

Let's take a look:


Delicious aren't they?  I love how the beads look in the trays.  Now do you want to know how to create these?  

Here's how to create these necklaces:

  • Decide which tray you want to use.
  • Add one layer of the Glaze and Glue so that it covers the bottom of the tray.
  • Add one layer of Sea Glass on top of the glue.
  • Let it dry for 2 hours.
  • Once the first layer dries, add another layer of glue on top of the sea glass.
  • Add another layer of sea glass and let it dry for another 2 hours.
  • Once that last layer dries, add one more layer of glue on top of the sea glass.
  • Let it dry completely!
  • Add the charm using a large jump ring.
Amazing right!!  I love how they turned out.  They are solid necklaces. 

Lets take a closer look:


So what do you think?  Would you consider creating necklaces with sea glass? Please let me know below.  I would love to hear from you!!

Just in case you didn't know you can find Craft Fantastic on all of the social media platforms:

Facebook  ~  Instagram  ~  Pinterest  ~  Twitter  ~  Blog


Follow so that you don't miss out on any of the creative ideas, deals and new goodies that appear in the store.

Thank you so much for stopping by!!

Tuesday, August 22, 2017

Dress Up Your Wine Glasses

With school back in session for many of us, I tend to start thinking about the fall, and with the fall comes holidays, and holidays means entertaining! With a kids party a Sharpie on paper cups can work great for identifying which drink belongs to which person, but personally I don't want to use a Sharpie on my wine glasses. So instead, we can use our Craft Fantastic goodies and make something cute and special!

So lets get started. I chose the following to work with: round charm bracelet kit in silver, 24 inch rolo chain in silver,  tiny round link tray kit,  tiny round ornate kit in silver,  butterfly link tray kit in silver,  silver lobster clasps, tiny round glass bling, large silver jump rings, small silver jump rings, bright butterflies all size glass image sheet, typewriter keys mini and small glass size image sheet,  fantastic super sticky dots, and fantastic glaze and glue.

Select your images from the image sheets and use a drop of glaze and glue on the flat side of the jewelers glass, place on your chosen images and hold in place until the glass grabs the image sheet.  Then once dry, use a scissor to trim around the jewelers glass. For bling you do not have any prep. Place fantastic super sticky dot on the chosen tray on the side where you will be adhering your jewelers glass or your bling. Peel off the orange piece and adhere your jewelers glass or your bling to your charm base.

Next you can use a piece of chain measured to approximately 4 inches in length. How long your chain pieces should be depends on how long you want the chain to fit around the glass stem. On one end of the chain attach a lobster claw clasp and on the other end, use a jump ring to attach the tray to the chain. Depending on what size the thickness is of the chain will help you to determine what size jump ring you would like to use.

I am showing you three different types of trays with two different sizes of chain. One of the things I love about this project is that you can decide how you would like to personalize this. In one of the pictures I decided to use an initial for the person's first name, in another you could use matching bling or various colors of bling, or you could go more for a theme, as i am showing using the butterfly trays with different butterfly images. Really you can have a lot of fun customizing this project.


So, what do you think of this project? I would love to see what you come up with. Please leave a comment below and let me know if you like this project!

Hugs,

Judy

Saturday, August 19, 2017

Masculine Gifts: Dog Tags + Key Rings


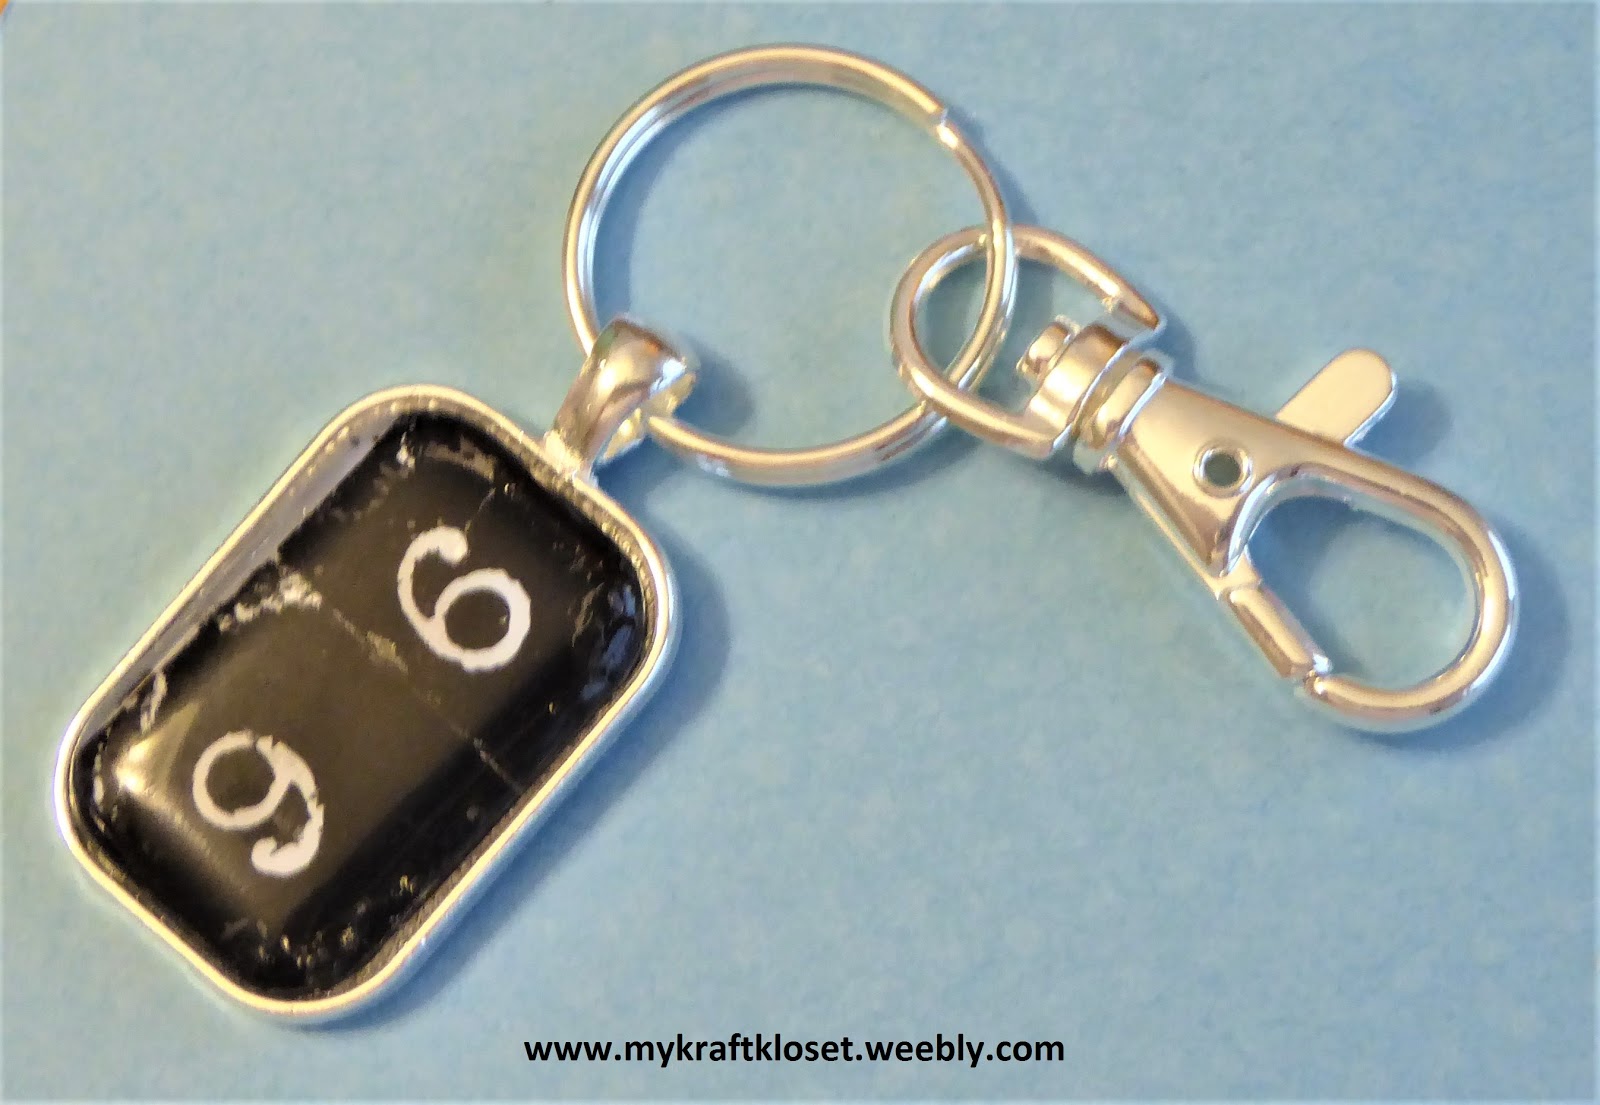
Hi everybody! Kim here from My Kraft Kloset sharing a special gift I made for my husband to commemorate our Wedding Anniversary using these vintage looking products from Craft Fantastic.


Usually it's really hard for me to make anything for my husband, besides just a handmade card and he gets those ALL the time. (lol) But when I came across this fabulous Key Ring Kit and those old time typewriter numbers, I just knew I could make something really cool and special for him.

Let’s get started:


1. Gather up all your supplies from these links: SMALL RECTANGLE PENDANT KIT silver, KEYRINGS W/ CLIPS silver, NUMBERS #2 mini & small glass sizes, Fantastic Glaze & Glue, Fantastic Super Sticky Dots, and Q-tips.


2. Choose your image. I'm using the old time typewriter Numbers. And I used a 1" square punch to punch them out and just trimmed a little bit off the insides to fit inside the tray. And laid them side by side on a scratch piece of white copy paper. (Because they weren't side by side on the image sheet)

3. Next I chose this funky Rectangle Pendant Kit because it reminded me of military dog tags and my husband being a US Army Veteran, I knew he'd love that connection. I added a few Fantastic Glaze & Glue droplets onto the back of a glass rectangle and placed over the images. Move your glass around to position your image, and add a little pressure to get any bubbles out.


4. Pull up around the glass quickly, so it won't stick to the copy paper, and when I did that it created these little tears across the top. Which my first thought was I ruined my project and I'd have to start over. But it turns out they were really cool and rustic. So, I pulled a little around each of the outer edges to create a distressed look. Hold in place for a couple minutes to set and let dry. This created a very unique, rugged, and masculine look.

5. Once set, use a Q-tip to remove any excess glue around the edges of the glass. Cut around the glass and cut out the image. If any of your image comes apart from the glass, just dab a little more glue around the inside edges with a toothpick, press, and hold until it dries.


6. Add a couple Fantastic Super Sticky Dots to the silver rectangle tray, peel off red backing, place glass image into the tray, and press down to secure in place.

7. Put the ring onto the clip (from the kit) and slide the finished "96" image piece onto the ring too. And now it's ready to add keys or even charms. Or take the dog tag off the key ring and add it to a chain and he can wear it as a necklace too! Extra Bonus!


Voila! A personalized handmade key ring that is super special for my husband and your special guy too!

I hope I’ve inspired you to try these wonderful Craft Fantastic products and try a kit or two, because the possibilities are truly endless! Please leave us a comment and let us know what you think, we’d love to hear from you.
Thanks for stopping by!

-Kim Klinkovsky @mykraftkloset