Thursday, May 12, 2016

Chunky Bracelet Chain


We sometimes receive requests to carry a chunkier chain. While we love the dramatic look of a bigger chain, we hesitate to add one to our product line. Primarily because our pendant bails on our basic trays would not easily slide on and off. A large jump ring would accommodate the pendants that contain a flat loop, but our beautiful pendant trays with the lovely pendant bails would not work with them. It would be a crime.

However, now that we're carrying these new charm bracelets, it's easy to create a fresh, chunky chain just by stringing them together! Gather round Crafty Friends, this is going to be a quick tutorial! If you blink, you'll miss it! 

Let's get started...

What You'll Need

Craft Fantastic Charm Bracelets (3 or 4) - It depends on the desired length. I wanted something long and stylish for my samples so I opted for 4.

Pliers

Scissors (not pictured) 


As I said, this is going to be a lightening fast tutorial!


Our new Charm Bracelets have an adorable ball dangle at the end, which makes for a lovely detail on the bracelet, but not so much for our chain. I clipped the dangles off easily using a pair of scissors. 


I've removed the dangles from my bracelets and now I'm ready to string them together.


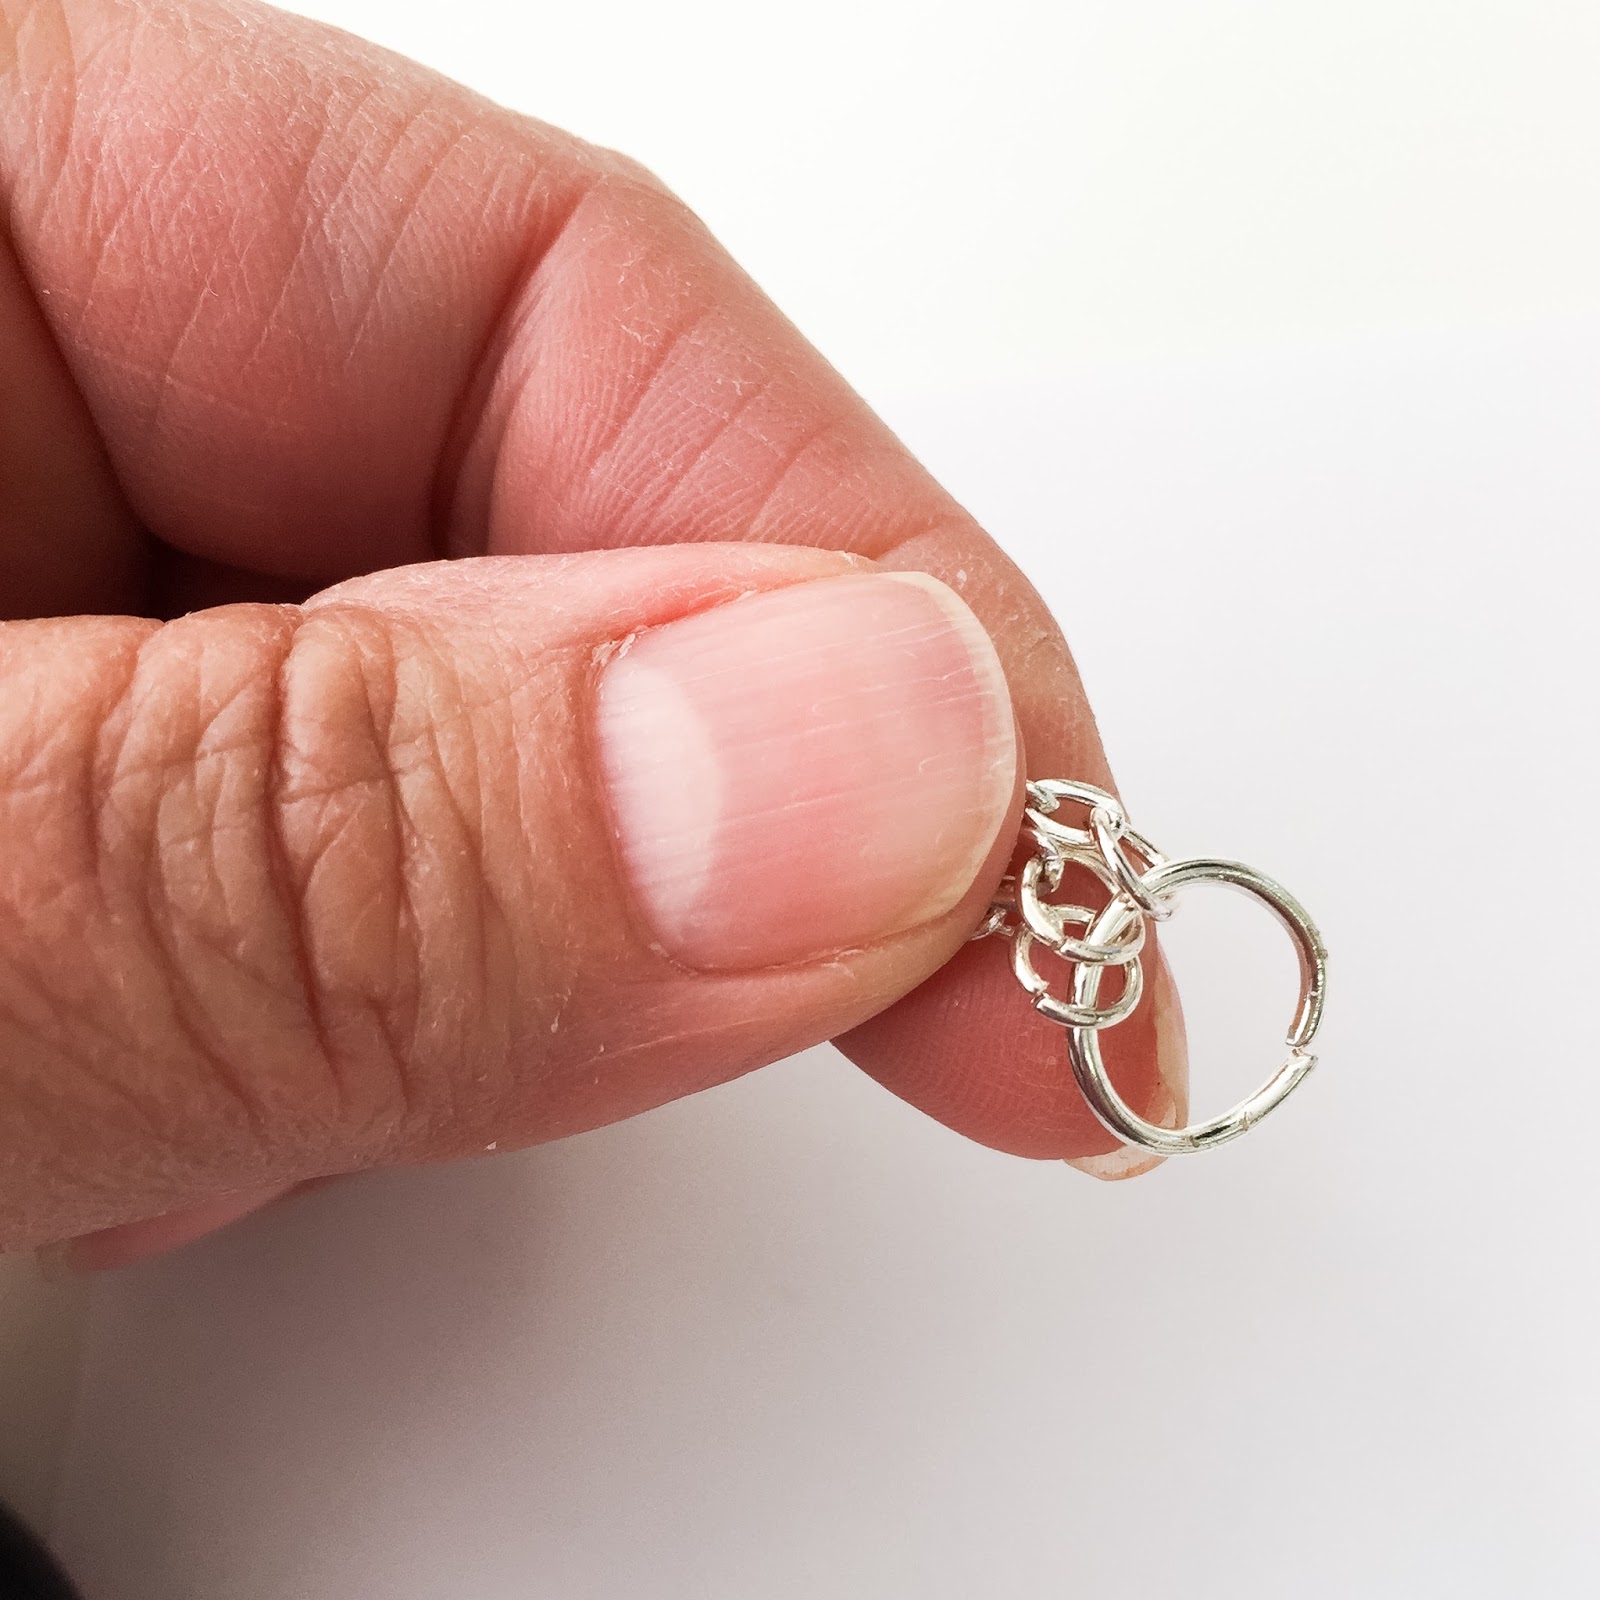
I attach a lobster clasp from one end of a bracelet to the exposed jump ring of another bracelet. I do this with all four bracelets.


VOILA! I like the substance of this chain and I even like the detail of the lobster clasps. They provide an edgy, modern appeal. Plus I have the flexibility of using the bracelets again later as bracelets if I so desire. I could easily remove the lobster clasps and attach them with small jump rings if I wanted to give the chain a cleaner look and I knew I was only going to use it as a necklace. 


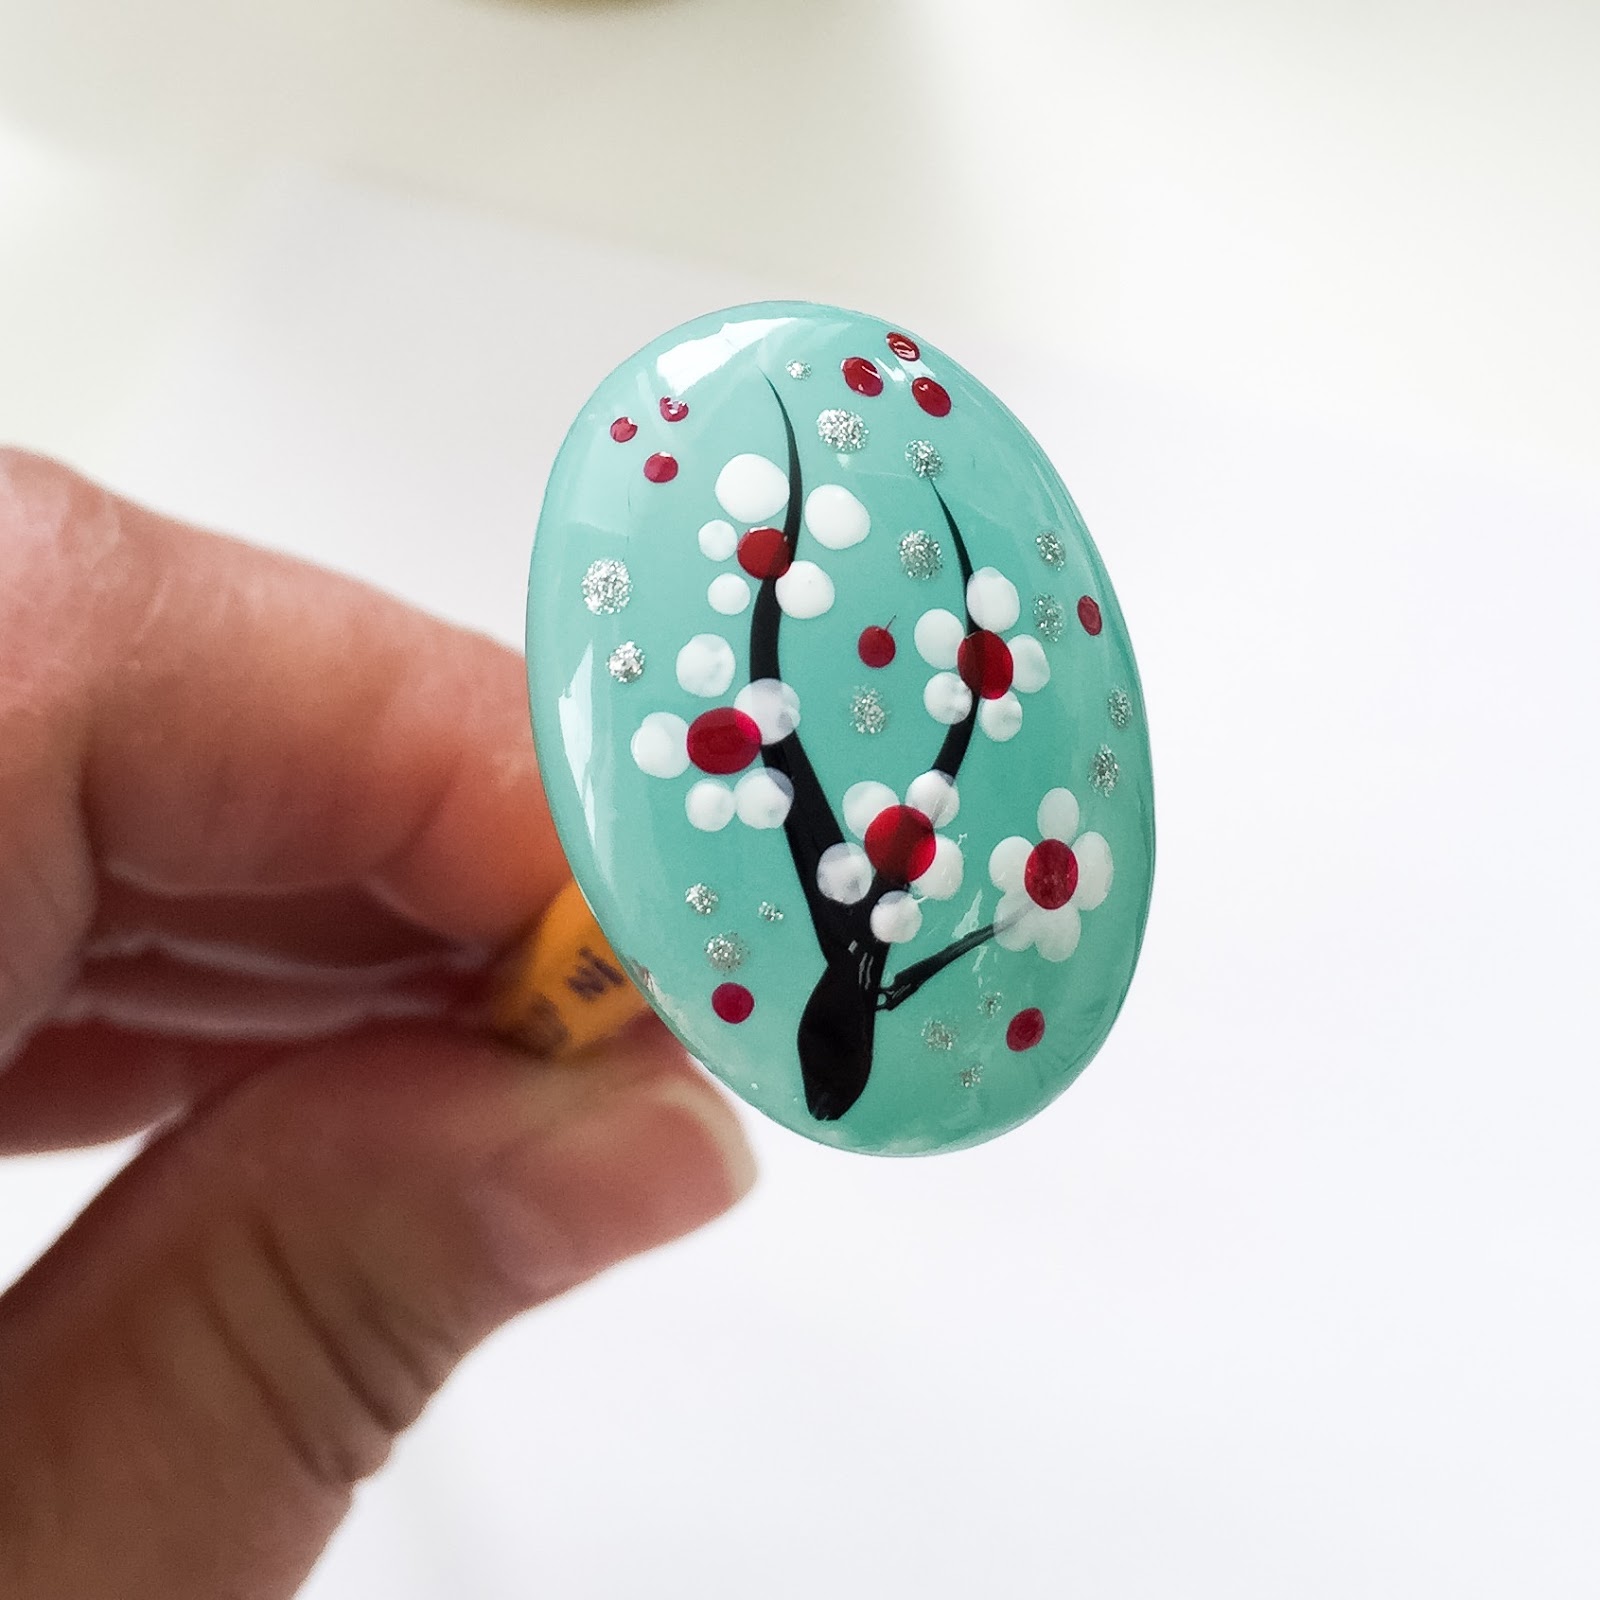
The chain looks pretty great as is and a large jump ring will allow the addition of a tray with a flat loop to slide right on. HOWEVER, for something even more stylish, I added a large jump ring to the small jump ring of one of the bracelets, along with a couple of our fabulous pendant trays and attached the lobster clasp directly to the large jump ring. This creates an elegant long piece (which I adore)!  


Now that is a good looking piece of jewelry! Substantial and rich! The addition of the Extra Large Round Tray and Small Round Tray is perfectly balanced by the chain and doesn't overwhelm it. 


Here's a version in silver using our new Grand Cross. I added a small glass round that I created using the Faux Turquoise Water Marbling Technique I featured in a previous post. This piece really speaks to me as it is reminiscent of New Mexico art, sky, and terrain. The Southwestern style of using silver and turquoise together is sort of our state's notable jewelry collaboration. You can tell I love the Land of Enchantment :) 


A closer look!


Four bracelets strung together create a necklace approximately 32" long, three bracelets create a necklace approximately 26" long. Do you want to wear it long one day and short the next? No problem! Just remove one bracelet! Want to wear one of the bracelets as an actual bracelet? Again, not a problem! I guess you could consider this a truly convertible piece!

I'll be honest. I really love the bohemian look of the longer pieces layered together with shorter pieces. Sort of like the wearer just threw them on with carefree abandon, but the layers come together to create something artsy and original. Now that I'm thinking about it, these longer chunky necklaces would be perfect with our Faux Leather Cords!

I hope you're as excited about this alternate use for the Charm Bracelets as I am! Be sure to follow us on the Craft Fantasic FACEBOOK PAGE, sign up to receive our monthly NEWSLETTER, and subscribe to the BLOG (in the sidebar) so you never miss a post. We frequently host giveaways, share project ideas, feature customer creations, provide product sneak peeks and MORE on all of our social media sites!

See you next time with something new and CRAFTY!


Thursday, April 28, 2016

Custom Painted Spring Cabochon!


It's no secret that I love to play with nail polish in my craft room. The endless color options and the hard glossy finish it leaves behind draws me in like a moth to a flame. Of course, these qualities are meant to give your fingernails a bit of glitz and glamour, but what it does to a Craft Fantastic Glass Cabochon will send your crafty mojo into orbit! I paint it on the back of the glass for a faux dichroic effect, I paint it on the front for a completely different effect, and I swirl it around in water for a faux marble effect. Ironically my nails always look terrible, but my glass cabs look great!  

Let's get started...

What You'll Need

Craft Fantastic Glass Cabochons - use whatever shape or size your crafty heart desires.

Nail Polish - pick your palette. I used dollar store polishes in this project to keep it economical, but you probably have a medicine cabinet full of nail polish bottles just gathering dust. 

Nail Art Polish - I also picked this up from the dollar store in white, black and silver.

Clear Top Coat

Pencils with an Eraser Top

Flat Topped Tac


Stylus


I forgot to take a picture of my supplies, so I'll just jump right into the process. I needed a sturdy way to handle my glass cab so I stuck a flat topped tac into the eraser end of a pencil.


Next I added a jeweler's dot to the top, firmly pressed it into the tac and peeled back the red liner to expose the adhesive.


Then I pressed the back of the glass cab onto the jeweler's dot. This gives me a way to securely paint my cab with the polish without the risk of dropping it or getting fingerprints all over it. 


I started with my base color, this is a light aqua polish and it was pretty sheer, so I needed about three coats to provide opaque coverage. I placed the pencil in a heavy mug and let the cab dry thoroughly between coats.


Time to get creative! I picked up some polish at the dollar store specifically for painting designs on fingernails. This bottle refers to it as Nail Art Paint. It typically comes in a tall narrow bottle and has a long skinny brush. I used this jet black color to create a few simple branches on my cab then I placed my pencil holder and cab into a mug to dry. 


Next, I took Nail Art Paint in white and dabbed it onto the top of another bottle of polish. I needed a flat surface that I could easily dip a stylus into. I stole this idea from watching the ladies at the pedicure places. They know their stuff! A stylus is used in lots of paper crafts for embossing and scoring techniques. I bet you already have one of these in your craft stash.


I dipped the stylus into the white Nail Art Paint and then gently pressed it into to the cab around my branches to create petals for my flowers.


This is already looking pretty great!


I followed the white Nail Art Paint with a few random dots of silver Nail Art Paint. Then I finished my flower centers with dabs of basic red nail polish. I let all of these layers dry and then topped it with a coat of clear Top Coat nail polish. This adds a protective layer and gives it a nice smooth glossy finish.


I added a tray and some findings to create a one of a kind hand painted necklace. Oh my gosh! This was so much fun! I hope you'll try your hand at this technique. If you do, feel free to share pictures on the Craft Fantastic Facebook Page. Also, if you liked this post and want to see what I do next, be sure to sign up in the sidebar to receive blog updates right to your IN BOX

Don't forget to add your email address to subscribe to our monthly NEWSLETTER. It's filled with exclusive specials, freebies, product peeks and oodles of inspiration!

See you next week with something new! 

Wednesday, April 20, 2016

Working with Modular Trays!


Have you been poking around the Craft Fantastic online shop lately? Well, you should because there are LOTS of new items waiting for some crafty attention from talented crafters like you! 

One of my favorites from the new additions are the Modular Trays. They are the most flexible jewelry findings I've ever worked with. The trays are lightweight and low-profile, not adding any bulk to the glass as you're creating your piece. The edge consists of tiny loops that are easily bent to accommodate jump rings and pinch bails, allowing you to link them together or hang small charms and beads from them. My head is swarming with ideas!

Today I'm featuring a fairly simple project using these new trays. I will walk you through the basics, but at the end of the process we'll have a pretty fabby completed piece.

Let's get started...

What You'll Need


Scissors 


Looks pretty similar to the supplies used in other projects, but wait until you see the end results!


The magic is in the loops! This tiny lacy detail allows you to turn them into bracelets, earrings, extravagant necklaces, the list goes on and on. 


I start by adding a jeweler's dot or two to each of my trays. The tiny trays are very petite so a dot cut into quarters does the trick.


I made up my glass pieces earlier using images from the Porcelain Art Image Sheet. I actually used images from two of these sheets so that I could create a symmetrical pattern. Here I've laid out my trays in the configuration of my necklace. I find that it's easier to string the trays together before I add the glass. This allows me to have complete control over which loops I use for the jump rings instead of letting my images dictate the loops used.


I use a pair of pliers to gently bend back one of the loops that will accommodate a small jump ring.


Here I've selected my loops on my large round modular tray and bent them out.


After selected and bending back the loops on each tray, I string them together using small jump rings. 


Next, I add my glass pieces. My necklace is really starting to take shape now.


I remove the clasps and jump rings from each end of my three rolo chains. These jump rings are slightly smaller than the jump rings that I will be using in the rest of my project. It's a small detail, but I like the consistency, so I replace them all. 


I add new small jump rings to the end of each chain.


Then I string one end of each of the three rolo chains onto a large jump ring. I do the same with the other ends of the chains.


Next I attach the large jump ring to one end of my linked modular trays using a small jump ring and do the same on the other end.


I split the center of the backs of the chains using a pair of scissors. This is the point farthest from the modular trays.


I measure out 7" and carefully trim off the excess from the end of each chain. If you want to be more precise, you can count the number of links on each of the chains to ensure they are of equal length. I would normally do this, but today I opted for quickly measuring, cutting, and praying that I got them right. PHEW! Today it worked out, sometimes it doesn't. 


I've trimmed my chains.  I'm almost done! WOO HOO! 


The final step is to add small jump rings to the end of each chain and string them onto a large jump ring. On one end I attach one of the lobster clasps that I removed earlier, with a small jump ring. Now I'm all done and ready to show off the finished piece!  


Pretty swanky! This would make for a lovely Mother's Day gift!


I left the remaining loops standing straight up on each tray and I have to say that I prefer it this way.


If you like a tighter finish, gently bend each loop over the glass, as I've done for this photo. It's really just a matter of preference. 


Did you like today's project? I hope it inspires you to take these fabulous trays for a spin and see where your inner creative tour guide leads you. They're very easy to work with, yet they allow you the freedom to have fun and think outside the (jewelry) box. Share pictures of your designs with me on the Craft Fantastic Facebook page. I love to see what you're working on!

Like this post? Sign up in the side bar to receive blog updates right to your IN BOX and you'll never miss out on the projects and techniques I share each week.

Need even MORE Craft Fantastic news? Sign up for our MONTHLY NEWSLETTER and you'll be part of the VIP crowd. Receive special offers and freebies only available to our newsletter subscribers!

See you next time with something NEW!

Tuesday, April 5, 2016

Tiered Connector Necklace


I'm back this week with another project featuring our glorious line of connectors. Last week's project was just the tip of the creative iceberg. I was so inspired to use these sweet connectors again that I decided to create a piece that really showcases their beauty and versatility. 

The result? A drop tiered necklace with layers of connectors linked together to create unique strands. My necklace has a nature theme as I chose the long rose, mini bird and branch connectors to work with. A small round pendant tray serves as the centerpiece. Imagine how easy this piece would be to customize for a special recipient. 

Let's get started...

What You'll Need

30" Craft Fantastic Rolo Chains (2) - One serves as my necklace base and the other provides the extra chain I'll need to create my additional strands. I'm sure 2 24" Rolo Chains would work just as well since we are cutting them up.  


Pliers (2)

Not Pictured:


This project takes more time than last week's simple pendant piece, but the results are dramatic and unique. If you wear this piece out, prepare to be showered with accolades! 


First, hold the chain by the clasp and cut the chain in the center (the opposite end of the clasp) with a pair of scissors. Do not use your fancy schmancy scissors for this endeavor. You can see how beat up the pair I'm using are. These are the dollar store variety and they will end up in the garbage once I have drained them of their usefulness. 


Trim each end to 7 1/2". You're still working on the end opposite from the clasp.


Attached a small jump ring to each of the loose ends of chain.


Attach a large jump ring to each of the small jump rings. 


Now assemble this strand. To the large jump ring add the following...

small jump ring
mini bird connector
small jump ring
1/2" length of chain (4 links)
small jump ring
branch connector
small jump ring
1/2" length of chain (4 links)
small jump ring
mini bird connector
small jump ring
1'2" length of chain (4 links)
small jump ring
branch connector
small jump ring
1/2" length of chain (4 links)
small jump ring 
mini bird connector
small jump ring

Connect this end to the large jump ring. You're almost there! Only 2 more strands to go!


Now assemble the next strand. To the large jump ring attach the following...

small jump ring
3/4" length of chain (6 links)
small jump ring
long rose connector
small jump ring
1/4" length of chain (2 links)
small jump ring
long rose connector
small jump ring
1/4" length of chain (2 links)
small jump ring
long rose connector
small jump ring
1/4" length of chain (2 links)
small jump ring
3/4" length of chain (6 links)
small jump ring

Connect this end to the other large jump ring. Only 1 more strand to go!


The last stand is pretty simple. To the large jump ring attach the following...

small jump ring
1 1/2" length of chain (14 links)
small jump ring
large jump ring
small round pendant tray (with glass)
small jump ring
1 1/2" length of chain (14 links)
small jump rings

Connect this end to the other larger jump ring. Voila! You're finished!


Behold your fabulous creation!


Pretty swanky!


Well, that was fun! Imagine this beautiful piece displayed in the open neckline of a crisp, white shirt with the collar turned up. I may have to run out and buy one to add to my wardrobe!

If you enjoyed today's tutorial be sure to sign up in the side bar to receive blog updates delivered right to your Inbox! Also, follow Craft Fantastic on Facebook for LOTS of giveaways, product peaks, and inspiration. And finally, be sure to subscribe to our monthly newsletter! There are LOTS of ways to keep up with us and you don't want to miss out on any of them!

See you next week with something new.