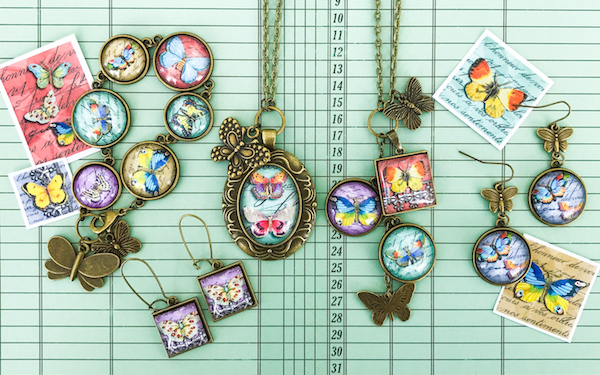
There are so many things to love about this month's kit! Whimsical FLAPPERS and TINY ALPHABET #1 Image Sheets provide tons of creative options! As a BONUS, we're throwing in the COLLAGE WORDS sheet, too! Beautiful Glass Bling and Retro Charms create an artsy, bohemian look that will add eclectic style to any wardrobe!
Let's put these fabulous pieces together...
Assembly Instructions
Click HERE to order yours today!
Here's a few links to help you complete the projects followed by a few
assembly instructions for each piece:


- Select images and add them to the glass cabochons using Fantastic Glaze & Glue.
- Remove the Lobster Clasp and Jump Ring from the 30" Rolo Chain and cut off a 5-link strand for use on the Swallow Dangle.
- To each exposed end of the Rolo Chain, add a small jump ring. To each small jump ring, add a large jump ring and clip both ends through the Key Clip.
- MONOGRAM DANGLE: Using pliers, attach the Tiny Round Ornate Tray to the Swivel Loop of the Key Clip with a Large Jump Ring.
- SWALLOW DANGLE: Attach a Small Jump Ring to one end of the 5 link strand you cut from the Rolo Chain. Attach the strand to the Swivel Loop of the Key Clip using a Large Jump Ring. Bend back the top and bottom loops of a Tiny Round Modular Tray and attach it to the bottom of the strand using a Small Jump Ring. Attach the Swallow Connector to the bottom of the tray using a Small Jump Ring. Bend back the top loop of the remaining Tiny Round Modular Tray and attach it to the bottom of the Swallow Connector using a Small Jump Ring.
- IMAGE DANGLE: Attach the Small Round Classic Link Tray to the Swivel Loop of the Key Clip using a Large Jump Ring. Attach the Mini Round Twist Link Tray to the bottom link of the Classic Tray using a Small Jump Ring. Attach the Mexi-Rose Charm to the bottom link of the Twist Tray using a Small Jump Ring.
- GLASS BLING DANGLE: Attach the remaining Mini Round Twist Link Tray to the Swivel Loop of the Key Clip using a Large Jump Ring. Attach the Wing Charm to the bottom link of the Twist Tray using a Small Jump Ring.
- Add a Fantastic Sticky Dot to each tray. Use 1/4 dot in the tiny trays. Remove the red backing to expose the adhesive.
- Firmly press the appropriate cabochons and glass bling into the trays.

- Select an image and add it to the glass cabochon using Fantastic Glaze & Glue.
- Using a jump ring, add the Grand Rose Charm to the 24" Classic Chain.
- Slide the Dewdrop Tray onto the 24" Classic Chain.
- Add a Fantastic Sticky Dot to the Dewdrop tray. Remove the red backing to expose the adhesive.
- Firmly press the cabochon into the tray.

- Select an image and add it to the glass cabochon using Fantastic Glaze & Glue.
- Using a jump ring, add the Fan Charm to the 24" Rolo Chain.
- Slide the Pleat Tray onto the 24" Rolo Chain.
- Add two Fantastic Sticky Dots to the tray. Remove the red backing to expose the adhesive.
- Firmly press the cabochon into the tray.

- Select images and add them to the glass cabochons using Fantastic Glaze & Glue.
- Using pliers open the loop to each French Earwire and attach the Tiny Round Ornate Tray to each wire, closing the loop with pliers.
- Cut a Fantastic Sticky Dot into quarters and attach to each Tiny Round Ornate Tray. Remove the red backing to expose the adhesive.
- Firmly press the appropriate cabochons into the trays.

- Select images and add them to the glass cabochons using Fantastic Glaze & Glue.
- Unscrew the ball to the Slide Bangle Bracelet and thread on the Mini and Small Square Pendant Trays.
- Add a Fantastic Sticky Dot to each tray. Remove the red backing to expose the adhesive.
- Firmly press the appropriate cabochons into the trays.

- Select images and add them to the glass cabochons using Fantastic Glaze & Glue.
- Unscrew the ball to the Slide Bangle Bracelet and thread on the Mini and Small Round Pendant Trays.
- Add a Fantastic Sticky Dot to each tray. Remove the red backing to expose the adhesive.
- Firmly press the appropriate cabochon and Glass Bling into the trays.
We hope you have fun putting together the MARCH Kit-of-the-Month! Be sure to follow Craft Fantasic on FACEBOOK and INSTAGRAM! Also, sign up for the CRAFT FANTASTIC NEWSLETTER for the latest and greatest sales, giveaways and product peeks!
See you soon with more crafty stuff!