
I missed a blogpost last week because I was on vacation, but I am back and raring to go!
I have received a few questions asking how I take photos for our Facebook page and the blog using only the camera on my iPhone. I have a few tricks up my sleeve, so I thought I would share them with you. The cameras on phones nowadays take amazing photos, in fact, I didn't even take my regular camera with me on vacation this time. Instead I opted to use only my iPhone and ended up taking 100s of great shots. Plus my phone is with me all the time, which means my favorite photos are with me all the time, as well. So convenient when I want to share a photo on Facebook or just sort of peruse my photo library and reflect on what was happening when I snapped that pic. It's like my own, personal, high tech scrapbook.
In this tutorial, I'm going to share the exact steps I use to take the photos you see here on the blog and on our Facebook page. Photos used on our website are a little different process.
Let's start with the basics...
Tools - I have an iPhone6, but I'm sure if you have an Android the process would be similar. The iPhone6 takes pretty good pics compared to previous versions. It also comes with a photo editor, but I loaded the free Photoshop App called PS Express and let me tell you, it is top notch. So many editing features right at your fingertips. I use it for ALL of my photo editing. You can pay to upgrade it so that you have access to even more editing options, but the free version has everything I need. If you want to read more about PS Express click HERE to go to their site. Here's a silly little tip for you, occasionally wipe off the outside of your phone's camera lens with a clean cloth or your shirt tail. You would be surprised at how easy it is to get finger smudges on it.
Let me demonstrate the magic of PS Express with one of my vacation pics...
 |
| My unedited pic. Looks like it can't be saved, doesn't it? |
 |
| This is after I selected the "auto" edit function and let the app adjust everything for me. Not too shabby. |
Lighting - Craft Fantastic headquarters has lots of windows that are situated towards the top of a high ceiling, so there is an abundance of natural light throughout the day. You might think this would create harsh, bright light, but we have simple white muslin window coverings on some of them and the light, as result, is soft and muted. I NEVER use the flash. It creates hot spots and can ruin an otherwise good picture. If the light is not good and I cannot take the picture at a brighter time of day, I will take my chances with the low light and try to correct it in PS Express.
Backgrounds - I like to use a patterned background that picks up some of the colors in my project. I try to opt for backgrounds that are not overly busy, bold or bright, as I don't want my project to compete as the focal point. Sometimes I use white or black, but it can be tricky to maintain consistency if you're creating a series of photos. In our workspace, I have an abundance of textile and swatch books available to me. I love to grab one of these books, flip through it and find something great to offset my piece.
 |
| A stack of books I frequently use for backgrounds. |
 |
| I like to flip through one of these books, find something complementary to my piece, and snap a pic. This is an unedited photo. |
 |
| Here it is after I rotated, cropped, and edited it. Looks pretty good! |
When I take pictures of a project, I try to take multiples and then pick the best one to edit. Let's edit the photo below together. This is my unedited pic of a square link bracelet I made using some of the glitter cabs for a previous tutorial. I decided to photograph it against an image of an old french document. Love that background with these Paris themed cabs. I snapped this pic in natural daylight (NO flash), using my iPhone.
 |
| My "before" pic. |
I've posted screenshots of every step and circled important items in red. Here's a screenshot of the PS Express icon on my phone. Oh, by the way, I'm a big Walking Dead fan. ;)

The next screen asks where I want to pull my photo from. Here I've already taken the picture and need to access it from my Camera Roll.

The magic wand icon is an "auto" edit meaning that if you select that, it will adjust the settings as the app thinks is best. Sometimes this works great and doesn't require anymore editing, but most of the time it still needs some tweaking. We're going to bypass the "auto" edit this time.

Let's start by cropping our photo. We'll go to the Crop button at the bottom of the screen. This will pull up options to custom crop or select one of the crop shapes already available. I usually opt for one of three cropped shapes...square, a 5"x7" rectangle or a 7"x5" rectangle. This way I don't need to think too hard about cropping. For this sample I selected a 5"x7" rectangle.

The app pulls up my requested shape and now I can drag the corners in to get rid of any excess outside space and focus more on my featured project. I can also place my finger in the center and move the rectangle around my image.

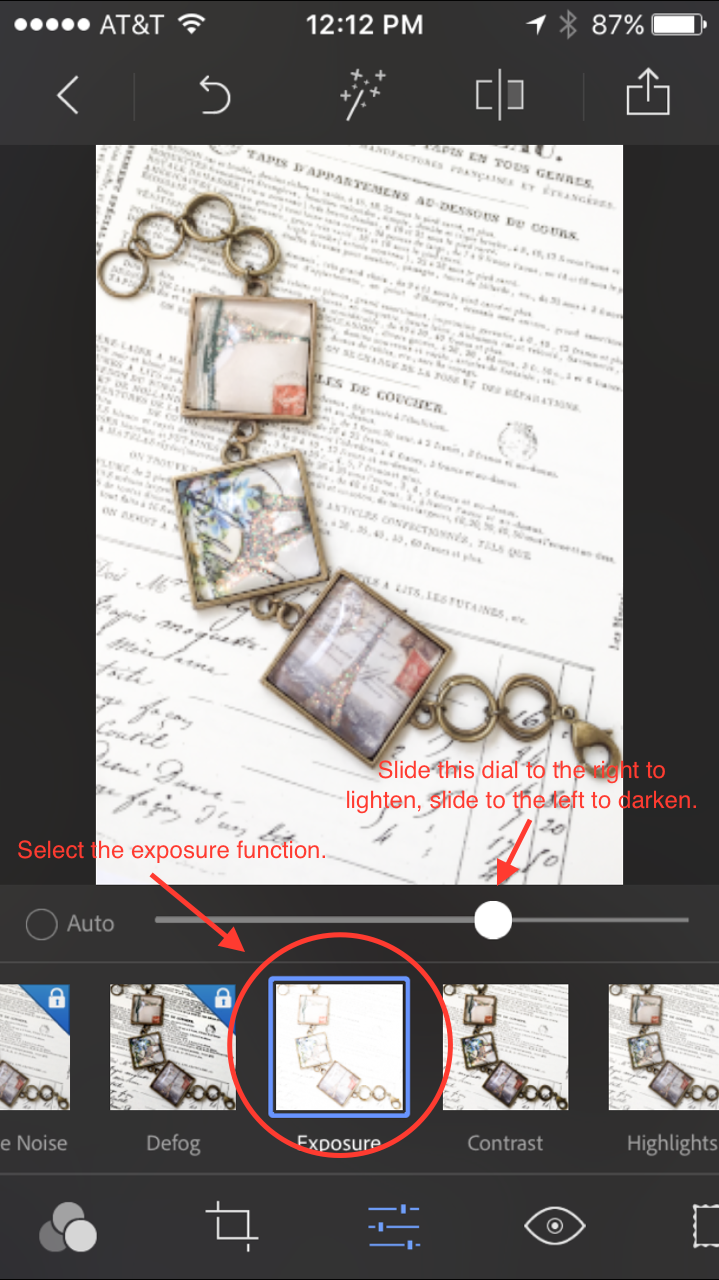
I've cropped my photo and now I select the Edit function. Here is where the magic happens. The Edit function will pull up a plethora of edit options including Clarity, Sharpen, Exposure, Contrast, Highlights, Shadows, etc. There are a few more options that require additional purchases, but I don't really need them.

The first edit I make is Exposure. You can select the auto dial and the app will do what it thinks is best, but I prefer to do it myself. The pic below indicates what the Auto exposure looks like.

Instead I opt to slide the white dial to the right just a hair and it brightens the image significantly. I think that looks much better.
Next, I adjust the Contrast. Sometimes over exposing a picture causes everything in it to get too light, so I adjust the Contrast by sliding the white dial to the right and creating more of a contrast between my light background and my bracelet. This makes the bracelet stand out a bit more.

My next and final edit is the Vibrance. I don't want my image to appear too washed out which can happen when I adjust the exposure, so I move the white dial to the right to slightly amp up my colors. To me this looks more like what I see in real life when looking at the bracelet.

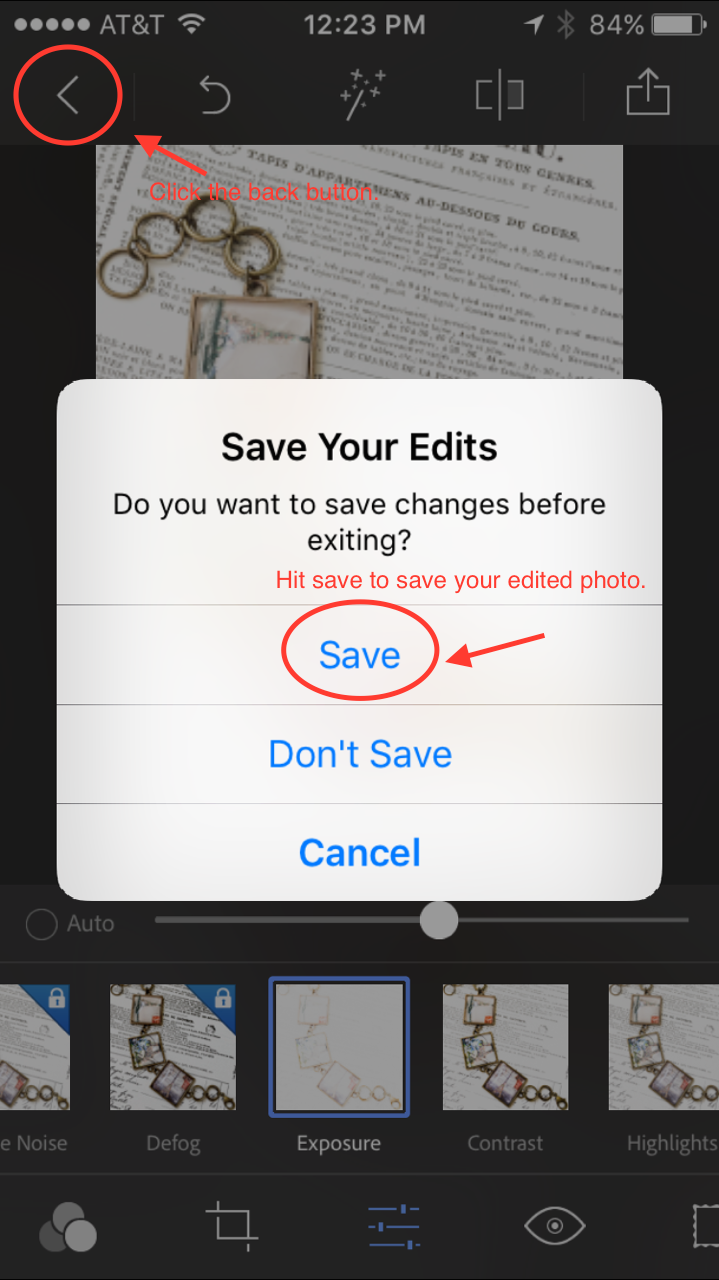
After I complete all of my edits, I hit the back arrow in the upper lefthand corner and it brings up the save screen. I click Save and voila! I'm done! The picture is saved in my Camera Roll and it shows up as my most recent photo so there's no need to go digging around for it. This is particularly useful if your Camera Roll contains 1,000s of photos like mine does. I'm a picture hoarder.
Let's compare, here is the unedited photo.

And here is the edited photo. Looks pretty good and it really only took a couple of minutes to snap the pic, crop and edit it. Once that's done, I air drop it onto my computer desktop and then I can load it to Facebook or the blog. Easy, peasy!

Next time you need a quick pic, reach for your phone, do a quick edit and share that wonderful photo with the world. Thanks for stopping by today! Be sure to check in next week for something new. Also, check out our Facebook page for the most up to date Craft Fantastic information regarding giveaways, projects and new products. In fact, I'm running a giveaway over there right now and some lucky person is going to win a $50 gift certificate to spend in our online store. Head over there now to check it out!
Thank you so much for the tutorial I requested, and for the "Thank You" gift! Jan
ReplyDeleteYou are so welcome, Jan! :)
DeleteI can't seem to "Pin" this for future reference. Is there some way to do this?
ReplyDeleteJan, Do you follow Craft Fantastic on Pinterest? I will pin this post to our Pinterest page and you can pin it from there or to pin directly from this post, just scroll over one of the photos, the Pin It button will flash in the top corner of the photo and you can pin it that way. Let me know if you have any trouble or if it's not working correctly. Thanks! Cheryl
DeleteCanon is driven by innovation and aligned with its corporate tagline - 'Delighting You Always,' and is committed to delivering customer delight by offering an extensive product portfolio that includes Copier MFDs, Managed Document Services, Fax-Machines, Printers, and Document Solutions.So follow this to know canon printer setup
ReplyDelete