

It's back to the basics this week on the blog. Today I'll show you step by step how to apply our Art Images to the back of a glass cabochon and then turn that simple cab into a pendant. I know many of you have been using Craft Fantastic products for a long time, so this post will just be a refresher for you. We have, however, lots of new folks who have joined the Craft Fantastic family as of late, so I thought it would be great to have a basic tutorial for this process as a reference on the blog.
Our entire line of products centers around our crystal clear glass cabs. They exquisitely showcase family photos, art, decorative papers, ephemera, collage elements, and of course, our Craft Fantastic Art Images. Once a photo or an image has been applied to the glass, they become the heart of the jewelry pieces created with them turning them into wearable pieces of art or portable memories.
Let's get started...
What You'll Need
Assorted Craft Fantastic Glass Cabochons - We carry them in an array of shapes and sizes, from big and bold to sweet and petite.
Assorted Craft Fantastic Art Images - Interested in using a scanned photo instead? Visit this link where I answer all of your questions about printing your photos at home.
Cotton Swabs
Scissors

Today I'm making six pendants, which should take me about 30 minutes total. At the end of this process I will have six completed projects that will make wonderful stocking stuffers, hostess gifts, or impromptu presents for that person I may have inadvertently forgot to add to my Christmas list. Don't laugh, it happens to me every year.

I'll start with my Large Glass Oval.
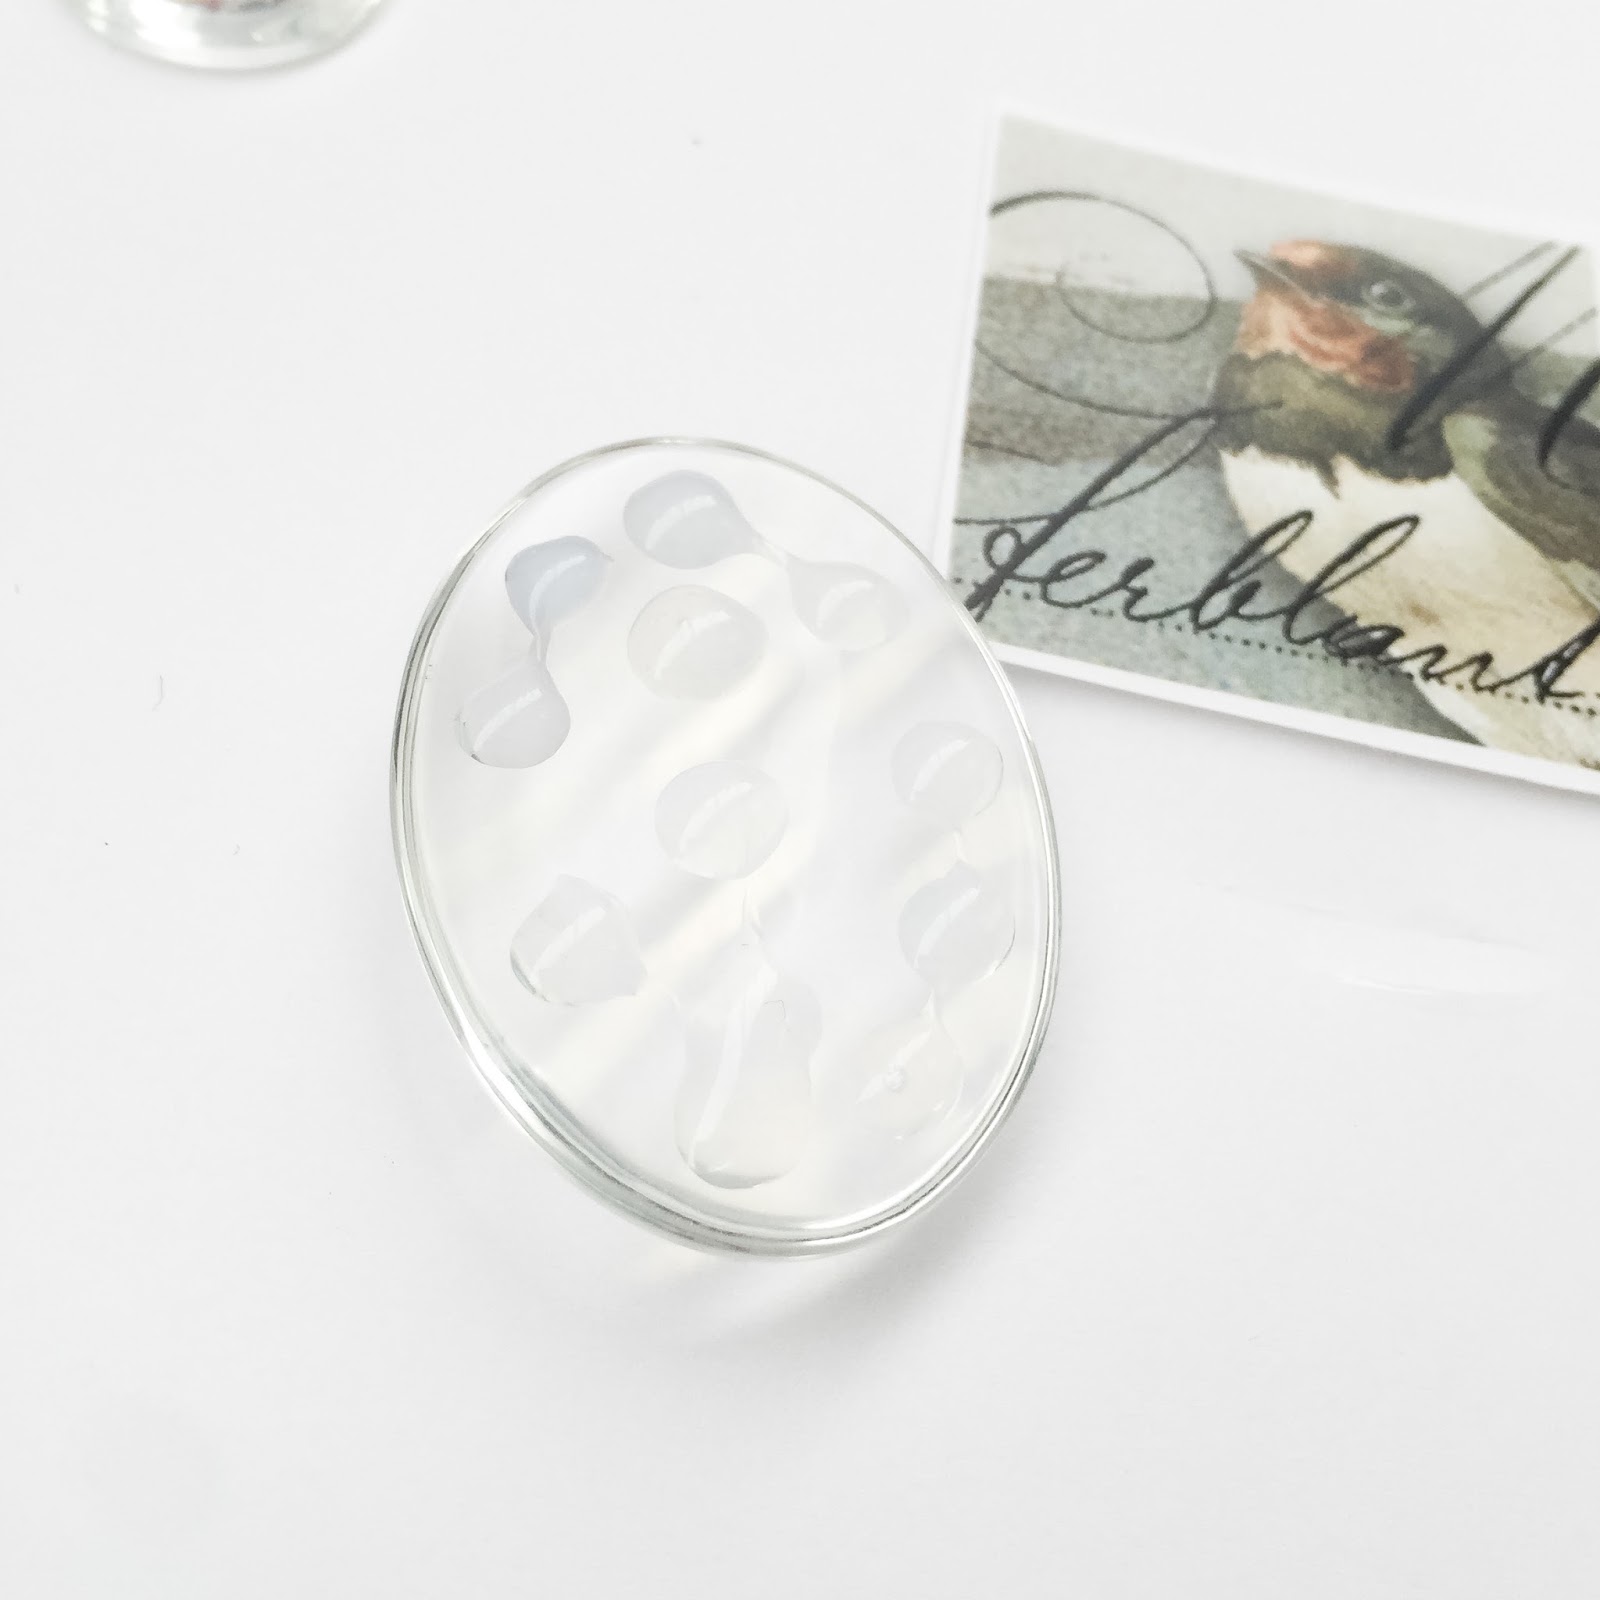
Working on the flat side of the glass, I apply several dollops of the Fantastic Glaze & Glue. This is one of our largest pieces of glass so I make sure to add a couple of dollops to the middle and then all around the edges. Too much glue can be wiped away, but too little glue is really hard to fix once the glass is applied to the image.

I lay the glass oval glue side down on top of my image and press it firmly to force any air bubbles out to the sides. Glue should ooze slightly outside of the edges. I try not to move the glass too much after I lay it on my image. I hold it in place until I feel it sort of "grab" the paper. This only takes a minute.

Once I'm confident that the glass is firmly in place, I use a cotton swab to wipe away the excess glue from around the edges.

I've glued all of my glass pieces in place. I wasn't paying attention and the small round glass cab on top of the "v" drifted off to the side, so I had to re-make that one. Oops. Don't tell ;)

Next, I trim away all of the excess paper from my glass pieces by cutting right up next to the edge with my scissors. These are just inexpensive scissors that that I'm not emotionally attached to as they are going to get a bit gunky after awhile and will eventually end up in the trash. So keep those expensive fabric scissors tucked away and hide your fancy paper scissors, because you will not need them for this process.

I place Fantastic Glue Dots into the trays using one dot for medium and smaller trays and two dots for larger trays. I place the dot into the tray, remove the red backing to expose the adhesive and press the glass piece firmly into it to form a strong bond between the tray and the glass. If I apply the glue dot to the back of the glass and then press it into the tray, I won't create that bond and eventually my glass piece will fall out. No mi gusto.

Here are my six trays finished and ready for chain to finish them off. The pendant bail means that I can just slip a chain through the loop and they're ready to wear. No need to add a separate jump ring or pinch bail. How easy is that?

Here are my completed pendants ready to give or to wear.


How about a photo? Type of paper? Thx!
ReplyDeleteHi Ramona! Here's a link to a post I wrote about printing images at home. I answer questions about paper, ink, etc. http://craftfantastic.blogspot.com/2015/09/printing-photos-and-images-at-home.html Thanks so much for your comment :) Cheryl
DeleteHi! Do these have to be cured before putting in the trays? Or can I do it right away and then leave them alone for a day or two after in the tray.
ReplyDeletethank you so much for the tutorial!
ReplyDeleteWill the glaze/glue work to adhere the glass into the tray?
ReplyDeleteHi Tina! The Glaze & Glue will not work to adhere the glass into the tray. The strongest bond for that task is using one of our Fantastic Jeweler's Dots. They are high tack and very strong. Thanks for your question!
ReplyDeleteCan you use scrapbooking paper? If so, does it have to be a particular weight? Thanks
ReplyDeleteHi! I visited your booth and bought some supplies from you at the quilt show in Dallas last year. QUESTION: How long to I need to wait, to let the cabochon dry before cutting the paper around it?
ReplyDeleteAlso, how to remove a cabochon from a tray. I realized after assembling that my ink faded throught the image with the glue...
ReplyDeleteAs I look at the glass cab., with the bird in the demo, I do see the dolops of glue all in the glass, but here is where I get lost...do I press the picture down into the glue and make it conform to the shape of the cab, if so , since the cab is concave and the picture flat how do I avoid wrinkling? A little confused...If I'm to only glue the edge then why the glue inside the cab.I must be missing something, lol
ReplyDeleteI finally get it...cabs. are flat on back.
DeleteI print my images at home with an older Canon printer for photos and never have an issue with image smearing. my problem is that the glue puddles or something so the image isn't clear. Is it because I'm using too much glue or not enough? Thanks!!
ReplyDeleteHave you ever used fabric for your image sources?
ReplyDeleteThere are various of other logo configuration administrations, who offer extraordinary administrations with truly reasonable charge. However, to locate the one you have to look through a ton. logo design service
ReplyDeleteActually I read it yesterday but I had some thoughts about it and today I wanted to read it again because it is very well written
ReplyDeletemcafee.com/activate | canon printer support | sony printer support | samsung printer support | brother printer support | dell printer support
I am really very satisfied and feeling amazingly good by find this site.i heartily thank You for this fantastic post.
ReplyDeleteaccounting software support
I am really very satisfied and feeling amazingly good by find this site.i heartily thank You for this fantastic post.
ReplyDeleteaccounting software support
Really very appreciable and enthusiastic post please keep sharing. we are waiting for more such posts. quickbooks support
ReplyDeleteThis comment has been removed by the author.
ReplyDeletewebmail sign-in issue
ReplyDeleteiHelper is an acknowledged technical assistance provider that is home to cultivated technology experts who work around the clock to provide tech users with needful assistance for their technical glitches related to tech gadgets, digital devices, and digital platforms.
NIce article
ReplyDeleteshibabrata Bhaumik
Thanks for sharing this great post.
ReplyDeletebdsm stories
Simply wish to say your article is as astonishing. The clarity in your post is simply great, and I could assume you are an expert on this subject. Same as your blog i found another one Sohman Epoxy .Actually I was looking for the same information on internet for
ReplyDeleteHSC 1100 and came across your blog. I am impressed by the information that you have on this blog. Thanks a million and please keep up the gratifying work.
This is really a great piece of content, thanks for sharing.
ReplyDeletestudytonight
Good day. I was impressed with your article. Thanks for sharing.
ReplyDeleteCreate your own Acrylic Print
Custom Acrylic Wall Art
Thanks for giving us precise knowledge of window replacement. When replacing your windows, it isn't necessary to choose the best materials and hire the best window replacement professionals. I got my window replaced from Window installation Vancouver. I'm impressed by their services.
ReplyDeleteCommercial glass repair Vancouver
Window installation Vancouver
Applying an image to a glass cabochon involves a process of carefully adhering the image onto the flat side of the cabochon Commercial concrete using a suitable adhesive. This creates a beautiful and personalized piece of jewelry or ornamentation
ReplyDeleteIn my area, I found a contractor contractors near me who specializes in applying images to glass cabochons. They're skilled and reliable, ensuring a seamless and visually appealing result.
ReplyDeleteUsing an image on a glass Pressure Wash Services South Carolina cabochon is a creative way to personalize your jewelry pieces! As for pressure wash services in North Carolina, they can greatly enhance the curb appeal and cleanliness of residential and commercial properties.
ReplyDeleteBack to the Basics: Applying an Image to a Glass Cabochon" and crypto may seem unrelated at first, but both involve careful crafting and attention to detail. Just like applying an image to a glass cabochon requires eth price precision, creativity, and patience, the world of cryptocurrency also demands a meticulous approach. In crypto, understanding how transactions work and securely managing assets, such as through wallets, is a form of craftsmanship in its own right. Both involve unique tools and methods, making each an art in its respective field.
ReplyDeleteCreating custom glass cabochons by applying images is an artistic process that allows for personalized designs, similar to how cryptocurrency enables customized financial experiences. Just as a glass cabochon can btcz price encapsulate a unique image under its clear surface, cryptocurrency can encapsulate value in a secure, transparent way. Both processes involve attention to detail, creativity, and a sense of ownership over what is created, whether it be a physical piece of art or a digital asset.
ReplyDeleteDoor glass replacement and tree services may seem unrelated at first, but they can be interconnected in certain scenarios. For example, a tree near your home can become a potential risk to your property, especially tree pruning nassau county ny during storms or high winds. Falling branches or an unstable tree can damage windows, doors, or even the structure of the house. Therefore, proper tree maintenance and timely tree services can help prevent such accidents, thereby reducing the need for door glass replacement. In essence, proactive tree care can save on costly repairs and keep your home safe and secure.
ReplyDeleteCool crafts
ReplyDeletehosting mode is off quickbooks desktop
ReplyDeleteThis Kickstarter campaign supports an exciting independent sci-fi action feature film that champions creativity and small businesses. By backing this project, you’re not only fueling the vision of passionate filmmakers but also empowering local artists and entrepreneurs involved in production. This thrilling film promises Disabled women a unique, high-energy narrative crafted outside the studio system, and your support helps bring it to life. Join the movement—support indie cinema, uplift small creators, and be part of something original. Comment: Downloading this film once released is more than just entertainment—it's a statement of support for indie filmmakers and small business collaboration
ReplyDeleteIeškote patikimos ir įdomios lošimų patirties? Užsienio kazino Lietuvoje siūlo platų žaidimų pasirinkimą, generuojančią premijų sistemą ir saugią aplinką. Čia galite mėgautis populiariausiais lošimo automatais, stalo žaidimais ir gyvais kazino žaidimais tiesiai iš savo namų. Užsienio kazino Lietuvoje užtikrina greitus išmokėjimus, patikimą klientų aptarnavimą ir įvairias lojalumo programas. Tai puiki vieta naujiems ir patyrusiems žaidėjams, siekiantiems kokybiškos ir saugios pramogos internetu.
ReplyDeleteWe provide high-quality Perkins parts, Volvo Penta parts, Yanmar parts, and essential engine parts for reliable performance and durability. Our range ensures smooth operation for all types of engines, whether for marine, industrial, or agricultural use. With genuine components and expert support, maintenance becomes hassle-free, extending engine life and efficiency. Trust our premium parts to keep your machinery running at its best, reducing downtime and enhancing overall productivity with every replacement or repair.
ReplyDeleteDiscover premium human hair wigs for alopecia designed to restore confidence with comfort and style. Our realistic hairline wigs provide a natural look, while glueless wigs UK ensure easy, secure wear without fuss. Perfectly crafted for those seeking elegance and convenience, our alopecia wigs UK collection offers versatility and quality. Explore our range of wigs for alopecia UK and enjoy soft, durable, and lifelike hair solutions that enhance your appearance and boost self-esteem every day.
ReplyDeleteHip brace and ankle brace for nerve damage products are designed to provide stability, pain relief, and improved mobility during daily activities and recovery. A plus size knee brace that doesn't slide down offers secure support and comfortable fit for extended wear. Fivali back brace and Fivali back brace reviews often highlight posture correction and lower back relief benefits. These supportive braces help reduce strain, protect joints, and enhance confidence in movement for users needing reliable orthopedic support.
ReplyDeleteLooking for quality ATVs for sale? Explore our wide range of kids and youth ATVs, perfect for young riders seeking adventure safely. We also offer durable 4-wheelers for sale suitable for beginners and experienced riders alike. Each vehicle is built for performance, safety, and fun, ensuring a thrilling outdoor experience. Whether it’s for family recreation or competitive riding, our selection of ATVs provides reliability, excitement, and value. Find your perfect ride today!
ReplyDeleteLooking for reliable wholesale supplements? Our network of trusted wholesale supplements distributors ensures high-quality products at competitive prices. We connect businesses with top supplement wholesale suppliers offering a wide range of vitamins, minerals, and fitness products. Whether you’re a retailer, gym, or health store, our distributors provide consistent supply, excellent customer service, and flexible ordering options. Partnering with reputable wholesale suppliers makes scaling your business easier, ensuring your customers receive premium supplements every time.
ReplyDeleteDiscover the power of générateur vidéo AI to effortlessly create stunning videos. With advanced tools, you can transform image en vidéo AI, turning static images into dynamic, lifelike animations. Perfect for content creators, marketers, and innovators, this AI-driven technology simplifies video production, saving time while enhancing creativity. Whether for social media, presentations, or personal projects, this solution allows you to generate high-quality videos from images with ease, making every visual idea come alive in seconds.
ReplyDeleteLooking for a way to make AI-generated text sound natural? Humanizador Catalan is your ultimate tool to переписать текст ИИ на человеческий, transforming robotic content into smooth, readable, human-like language. Perfect for writers, translators, and content creators, this tool ensures clarity, flow, and authenticity in every sentence. Whether you need articles, essays, or social media posts, Humanizador Catalan helps you produce text that resonates with real readers, maintaining meaning while improving style and readability.
ReplyDeleteEnhance your space with stunning canvas prints, wood prints, and fine art designed to inspire. Our collection features vibrant acrylic wall art and sleek acrylic prints, perfect for adding elegance to any room. Whether decorating your home office or selecting the best wall art for living room, our pieces combine style and quality. Transform your walls with art that reflects your personality and taste, creating a welcoming and sophisticated atmosphere in every corner of your home.
ReplyDeleteProtect your online reputation with expert services to remove defamatory content online, remove negative articles from Google, and deindex search results Google. Safeguard your privacy by helping remove explicit content from the internet and remove court records from Google efficiently. Our solutions ensure unwanted or harmful information is minimized, giving you control over your digital footprint. Trust our professional approach to maintain a clean and positive online presence while improving search result visibility for your name or brand.
ReplyDeleteEnhance your vehicle's efficiency with top-quality Car ECU IC and Auto ECU IC solutions. Our advanced automotive ECU IC components are designed for reliability and performance, ensuring smooth engine operations. Explore the most used ECU IC options trusted by automotive professionals worldwide. Upgrade your ride with a Car Performance Chip to boost power, optimize fuel efficiency, and unlock the full potential of your vehicle. Perfect for enthusiasts and mechanics seeking high-quality ECU solutions for modern cars.
ReplyDeleteUnlock your full potential with professional ADHD Coaching, Life Coaching, Confidence Coaching, and Self Esteem Coaching. Our personalized approach helps you overcome challenges, build resilience, and achieve your goals. Whether managing ADHD, boosting self-confidence, or improving self-esteem, our expert coaches provide guidance, support, and practical strategies to transform your life. Take the first step towards clarity, focus, and personal growth. Experience a journey of empowerment and success with our tailored coaching programs today.
ReplyDeleteTikTok scraper and TikTok API tools help businesses and developers collect public data for analytics, marketing, and research purposes. Through social media scraping, users can extract profiles, hashtags, comments, and engagement metrics efficiently. An Instagram scraper API enables automated access to public Instagram insights, while a YouTube scraper API gathers video statistics, channel data, and trends. These solutions support data-driven strategies, competitor analysis, and performance tracking while saving time and improving digital marketing decision-making across multiple platforms.
ReplyDeleteProtect and enhance your outdoor surfaces with Paver Sealer. This high-quality solution safeguards pavers from stains, weather damage, and fading while enriching their natural color. Ideal for driveways, patios, and walkways, Paver Sealer creates a durable, long-lasting barrier that resists oil, water, and UV rays. Easy to apply and maintain, it ensures your paved areas remain vibrant, clean, and visually appealing year-round. Invest in Paver Sealer for lasting protection and a polished finish.
ReplyDeleteLooking for a results-driven digital marketing agency Singapore? Our agency specializes in SEO, social media marketing, PPC campaigns, and content strategies designed to boost your brand’s online presence. We help businesses connect with their target audience, increase website traffic, and generate measurable growth. With innovative techniques and data-driven insights, our digital marketing agency Singapore ensures your brand stands out in the competitive market. Partner with us to transform your online strategy and achieve lasting success.
ReplyDeleteDirect Carpentry Singapore is a trusted choice for homeowners seeking high-quality, custom-made furniture without middlemen costs. By working directly with skilled craftsmen, clients receive tailored designs, premium materials, and precise workmanship at competitive prices. From built-in wardrobes and kitchen cabinets to TV consoles and office fittings, direct carpentry Singapore services focus on durability, functionality, and modern aesthetics. Transparent pricing, personalized consultations, and efficient project management ensure a smooth renovation experience, making it ideal for both residential and commercial interior projects across Singapore.
ReplyDeleteA Certificate of Conformity is a crucial document that verifies a product meets specific regulatory and quality standards. It confirms compliance with safety, environmental, and technical requirements, ensuring products are legally marketable. This certificate is essential for manufacturers, exporters, and importers to gain consumer trust and avoid legal issues. By providing a Certificate of Conformity, businesses demonstrate commitment to quality, reliability, and international standards, facilitating smooth trade, market access, and confidence in the product’s safety and performance worldwide.
ReplyDeleteSocial media data plays a key role in modern digital marketing and research. A social media scraper helps collect valuable public data from different platforms efficiently. Businesses and analysts often use tools connected with the tiktok api for scraping to gather trending videos, hashtags, and engagement insights. Similarly, instagram api scraping allows users to extract information about posts, followers, and performance metrics. These technologies support better market analysis, competitor tracking, and content strategy development while saving time and improving data accuracy for digital professionals.
ReplyDeleteEngine parts play a vital role in keeping machinery and marine engines running efficiently. High-quality Perkins parts, Volvo Penta parts, and Yanmar parts are designed to deliver durability, performance, and reliability for various engines. These trusted components help maintain optimal engine function, reduce downtime, and extend equipment lifespan. Whether used in industrial machines, generators, or marine engines, choosing genuine engine parts ensures better fuel efficiency, smoother operation, and long-term performance for demanding working environments.
ReplyDeleteHydraulika siłowa od Enerpac Polska zapewnia niezawodność i wydajność w każdym zastosowaniu. Zakuwarka do węży hydraulicznych umożliwia precyzyjne łączenie i montaż węży ciśnieniowych. Dzięki profesjonalnej zakuwarce tworzenie solidnych połączeń w wąż ciśnieniowy staje się szybkie i bezpieczne. Rozwiązania te są idealne zarówno dla przemysłu, jak i serwisu, gwarantując trwałość i efektywność pracy przy wysokim ciśnieniu hydraulicznym, co czyni je niezastąpionym narzędziem w każdej instalacji hydraulicznej.
ReplyDeletePOW Marketing Dallas is a dynamic marketing agency committed to helping businesses succeed through creative and data-driven strategies. POW Marketing specializes in digital marketing, SEO, social media campaigns, and brand growth solutions tailored to each client’s needs. Located in Dallas, their experienced team focuses on increasing visibility, attracting new customers, and driving measurable results. With a passion for innovation and excellence, POW Marketing Dallas ensures your brand stands out in a competitive market and achieves sustainable growth.
ReplyDeleteOur company excels in software development, delivering tailored solutions to meet diverse business needs. We specialize in mobile app development and AI application development, creating innovative, user-friendly platforms. With expertise in blockchain development, we ensure secure and transparent digital solutions. Our team of SEO experts helps boost online visibility, driving growth and engagement. Combining cutting-edge technology with strategic insights, we provide end-to-end digital services that empower businesses to stay competitive and future-ready.
ReplyDeleteExperience lasting emotional relief with EMDR Therapy in Birmingham, designed to help individuals process trauma effectively. Our experienced EMDR therapist in Birmingham provides professional support using Eye Movement Desensitisation and Reprocessing (EMDR) in Birmingham, ensuring a safe and personalized approach. EMDR therapy can help manage anxiety, PTSD, and stressful life experiences, restoring balance and well-being. Choose expert guidance and compassionate care with trusted EMDR therapy in Birmingham, and begin your journey toward mental clarity and emotional healing today.
ReplyDeleteADHD Coaching, Life Coaching, Confidence Coaching, and Self Esteem Coaching work together to help individuals unlock their full potential and achieve personal growth. These coaching approaches focus on improving focus, building resilience, and enhancing self-awareness. With personalized strategies, individuals can overcome challenges, boost productivity, and develop a positive mindset. Whether managing ADHD symptoms, gaining clarity in life, or building confidence, these coaching services empower people to live a more balanced, successful, and fulfilling life.
ReplyDeleteTransform your space with expert BATHROOM REMODELING services, starting with precise DEMOLITION to remove old fixtures safely and efficiently. Our team ensures a smooth renovation process, from tearing out outdated elements to creating a modern, functional, and stylish bathroom. With attention to detail and professional handling of every step, we make your dream bathroom a reality. Choose us for reliable BATHROOM REMODELING and DEMOLITION solutions that enhance both comfort and value in your home.
ReplyDeleteWe provide professional locksmith services including car keys, lock repair, and secure safes solutions for homes and businesses. Our expert team specializes in commercial locksmith services, ensuring maximum protection for your property. Whether you need urgent assistance or a planned business lock change, we deliver fast, reliable, and affordable solutions. Trust us to enhance your security with modern tools and skilled workmanship, giving you complete peace of mind for all your locksmith needs.
ReplyDeleteDiscover premium Paints in UAE with National Paints UAE, offering durable and vibrant solutions for every project. Explore the Best Paint Brands in UAE to enhance your spaces with quality finishes. From stylish Interior Paints in UAE to weather-resistant Exterior Paints in UAE, find the perfect choice for homes, offices, and commercial spaces. Trusted for performance and long-lasting results, these paints combine innovation and color excellence, making them the top choice for residents and businesses across the UAE.
ReplyDeleteExperience luxury on the roads of Dubai with premium car rentals. Choose Rolls Royce Ghost rental Dubai for elegance, G63 rental Dubai for power, Range Rover Vogue rental Dubai for comfort, or Cadillac Escalade rental Dubai for spacious sophistication. Whether for business, events, or leisure, these top-tier vehicles ensure a memorable journey. Enjoy unmatched style, performance, and convenience while exploring Dubai’s iconic landmarks in the car of your choice, making every ride a statement of prestige and luxury.
ReplyDeleteDiscover ultimate support and comfort with the Hip Brace designed for all-day wear. Our customers trust its durability and ergonomic design to relieve hip pain and improve mobility. Check out the Fivali Back Brace Reviews to see why users love its adjustable fit and reliable support. Perfect for recovery, sports, or daily activities, this brace combines functionality with comfort. Experience the difference today and join countless satisfied users who recommend it for effective hip and back care.
ReplyDeleteExperience the best online gaming at VWorld 2.0. Play live casino latest slot games sports betting with 24/7 support and fast payouts. Join VWorld 2.0 today! Enjoy a secure and exciting platform designed for beginners and professional players alike. VWorld 2.0 offers seamless navigation, multiple payment options, and a user friendly interface that ensures maximum entertainment and winning opportunities every day. VWorld2 Login Start playing today and explore endless rewards with trusted security, smooth gameplay, and instant customer assistance available anytime online.
ReplyDeleteVisual Sentinel is a powerful tool designed for free URL monitoring, helping users stay updated on website performance and availability. With its advanced system, you can easily check site status in real time and ensure your online services are running smoothly. It also allows you to check web status across multiple pages for better reliability and uptime tracking. Visual Sentinel provides accurate insights, making it ideal for businesses and individuals who want constant monitoring and quick alerts for any downtime or issues.
ReplyDeleteParhaat kasinot tarjoavat pelaajille turvallisen ja viihdyttävän pelikokemuksen, jossa löytyy runsaasti erilaisia pelejä ja bonuksia. Pikakasinot ovat yhä suositumpia, koska niihin voi kirjautua nopeasti ilman monimutkaista rekisteröitymistä. Parhaat uudet kasinot tuovat markkinoille tuoreita ideoita ja houkuttelevia tarjouksia. Nettikasino mahdollistaa pelaamisen missä ja milloin tahansa helposti. Pikakasinot tekevät pelaamisesta sujuvaa ja vaivatonta, mikä lisää niiden suosiota modernien pelaajien keskuudessa Suomessa. Parhaat kasinot yhdistävät laadun ja luotettavuuden tehokkaasti.
ReplyDeleteHITL (Human-in-the-Loop) is an advanced approach in artificial intelligence systems where human input is actively involved in the decision-making process. It combines machine learning efficiency with human intelligence to improve accuracy, reliability, and safety. HITL is widely used in data labeling, model training, quality control, and critical decision systems. This method helps reduce errors made by automated systems and ensures better performance in real-world applications. HITL plays a key role in building trustworthy and ethical AI solutions across various industries.
ReplyDeleteThe Infrared Lab Dyeing Machine is an advanced solution used in modern dyeing lab and lab dyeing processes for accurate color testing and fabric development. It ensures precise temperature control and consistent results for sample dyeing applications. This sample dyeing machine is widely used in textile industries for small-scale testing before bulk production. The sample dyeing machine price varies depending on features and capacity, while reliable sample dyeing machine supplier options provide high-quality equipment for efficient and cost-effective laboratory dyeing operations.
ReplyDeleteكورة 365 هو واحد من أفضل المنصات لمتابعة مباريات كرة القدم بث مباشر بجودة عالية وبدون تقطيع. يقدم koora live تغطية شاملة لأهم البطولات العالمية والعربية مع تحديثات فورية للأخبار والنتائج. من خلال كورة لايف يمكن للمستخدمين مشاهدة المباريات بسهولة على مختلف الأجهزة، بالإضافة إلى جداول المباريات وتحليلات دقيقة. إذا كنت من عشاق كرة القدم، فإن كورة 365 يوفر لك تجربة مشاهدة ممتعة ومتكاملة طوال الوقت.
ReplyDeleteReliable hydration services are essential for homes and businesses in Florida, and professional water delivery clearwater, water delivery st petersburg, and bottled water delivery tampa make it easy to stay refreshed every day. These services ensure clean, safe, and high-quality drinking water delivered directly to your door. Whether you need regular home supply or office bulk orders, timely delivery and dependable service help maintain convenience, health, and efficiency across Clearwater, St. Petersburg, and Tampa areas.
ReplyDeleteWe offer professional roof cleaning near me services designed to restore and protect your home from dirt, algae, and mold buildup. Our expert team specializes in roof cleaning Oldsmar and roof cleaning Clearwater, ensuring safe and effective cleaning results. We provide reliable pressure washing Tampa services to refresh driveways, walls, and outdoor surfaces. If you are searching for pressure washing near me, we deliver fast, affordable, and high-quality solutions to keep your property looking clean, fresh, and well-maintained year round.
ReplyDeleteคาสิโน เป็น แหล่ง ความบันเทิง ที่ เต็มไปด้วย ความตื่นเต้น และ โอกาส ใน การ ลุ้นรางวัล มากมาย ผู้คน สามารถ เพลิดเพลิน กับ ทดลองเล่น AMB Superslot เกม หลากหลาย เช่น สล็อต บาคาร่า และ รูเล็ต ซึ่ง casino ยัง มอบ ประสบการณ์ ที่ หรูหรา และ ทันสมัย ทั้ง ใน รูปแบบ ออนไลน์ และ สถานที่ จริง ทำให้ ผู้เล่น รู้สึก สนุกสนาน ผ่อนคลาย และ มี โอกาส สร้าง รายได้ เพิ่มเติม ได้ อย่าง น่าสนใจ ใน ทุกช่วงเวลา
ReplyDeleteExperience the beauty of Hoi An with the famous basket boat Hoi An adventure. A coconut boat Hoi An ride lets you explore peaceful waterways surrounded by lush greenery. The Hoi An basket boat Tour offers cultural fun and local fishing experiences. Visit coconut village and enjoy traditional life. Relax at basket boat cafe hoi an for scenic views. Discover coconut farm hoi an and enjoy nature, hospitality, and unforgettable memories in Vietnam’s charming riverside destination for perfect travel experience
ReplyDeleteA cell tower plays a crucial role in modern communication, supporting wireless networks and connectivity. Understanding cell tower sales can help owners maximize profits, while knowing what is my cell tower worth ensures fair valuation. Through cell tower renegotiation, lease terms can be improved for better income. Working with a cell tower consultant or cell tower advisor provides expert guidance, helping property owners navigate agreements, increase revenue, and make informed decisions in the evolving telecommunications industry.
ReplyDeleteLooking for a reliable digital marketing agency in singapore that helps businesses grow online? A professional agency provides SEO, social media marketing, PPC advertising, content creation, and branding solutions tailored to your goals. With expert strategies and data-driven campaigns, businesses can increase visibility, attract targeted customers, and boost conversions. Choosing the right digital marketing agency in singapore ensures your brand stands out in a competitive market and achieves long-term digital success with measurable results and consistent growth for all businesses.
ReplyDeleteA good hip brace provides targeted support to reduce pressure on joints and improve movement comfort. A plus size knee brace that doesn't slide down ensures a firm fit, helping users stay active without frequent readjustment. The fivali back brace reviews highlight its effectiveness in supporting posture, while the fivali back brace is commonly used for lower back pain relief. An ankle brace for nerve damage offers stability and mild compression, helping improve balance, reduce discomfort, and support daily mobility during recovery.
ReplyDeleteValkokultakorvakorut ovat elegantti valinta, joka tuo arkeen ja juhlaan ylellisyyttä ja hienostuneisuutta. Korvakorut lapselle suunnitellaan kevyiksi ja turvallisiksi, jotta ne sopivat herkkään käyttöön. hopeakorut tarjoavat ajattoman kauneuden ja kestävyyden, mikä tekee niistä suosittuja lahjoja. Hopeinen panssariketju on klassinen korumalli, joka yhdistää vahvuuden ja tyylikkyyden, sopien niin arkeen kuin juhlaan. Nämä korut korostavat yksilöllistä tyyliä ja kestävää laatua. Ne sopivat täydellisesti lahjaksi eri ikäisille ja tuovat arkeen ripauksen luksusta. Korut ovat ajattomia ja helposti yhdisteltäviä eri tyyleihin ja tilanteisiin kauniisti viimeistelty
ReplyDeleteराजस्थान सरकार की विभिन्न ऑनलाइन सेवाओं का लाभ लेने के लिए sso.rajasthan और sso .rajasthan.gov.in एक महत्वपूर्ण पोर्टल है। यहां j sso id login के माध्यम से उपयोगकर्ता एक ही आईडी से कई सेवाओं तक पहुंच सकते हैं। rajasthan sso id login प्रक्रिया सरल और सुरक्षित है, जिससे नागरिकों को सरकारी योजनाओं, नौकरी आवेदन और अन्य सेवाओं में आसानी होती है। यह डिजिटल प्लेटफॉर्म समय की बचत करता है और पारदर्शिता को बढ़ावा देता है, जिससे सभी कार्य ऑनलाइन पूरे किए जा सकते हैं।
ReplyDeleteTwitter SMM Panel is a powerful tool for boosting engagement, followers, and visibility on social media platforms like Twitter. The best twitter smm panelALLSMM Panel provides high quality services for fast growth, real interaction, and improved online presence. Using twitter smm panel services helps marketers, influencers, and businesses to increase reach, build trust, and achieve better results with consistent performance and affordable solutions from ALLSMM Panel for long term success in digital marketing and social media strategy worldwide growth platform.
ReplyDeleteProfessor e brings modern fashion and timeless elegance together for people who value confidence and creativity. Professor e clothing offers stylish designs, premium fabrics, and unique details that make every outfit stand out. From casual wear to formal looks, professor clothes provide comfort and sophistication for every occasion. Professor Outfits are designed to match today’s fashion trends while keeping a classy appearance. Whether for work, events, or daily wear, Professor Outfit collections help create a bold and fashionable personal style with lasting quality and comfort.
ReplyDeleteCoconut village, basket boat hoi an, coconut boat hoi an, and basket boat cafe hoi an offer a unique travel experience in Vietnam’s scenic waterways. It showcases traditional bamboo basket boats, peaceful coconut forests, and local culture while offering relaxing rides and delicious dining at riverside cafes surrounded by nature. Visitors enjoy immersive cultural tourism, scenic photography opportunities, and unforgettable adventures across calm waters, making it a perfect destination for families, travelers, and nature lovers visiting Hoi An Vietnam region.
ReplyDeleteيعتبر موقع yalla shoot و yallashoot من أفضل المنصات لمتابعة يلا شوت و يلاشوت لمشاهدة المباريات بث مباشر بجودة عالية ويقدم أهم مباريات اليوم لعشاق كرة القدم مع تحديثات مستمرة للنتائج والأخبار والتحليلات الرياضية الدقيقة ويتيح للمستخدمين تجربة مشاهدة سهلة وسريعة بدون تقطيع ويغطي الدوريات العالمية والعربية ويوفر جداول المباريات اليومية مع تفاصيل الفرق واللاعبين والمواعيد الدقيقة ويعد خيارا مفضلا لمحبي كرة القدم حول العالم ويتميز بسهولة الاستخدام والتحديث الفوري للبث المباشر وجودة عالية تناسب جميع الأجهزة المحمولة والكمبيوتر أيضا
ReplyDeleteBaseKV's guide to Next.js sessions explores modern session handling techniques for scalable applications. It also explains this config KV pattern for efficient configuration storage and retrieval. Developers can better understand config management with key-value stores to improve system performance and flexibility. Additionally, this AI model pricing comparison helps users evaluate cost efficiency across platforms. The discussion also includes UsageBox vs Paddle vs Recurly to compare billing and subscription management solutions for SaaS products and growing digital businesses for modern SaaS ecosystems and workflows optimization
ReplyDeleteADHD coaching, life coaching, confidence coaching, and self esteem coaching are powerful approaches designed to help individuals improve focus, build better habits, and achieve personal growth. ADHD coaching supports attention management and productivity, while life coaching guides goal setting and direction. Confidence coaching strengthens self belief and communication skills, and self esteem coaching helps individuals develop a positive self image, overcome self doubt, and create a more balanced, successful, and fulfilling life through practical strategies and continuous personal development effectively
ReplyDeleteLaifen toothbrush line offers advanced oral care with smart sonic technology for effective plaque removal and healthier gums. The Laifen electric toothbrush provides powerful yet gentle cleaning performance for daily use. Laifen Wave Pro enhances brushing precision with upgraded features and modern design. Laifen Wave toothbrush delivers consistent results, combining comfort, durability, and efficiency for a superior brushing experience. It is ideal for everyday oral hygiene and ensures long lasting freshness and professional level cleaning at home for all users
ReplyDeleteFreight forwarding services play a crucial role in global trade by managing the transportation and coordination of goods across international borders. These services handle documentation customs clearance warehousing and shipping arrangements through air sea and land routes. They ensure smooth and efficient movement of cargo from origin to destination. Businesses rely on freight forwarding services to reduce logistics challenges save time and optimize costs while ensuring safe and timely delivery of products worldwide for businesses globally across every industry sector
ReplyDeleteVelki Agent List, 9xbet9 Agent List এবং Velki Agent Bangladesh সম্পর্কে এটি একটি সংক্ষিপ্ত বিবরণ। এই এজেন্ট লিস্টগুলো অনলাইন গেমিং এবং বেটিং প্ল্যাটফর্মের নির্ভরযোগ্য তথ্য প্রদান করে, যা ব্যবহারকারীদের সহজে সঠিক এজেন্ট খুঁজে পেতে সাহায্য করে। বাংলাদেশে Velki Agent Bangladesh বিশেষভাবে জনপ্রিয়, কারণ এটি দ্রুত সেবা এবং নিরাপদ লেনদেন নিশ্চিত করে। 9xbet9 Agent List ব্যবহারকারীদের জন্য বিভিন্ন এজেন্ট অপশন দেখায়, যা সুবিধাজনক এবং কার্যকর অভিজ্ঞতা প্রদান করে।
ReplyDeleteSupport braces play an important role in improving mobility and reducing discomfort in daily life. A hip brace can help stabilize the hip area and ease pressure during movement. A plus size knee brace that doesn't slide down ensures consistent support without frequent adjustments. Many people check Fivali back brace reviews before choosing a Fivali back brace for better posture and lumbar support. An ankle brace for nerve damage may also assist with stability and protection, helping users walk more safely and comfortably.
ReplyDeleteWholesale supplements market is growing rapidly as retailers and fitness brands rely on trusted supplements wholesale suppliers for consistent quality and pricing. A reliable supplement wholesale distributor ensures access to a wide range of health products that meet industry standards. Leading supplement wholesalers play a key role in supplying vitamins, protein powders, and wellness products globally. Businesses benefit from competitive pricing, bulk availability, and dependable distribution networks that support long term growth in the health and nutrition industry sector worldwide.
ReplyDeleteTrusted maid agency in Singapore provides reliable domestic helper recruitment services tailored to meet every household's needs. With experienced consultants, thorough screening processes, and professional support, families can find trustworthy helpers with confidence. A trusted maid agency in Singapore also ensures proper documentation, training, and ongoing assistance, making the hiring process smooth and stress-free. Choosing a reputable agency helps employers enjoy peace of mind while building a positive and long-lasting working relationship with their domestic helper.
ReplyDeletePrimary 5 Science Tuition helps students build a strong foundation in essential science concepts through engaging lessons, practical examples, and personalized guidance. It improves critical thinking, problem-solving, and exam preparation while boosting confidence in the subject. With structured learning, experienced tutors, and regular practice, Primary 5 Science Tuition supports students in mastering key topics, strengthening their understanding, and achieving better academic performance in school assessments and future science studies.
ReplyDeleteEMDR Therapy Birmingham provides effective, evidence-based support for people struggling with anxiety, trauma, and emotional challenges. A qualified EMDR Therapist Birmingham creates personalized treatment plans to promote lasting recovery and emotional balance. Whether seeking EMDR Therapy for Anxiety Birmingham or EMDR Therapy for Trauma Birmingham, this therapeutic approach helps process difficult memories, reduce stress, and build healthier coping strategies for a more confident and fulfilling life.
ReplyDeleteADHD Coaching helps individuals improve focus, organization, and daily productivity through personalized strategies. Life Coaching supports personal growth, goal setting, and positive life changes. Confidence Coaching empowers people to overcome self-doubt, build resilience, and take meaningful action. Self Esteem Coaching strengthens self-worth, encourages a positive mindset, and promotes healthier relationships. Together, these coaching services provide practical guidance, motivation, and lasting skills to achieve personal success, emotional well-being, and greater confidence in every aspect of life.
ReplyDeleteDigital transformation in higher education is reshaping academic environments through advanced technologies, smarter learning systems, and improved collaboration. AI research in Saudi Arabia is driving innovation across universities while supporting scientific discovery and digital excellence. E-learning platforms for universities provide flexible, accessible education that enhances student engagement and academic performance. Digital repositories and open access ensure valuable research is widely available, promoting knowledge sharing, global collaboration, and continuous educational advancement for researchers, educators, and students worldwide.
ReplyDeleteThis was a fantastic tutorial! The step-by-step instructions and clear photos make the whole process easy to follow, even for beginners. I love how you explained the little details that help avoid common mistakes. Creative guides like this are always inspiring because they encourage people to try something new. Thanks for sharing your expertise and keeping crafting fun and approachable! Wishing you many more wonderful posts. Greetings from the team at RealTrading.co.uk.
ReplyDeleteDigital Membership Platform connects members with valuable Local Business Discounts through a trusted Local Business Marketplace designed to support everyday savings. VanPerks helps users discover exclusive offers while strengthening the Local Merchant Network by promoting nearby businesses and services. Members enjoy convenient access to special deals, trusted local merchants, and rewarding opportunities that encourage community growth. This all-in-one platform creates meaningful connections between customers and businesses, making shopping locally more affordable, rewarding, and beneficial for everyone involved.
ReplyDeleteDiscover professional support through Hypnotherapy Birmingham designed to help improve mental well-being and personal growth. An experienced Hypnotherapist Birmingham offers tailored sessions for lasting results. Anxiety Therapy Birmingham helps reduce stress and restore confidence, while Addiction Therapy Birmingham supports positive lifestyle changes. ADHD Therapy Birmingham focuses on improving concentration and daily performance, and Insomnia Therapy Birmingham promotes healthier sleep patterns. Every therapy approach is personalized to help you achieve balance, emotional wellness, and a better quality of life.
ReplyDeleteBrownstone Law is known for providing experienced legal representation through skilled Supreme Court lawyers and dedicated supreme court attorneys. Their team focuses on handling complex appeals, constitutional matters, and high-level legal disputes with careful research and persuasive advocacy. Clients benefit from strategic guidance, detailed case preparation, and a commitment to protecting their legal rights throughout every stage of the appellate process. Professional experience and thorough legal analysis help strengthen cases before the highest courts.
ReplyDeleteAI photo tools online make it simple to enhance, transform, and organize images with smart automation. AI tools for photos help improve quality, remove backgrounds, and apply creative effects in seconds. AI image editing delivers professional-looking results without advanced skills. An ai collage generator allows users to combine multiple pictures into stunning layouts, while photo collage ai creates eye-catching designs effortlessly. An ai collage maker is perfect for personal memories, social media content, marketing materials, and creative digital projects.
ReplyDeleteDiscover the exciting world of Howlin Hobbit, your trusted destination for adventure, fantasy, and tabletop gaming content. Whether you are looking for game reviews, creative storytelling ideas, role-playing resources, or engaging community discussions, Howlin Hobbit offers valuable insights for players of all experience levels. Stay updated with expert tips, entertaining articles, and inspiring content designed to enhance every gaming session. Explore new adventures, sharpen your strategies, and enjoy a welcoming space where imagination, creativity, and unforgettable gaming experiences come together.
ReplyDeleteOnline betting game menjadi salah satu bentuk hiburan digital yang menawarkan berbagai pilihan permainan dengan akses yang mudah dan praktis. Memilih platform yang memiliki reputasi baik dapat membantu memastikan keamanan data, kenyamanan transaksi, serta pengalaman bermain yang lebih lancar. win77 Pemain juga disarankan untuk memahami setiap aturan permainan dan mengelola anggaran secara bijaksana sebelum memulai. Dengan pendekatan yang bertanggung jawab, aktivitas bermain dapat tetap menyenangkan, aman, dan memberikan pengalaman yang lebih positif.
ReplyDelete