Monday, March 5, 2018

DESIGNER KIT - Earring Luxe Collection

Thank you for purchasing one of our EXCLUSIVE Designer Show Kits! We hope you enjoy wearing this one-of-a-kind piece of jewelry!

Here's a few links to help you complete the
Earring Luxe Collection Designer Kit 
followed by assembly instructions to finish your piece:


  1. Select images and add them to the glass cabochons using Fantastic Glaze & Glue. 
  2. Using pliers, attach a French Ear Wire to the top of each Mini Bird Connector, Butterfly Connector, and Tiny Round Link Tray. Attach a jump ring to the bottom of each connector and attach appropriate Mini Round Trays & Knot Connectors.
  3. Using pliers, attach a 2 Mini Round Trays and 2 Mini Square Trays to the 2 pairs of Long Earwires using small jump rings. 
  4. Add a Fantastic Sticky Dot to each tray. Remove the red backing to expose the adhesive. 
  5. Firmly press the appropriate cabochon into each each tray. 
We hope you have fun putting together the Exclusive Earring Luxe Collection Designer Kit! Be sure to follow Craft Fantastic on FACEBOOK and INSTAGRAM! Also, sign up for the CRAFT FANTASTIC NEWSLETTER for the latest and greatest sales, giveaways and product peeks! 

DESIGNER KIT - Love Key Necklace

Thank you for purchasing one of our EXCLUSIVE Designer Show Kits! We hope you enjoy wearing this one-of-a-kind piece of jewelry!

Here's a few links to help you complete the
Love Key Necklace Designer Kit 
followed by assembly instructions to finish your piece:


  1. Select images and add them to the glass cabochons using Fantastic Glaze & Glue.
  2. Using pliers, remove the lobster clasp and small jump rings from the 30" Rolo Chain.
  3. Using scissors cut a length of chain measuring 10 links from one end of the Rolo Chain.
  4. Using pliers, attach a small jump ring to each end of the Rolo Chain. String each end onto a large jump ring and slide the Medium Heart Pendant Tray on before closing. 
  5. Attach the Cute Heart Charm to the large jump ring using 3 small jump rings.
  6. Attach the Small Fancy Heart Charm Tray to the length of chain cut from the Rolo Chain using a small jump ring. Attach the other end to the large jump ring using 2 small jump rings.
  7. Slide the pinch bail onto the Love Key Tray and then onto the large jump ring.
  8. Add a Fantastic Jeweler's Dot to each tray and remove the red backing to expose the adhesive.
  9. Firmly press each glass piece into the corresponding tray.
We hope you have fun putting together the Exclusive Love Key Necklace Designer Kit! Be sure to follow Craft Fantastic on FACEBOOK and INSTAGRAM! Also, sign up for the CRAFT FANTASTIC NEWSLETTER for the latest and greatest sales, giveaways and product peeks!  

DESIGNER KIT - Butterfly Charm Bracelet

Thank you for purchasing one of our EXCLUSIVE Designer Show Kits! We hope you enjoy wearing this one-of-a-kind piece of jewelry!

Here's a few links to help you complete the
Butterfly Charm Bracelet Designer Kit 
followed by assembly instructions to finish your piece:


  1. Select images and add them to the glass cabochons using Fantastic Glaze & Glue. 
  2. Attach the Mini Square Charm Trays and the Butterfly charms to the Charm Bracelet using small jump rings. I left 3 links in-between each of the trays/charms.
  3. Add a Fantastic Sticky Dot to each tray. Remove the red backing to expose the adhesive. 
  4. Firmly press the appropriate cabochon into each tray. 
We hope you have fun putting together the Exclusive Butterfly Charm Bracelet Designer Kit! Be sure to follow Craft Fantastic on FACEBOOK and INSTAGRAM! Also, sign up for the CRAFT FANTASTIC NEWSLETTER for the latest and greatest sales, giveaways and product peeks! 

DESIGNER KIT - Classy Clip-On Necklace

Thank You for purchasing one of our EXCLUSIVE Designer Show Kits! We hope you enjoy wearing this one-of-a-kind piece of jewelry!

Here's a few links to help you complete the
Classy Clip-On Necklace Designer Show Kit 
followed by assembly instructions to finish your piece:


  1. Cut the center of the 30" Rolo Chain using a pair of scissors or wire cutters.   
  2. Attach a Small Jump Ring to each end of the chain.
  3. String a Large Jump Ring through the Small Jump Rings.   
  4. FOR THE CENTER DANGLE: Attach the Tiny Round Link Tray to the Mini Round Twist Link Tray using a Small Jump Ring.
  5. Attach the Knot Connector to the bottom of the Mini Round Link Tray using a Small Jump Ring.
  6. Attach the Lobster Clasp to the top of the Tiny Round Twist Link Tray using TWO Small Jump Rings. This will help the pendant lay properly when worn.
  7. Add a Fantastic Sticky Dot to the Mini Round Twist Link Tray. Add a Fantastic Sticky Dot that has been cut into 1/4 to the Tiny Round Link Tray. Remove the red backing to expose the adhesive. 
  8. Firmly press the appropriate cabochon into the Mini Round Twist Link Tray. Press the Tiny Round Glass Bling into the Tiny Round Link Tray.
  9. FOR THE HEART DANGLE: Select an image and add it to the glass cabochon using Fantastic Glaze & Glue.
  10. Attach the Heart Charm to the bottom of the Tiny Round Link Tray using a Small Jump Ring.
  11. Attach the Lobster Clasp to the top of the Tiny Round Link Tray using TWO Small Jump Rings. This will help the pendant lay properly when worn.
  12. Add a Fantastic Sticky Dot that has been cut into 1/4 to the Tiny Round Link Tray. Remove the red backing to expose the adhesive. 
  13. Firmly press the cabochon into the tray.
  14. FOR THE SQUARE DANGLE: Select an image and add it to the glass cabochon using Fantastic Glaze & Glue.   
  15. Attach the Lobster Clasp to the top of the Mini Square Pendant Tray using a Large Jump Ring. 
  16. Add a Fantastic Sticky Dot to the tray. Remove the red backing to expose the adhesive. 
  17. Firmly press the cabochon into tray. 
We hope you have fun putting together the Exclusive Classy Clip-On Necklace Designer Kit! Be sure to follow Craft Fantastic on FACEBOOK and INSTAGRAM! Also, sign up for the CRAFT FANTASTIC NEWSLETTER for the latest and greatest sales, giveaways and product peeks! 

DESIGNER KIT - Lots of Love Charm Bracelet

Thank You for purchasing one of our EXCLUSIVE Designer Show Kits! We hope you enjoy wearing this one-of-a-kind piece of jewelry!

Here's a few links to help you complete the
Lots of Love Charm Bracelet Designer Show Kit 
followed by assembly instructions to finish your piece:


  1. Select an image and add it to the glass cabochon using Fantastic Glaze & Glue. 
  2. Attach the Medium Fancy Heart Tray and the Heart Locket Charms to the Charm Bracelet using small jump rings. I left 4 links between the charms. 
  3. Add a Fantastic Sticky Dot to each tray. Remove the red backing to expose the adhesive. 
  4. Firmly press the appropriate cabochon into each tray. 
We hope you have fun putting together the Exclusive Lots of Love Charm Bracelet Designer Kit! Be sure to follow Craft Fantastic on FACEBOOK and INSTAGRAM! Also, sign up for the CRAFT FANTASTIC NEWSLETTER for the latest and greatest sales, giveaways and product peeks! 

Saturday, March 3, 2018

Rock Paper Scissors Projects

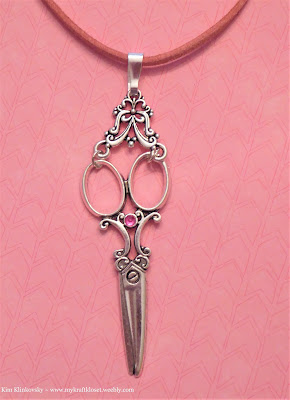
Hi everybody! Kim here from My Kraft Kloset sharing these beautiful silver scissor charm projects that are sure to please any crafter with these stunning products from Craft Fantastic. They are a wonderful mix of vintage and modern that would make great gifts for any special occasion you wanted to personalize with monograms from paper images, charms, faux leather and more. 


If you were lucky enough to get February's Kit-of-the-Month, congratulations, because that kit included a few of the pieces I used for these projects.  But don't fret if you didn't, click on these links to get all the supplies you need to make the projects above and several more: Silver Scissors Charms, V Connector, Small Jump Rings, Pinch Bails, Glaze & Glue, Faux Leather Necklaces, Key Ring, Large Jump Rings, and a Swirl Toggle.

To create the "rock" part of our project, I added just 1-2 drops of Glaze & Glue into the center of the scissors where there is a small open circle and placed a small sparkly blue gemstone (purchased at a local craft store), into the glue to secure it in place. Attach the scissors to a special key ring or add it to a 3-ring or spiral planner and personalize it with monograms for a lovely planner chain or bookmark. As shown above.


For my next project (shown above) I created a vintage necklace with a pink gemstone adhered with Glaze & Glue, attached a V Connector with small jump rings, added a pinch bail and slipped the pendant through a black faux necklace. And it's so simple, yet stunning. Don't you think? It's one of my favorite pieces, but I say that about all of them. (lol)

Here is another look at our stunning "scissors" on black faux leather for a vintage look and pink faux leather for a more modern look to mix and match your outfits. 


Voila! There you have several unique necklaces, planner chains, or key chains for special gifts or keep a few for yourself with just a few supplies.  The possibilities are truly endless! Thanks for stopping by!

Kim Klinkovsky @mykraftkloset

Thursday, March 1, 2018

SHE IS ARTFUL A COLLAGE PENDANT

Hello from Junque Drawer Designs!  If you are a crafty person like me and do lots of orders from different companies you most likely receive freebies like ephemera and collage sheets.  Sometimes I just do not know what to do with them or sometimes I love what it is and never get around to using whatever was sent.  Here's something I just made with one of the freebies that came in the order I placed:


I found this sheet and thought what a great idea for a PENDANT.  The first thing I did was to cut the words out that I wanted to use.  I then placed them over the flower image and used a tiny bit of glue to place them over the flowers.


I then used the CRAFT FANTASTIC GLAZE AND GLUE to adhere the image to the X LARGE GLASS ROUND.


Once dry I cut the image out and placed it into the EXTRA LARGE ROUND PENDANT TRAY using the FANTASTIC SUPER STICKY DOTS.

I loved the way this PENDANT turned out.  So easy to create a fabulous ONE OF A KIND statement to wear!


I then place the finished PENDANT on a 30" ROLO CHAIN ANTIQUE BRASS.