Wednesday, July 22, 2015

Painting Designs on Craft Fantastic Glass Using Nail Polish!

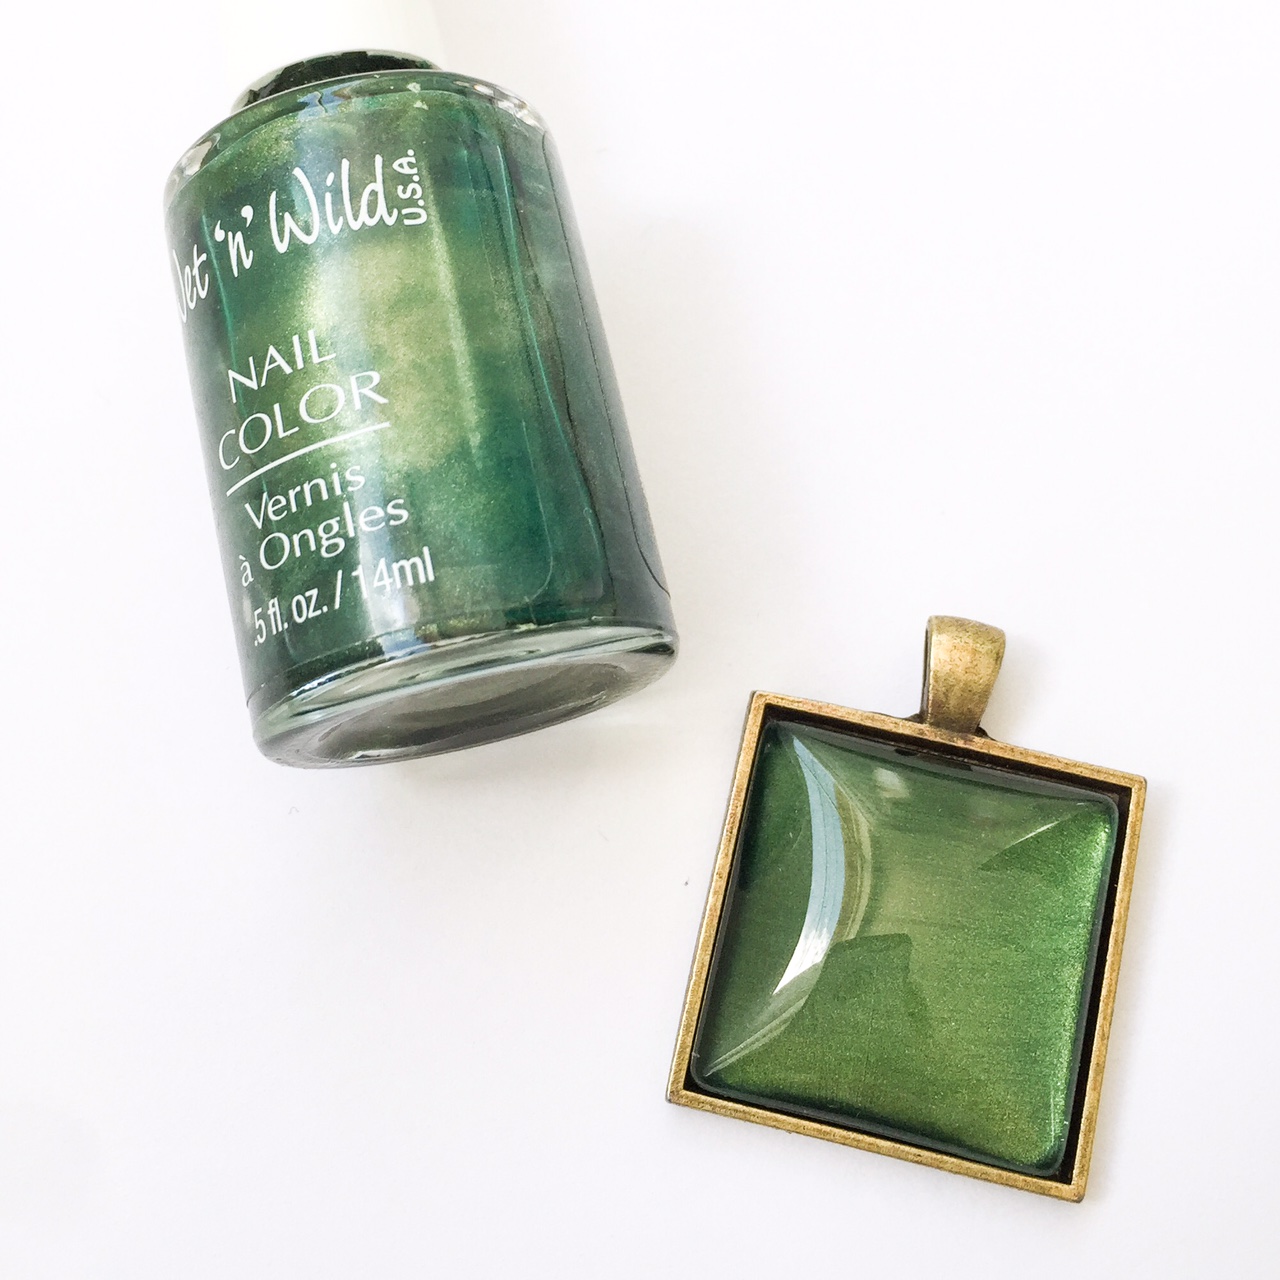
Last week I showed you how nail polish and Craft Fantastic glass cabochons were practically made for each other. Application of a few coats of your favorite nail finish on the back of one of our glass pieces magically transforms it into a faux stone! So easy and so much fun!

This week, we're going to take it up a notch and add some designs. The key here is to work backwards. You'll start with the tiny details that your eye sees first, then add layers of design, and finish with the background.


For example, on the above piece I began with the white dots. After those were thoroughly dry I layered black dots over the top of them to create a black border around each white dot. Once these were dry, I added silver streaks behind the black dots. Again, waiting until everything was dry, my final step was to paint the background. After all of the layers dried, I was left with a cool geometric design. I rather love this and it's relatively easy to do.

Let's get started...

What You'll Need

Nail Art Paint - The consistency is a little more opaque than regular polish and it usually comes with a really skinny brush. I picked these up at the dollar store.

Craft Fantastic Glass Cabochons - Use your favorite shapes and sizes.

Nail Polish Remover & Cotton Swabs -  This dynamic duo will easily clean up any wayward polish on the back of the glass.

Scrap Paper - A must have for keeping your work surface clean.

Painting Designs and Patterns on the Glass

Working on a piece of scrap paper, start with a Craft Fantastic Glass cabochon and your choice of Nail Art Paint. I'm using a white, black and silver palette for my design.


Visualize your design. Decide on which details will be in the foreground because you will need to work backwards. Think in layers. I'll start with these small white dots.


OOPS! I got a little sloppy, but that will clean up easy peasy with a cotton swab dipped in nail polish remover.


See...just a quick swipe and it's gone!


My dots are in place and now it's time to wait. Let these little blobs dry for a while.


Time to add the black paint over the white dots. My goal is to create a border around each white dot so my black polish will need to generously cover the white.


A quick flip lets me check to see if the black paint sufficiently covers the white dots. Careful though, I don't want to mess up all my hard work. I'll need to let this coat dry for a long time because my paint layers are fairly thick.


Now for some real fun. I use the silver paint to add silver stripes of varying lengths. Again, I'll let this dry a really long time. 


Finally, I add my background color. This time I opted for purple, but it goes on a bit sheer so I had to add about 5 coats, letting it dry between each application. Looks a bit sloppy at this point, but just wait until I flip it over...


TADA! All finished and popped into a Long Rectangle Tray, ready to be turned into a one-of-a-kind pendant! 


Now, wasn't that fun! I'm going to try and add a tutorial each Wednesday using Craft Fantastic glass, trays and findings in unexpected ways, so tune in next week for something new! 

Wednesday, July 15, 2015

Nail Polish Technique Using Craft Fantastic Glass!

I promised you a tutorial last week showing you how I use nail polish on Craft Fantastic glass cabochons to give them a completely different look! Here's a peek at what I've been making as of late.


Oh my goodness! I cannot even begin to put into words how much fun I am having with this technique! The best part is, I know that each and every one of us has an assortment of old, half empty bottles of nail polish just sitting around in the bathroom taking up precious counter space. With this technique it's time to move those bottles of polish to the craft room and start having some fun!

Colorful, Playful, Creative Fun!

Let's start with the basics...

What You'll Need

Nail Polish - Any type of nail polish will do. Opaque polish covers better than sheer polishes, but with several coats sheer polishes work well, too. I used glitter polish, matte polish, sheer polish, metallic polish, etc. All had different results which makes it even more exiting. 

Craft Fantastic Glass Cabochons - Any shape, any size. The world is your oyster ;)

Scrap Paper - A sheet of scrap paper to keep your work surface clean because this can get a bit messy and unfortunately nail polish is not all that easy to clean up.

Patience - There's a lot of waiting around for the polish to dry between coats, but luckily you can paint lots of these at one time. 


Creating a Solid Jewel Tone Effect

Working on a piece of scrap paper, start with a Craft Fantastic glass cabochon and your choice of nail polish.


Paint a coat of the polish onto the back of the glass cabochon. Don't apply it too thick as it will drip down the sides of the glass. If it does get on the front of the glass, scrape it off with a craft knife after it dries. No big whoop. Set it aside to dry. Completely. This will take a bit. This is where that patience thing pays off.


Repeat 2 or 3 more times to get the desired coverage on the glass. Each coat will make the color appear more vibrant. Be sure to let each coat dry completely before adding another. More of that patience stuff will come in handy right about now. After you're finished painting them, let them dry overnight before you affix them to a tray or finding.


Aren't they pretty! So vibrant! You could literally custom create jewelry to match any outfit in your closet!


Here's few more pics!


That's the basics of using nail polish with Craft Fantastic glass. An easy and fun technique that will give your custom jewelry creations a splash of vibrant color and a lot of panache! Give it a try and share your pics on the Craft Fantastic Facebook page. We would LOVE to see what inspiring projects you create with this fabulous finish! 

Next week I'll share a quick and easy tutorial on creating designs on the glass with nail polish so tune in on Wednesday for something new!

Tuesday, July 14, 2015

Marvelous Upcycled Pencil Holders by Jeanne Streiff!

Today I'm sharing a project from Craft Fantastic Designer, Jeanne Streiff! 

Jeanne has cleverly taken a seemingly simple item that for most of us would end up in the recycling bin or (fret) the trashcan and turned it into something we would proudly use and display on a daily basis. The item in question? A nondescript, ordinary aluminum can. You know the kind, usually filled with veggies, fruit cocktail, soup or the even the occasional fried onions. I know if I open my pantry door right now, I would have at least a dozen of these sitting on a shelf.

Leave it to Jeanne to see inspiration in that simple can and turn it into something beautiful and worthy of space in her art studio or home office!

She started with a few Earth Safe Finishes Chalk It Up Paints in varying jewel tones, added strips of designer paper and twine, and then finished them with decorative Craft Fantastic Pendants featuring the Medium Round Dotty, Small Rectangle, and Dew Drop Trays along with corresponding glass cabochons. You can see more details on her blog HERE and on the Earth Safe Finishes Blog HERE.    


Be sure to follow the Craft Fantastic Blog for more ideas, projects, and product previews! Thanks for stopping by!

Wednesday, July 8, 2015

And how about some more...!

I shared pics of a few new Craft Fantastic products yesterday, but that's not all! I've got a few more photos up my sleeves! Find them in the Craft Fantastic online shop today!


Flower Connectors in silver, coming to the shop soon!


Flower Connectors in antique brass, coming to the shop soon!


Tiny Round Ornate Kit in silver, so pretty!


Tiny Round Ornate Kit in antique brass, beautiful!


Small Oval Daisy Tray in silver, so sweet!


Tuesday, July 7, 2015

A few new goodies at Craft Fantastic!

If you follow Craft Fantastic on Facebook, you've been seeing a few of our latest and greatest product additions to our popular line of glass beads, trays and findings. If you missed it, here are a few pics to wet your whistle. Visit the Craft Fantastic online shop to pick up these new items plus a whole lot more!

Be sure to follow Craft Fantastic on Facebook for the most up to date information on new releases and giveaways!


Keyrings with Clips, the perfect accessory!


Owl Trays, aren't they sweet!


Sunflower Trays, so chic!


Key Trays, a timeless classic!
  

Tuesday, May 12, 2015

Design Team Member, Rina Meyers Shares an Exquisite Altered Box!

Today I am thrilled to share a gorgeous altered box project created by Design Team Member, Rina Meyers! If you are familiar with Rina's style you know she is a master of Shabby Chic design. In this project she uses lots of Craft Fantastic metal trays, glass, charms, and findings to add fabulous detail to her project. A unusual and inspiring way to use the Craft Fantastic products. Please check it out and be sure to subscribe to Rina's YouTube channel.


Wednesday, April 8, 2015

Jeanne Streiff Shares a Fabulous Keyring Project!

Take a gander at this wonderful keyring project that Jeanne Streiff created for Craft Fantastic! Jeanne artfully crafted a customized image using colorful inks, glitter glue and a rubber stamped sentiment. Find out exactly how she did it by visiting her tutorial on her blog at Inky Paws.

You can also find the Keyrings in the Craft Fantastic online store here!